
Soundocity Outrigger Review
Soundocity Outriggers
- Product Name: Outriggers
- Manufacturer: Soundocity
- Performance Rating:


- Value Rating:
- Review Date: February 12, 2007 16:54
- MSRP: $ 96.25-$106.15/pair (one speaker)
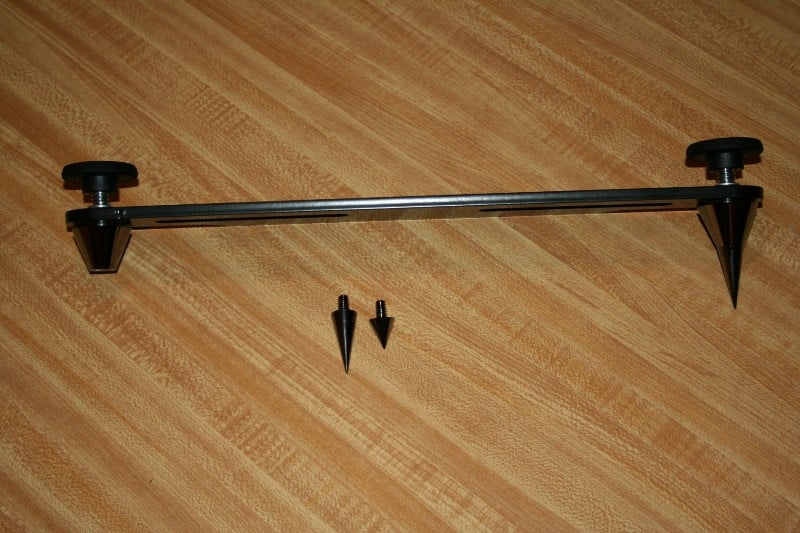
- 1/4" thick HRPO (steel) main bars with durable black powder coat finish
- Comfort grip fiberglass filled polypropylene knob (soft to the touch)
- All Brass precision machined cones with black or gold nickel finish
- Each cone spike weighs 86 grams and measures 1-1/4" diameter and 1-1/2" tall or 2.00"
- Each cone has two piece threaded tip design allowing additional level adjustment
- 100 lb /sq. in. tension spring for positive knob feedback (new!)
- All steel with zinc plate 1/4-20 wood inserts for DIY insert installation
- All steel mounting hardware (Bolts & Washers for 1/4-20 for installation)
- Custom shipping packaging include polyethylene foam for protection
Pros
- Aesthetically pleasing
- Easy to adjust
- Interchangeable tips for the spikes
Cons
- Price
Soundocity Outriggers: Of Tweaks and Serendipity
 Serendipity…
An instance of making a fortunate
discovery by accident. Well, one day Paul Stepanek, President/Owner &
Designer from Soundocity was browsing the web. He came across a review at
Audioholics. The author, a particularly whiny fellow, was lamenting the fact
that the speaker he had reviewed was a bit “tippy” and that he wished the
manufacturer would provide an outrigger setup as an option. Paul looked around
at the warehouse full of aftermarket Outriggers and thought, “Hey, I bet that
guy would review these if I sent him a set!” (Ok, I don’t know what he was
thinking but that sounds good to me.) At the same time, said reviewer was
working on yet another review where he was having problems leveling a different
pair of floorstanding speakers. Not as bad as the first time, but still a
little frustrating. Paul’s email couldn’t have come at a better time. And, yes,
he was right, I would review them.
Serendipity…
An instance of making a fortunate
discovery by accident. Well, one day Paul Stepanek, President/Owner &
Designer from Soundocity was browsing the web. He came across a review at
Audioholics. The author, a particularly whiny fellow, was lamenting the fact
that the speaker he had reviewed was a bit “tippy” and that he wished the
manufacturer would provide an outrigger setup as an option. Paul looked around
at the warehouse full of aftermarket Outriggers and thought, “Hey, I bet that
guy would review these if I sent him a set!” (Ok, I don’t know what he was
thinking but that sounds good to me.) At the same time, said reviewer was
working on yet another review where he was having problems leveling a different
pair of floorstanding speakers. Not as bad as the first time, but still a
little frustrating. Paul’s email couldn’t have come at a better time. And, yes,
he was right, I would review them.
Tweaks. Audiophiles wonder what the big deal is while Audiophools swear by them. Here at Audioholics, we’re not one for tweaks. Keep your magic stones, your green markers, your mats and stabilization devices… we’re not interested. But that doesn’t mean we don’t wonder from time to time. Some tweaks actually have a use. Outriggers have been hailed by some as doing wondrous things to the soundstage, imaging, bass, treble, midrange, marital relations, and the Iraq war. Well, don’t expect any of that here. I’m interested in only one thing – how well they help me stabilize my speakers. That’s their use, that’s their purpose, and that is what this review is about. For those of you looking for validation for spending thousands on esoteric wooden knobs… well, I don’t know what you are doing on this site in the first place.
Soundocity Outriggers: Build Quality
 I
communicated with Paul quite a bit about his product. He asked if I’d be
interested in a set, I said yes, and then I had to figure out which set to
order. Well, I had no idea. Luckily, I told him the speakers (Axiom m60 v2’s)
and the type of floor (medium pile carpet) and he did the rest. I ended up with
9 inch “straight end” Outriggers (there is a “round end” where the metal under
the adjustment knob is, well, round). He suggested using the sharper 2.12”
spikes (over the 1.5”) but provided both for the purposes of the review (prices
change based on the length of the bar and not the style or spike length). The Outriggers
were well packed and arrived without incident.
I
communicated with Paul quite a bit about his product. He asked if I’d be
interested in a set, I said yes, and then I had to figure out which set to
order. Well, I had no idea. Luckily, I told him the speakers (Axiom m60 v2’s)
and the type of floor (medium pile carpet) and he did the rest. I ended up with
9 inch “straight end” Outriggers (there is a “round end” where the metal under
the adjustment knob is, well, round). He suggested using the sharper 2.12”
spikes (over the 1.5”) but provided both for the purposes of the review (prices
change based on the length of the bar and not the style or spike length). The Outriggers
were well packed and arrived without incident.
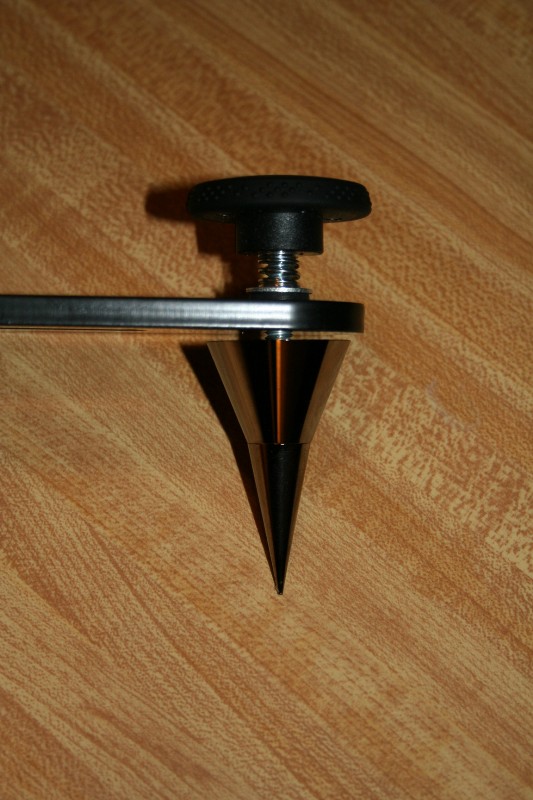
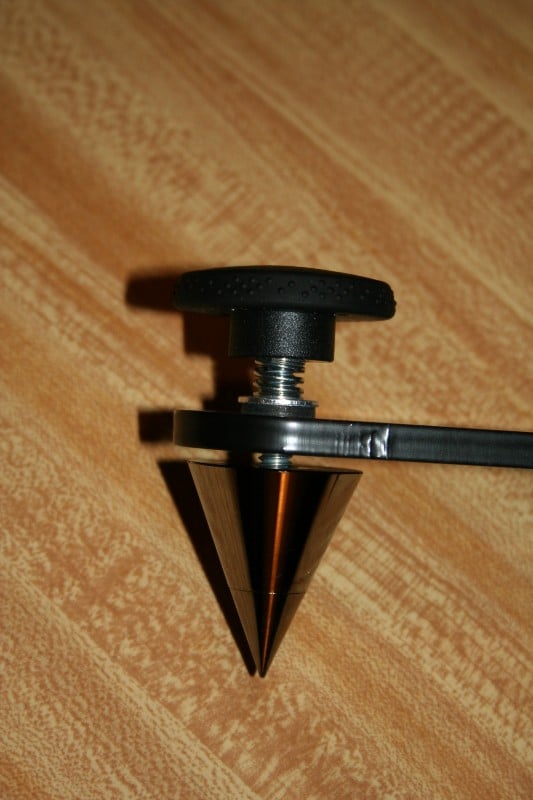
The crossbar is constructed of ¼ inch thick HRPO (steel) with a black powder coat finish. The spikes are brass and come in two finish flavors, gold nickel or black nickel. I ended up with black nickel which should really be called “silver” or “chrome”. Regardless, the finish is impeccable. Each of the cones has a removable tip so that you can install either the shorter, duller tip for a complete length of 1.5”, or a longer tip for a complete length of 2.12”. The tips screw in easily but they don’t lock in any way. I found that during adjustments, sometimes the tips loosened a bit so you may want to add a dab of Locktite on them if you’re sure you’ll be sticking with the same tip forever. The Outriggers did increase the height of the speaker probably only a fraction of an inch. You have the option of using a combination of the shorter and longer tips in order to point the speaker slightly up or down depending on your needs. For someone with a low (or high) couch, this may help a bit in getting the tweeters pointed in the right plane.
In addition to the crossbars and spike tips, I also received all steel mounting hardware (washers and bolts), some dimpled rounds (for installation on hardwood/tile floors), and some all steel with zinc plating threaded inserts… Wait threaded inserts. It was at this point that I started to get worried…
Soundocity Outriggers: Installation
There was no included installation manual so I was off to the Soundocity website for further instructions. I was dismayed when the first picture was of someone drilling holes in the bottom of their Polk speakers to accommodate their new Outriggers. Well, that wasn’t going to be me. I decided that if the included hardware didn’t fit the Axiom installed inserts, I’d look around for something that did. Me + Power Tools = Bad in general. Me + Power Tools + Brand New Axiom Speakers = Fairly Uncomfortable Call to Gene. Yeah. Even if I owned the speakers, I’m not going near them with a drill. And I don’t suggest anyone else does either. Luckily, the supplied hardware did fit the provided inserts so it wasn’t an issue.
As one would guess, you just slap the things on (making sure the spikes are pointing down), tighten down the bolt (with the washer), and turn the speakers over. It isn’t exactly rocket science. I would suggest a few things. First, don’t over-tighten. I’m not sure how well each of these threaded inserts is secured but if I were you, I wouldn’t assume they are secured with liquid nails or anything. Just get it tight enough so that the crossbars won’t move around and give it maybe another ¼ turn. Don’t bust out your torque wrench, don’t try to make the Outriggers “one” with your speakers, just secure them and walk away. This isn’t a contest. Also, pay attention to the cut-in portion of the crossbar. While there are aesthetic considerations, for installation purposes, it makes it much easer to line up the Outrigger. It is much easier to eyeball how far the edge of the Outrigger is from the cut-in than it is from the ends. This practically negates the need to use a tape measure during the process.


Warning – spikes can be dangerous.
Specifically the longer ones. I tried them both but found that the shorter set didn’t really pierce the carpet (which made the speaker extremely easy to level but defeated the whole purpose of the spikes). The longer set is SHARP. I would advise having a friend help you turn the speaker over. Even then, it is a good idea to try and lower the speaker straight down rather than on an angle to avoid damaging the tips. Regardless, be careful. You only have to hear a story of someone setting a spiked sub on their foot once to make you a bit leery.

Soundocity Outriggers: The Outriggers in Action
 So, once
you turn your speakers over, what can you expect? First, you’re going to have
less maneuvering room. The base of the speaker is considerably wider (depending
on what size Outrigger you went with). If your room is small and the space
between everything is pretty close, these may make thing a bit more difficult
for you. If you have lots of room, no worries. In my case, I went from having
4-5 inches to roll out my entertainment unit to only having about 1.5. Not a
dealbreaker for me (and really 0” would be OK for most people – I’m one of the
few that have to get behind their equipment on a daily basis) but it is a
little problematic at times.
So, once
you turn your speakers over, what can you expect? First, you’re going to have
less maneuvering room. The base of the speaker is considerably wider (depending
on what size Outrigger you went with). If your room is small and the space
between everything is pretty close, these may make thing a bit more difficult
for you. If you have lots of room, no worries. In my case, I went from having
4-5 inches to roll out my entertainment unit to only having about 1.5. Not a
dealbreaker for me (and really 0” would be OK for most people – I’m one of the
few that have to get behind their equipment on a daily basis) but it is a
little problematic at times.
I can not express in words the convenience of having the spike adjustment on the side of the speaker. It is… an indescribable difference. I used to dread having to move my speakers. Once I got them set I’d put little pieces of tape on the ground so I wouldn’t have to guess where they once were. Being an Audioholic, I can’t help but occasionally adjust the toe in or position based on something I read, a suggestion from my compatriots, or just a whim. That mostly stopped once I started using spikes. I’d only do it if I was really dedicated to the idea. That just takes a lot of the fun out of this hobby. With the Outriggers in place, I felt empowered to move my speakers at will. Adjustments were easy, convenient, and most of all – effective.
When the spikes are located under the speaker, you end up having to lie down on the ground and either attempt to adjust the speaker while it is sitting on the ground, or continually tip the speaker up, adjust, set it back down and test, and so on. More times than not you’ll finally get the speakers set right just to stand up and realize that they are leaning a bit to one side. Sure, the spikes are level but the speaker is just a little off plumb. Back you go to the floor…
With the Outriggers, it’s a couple of twists here and there, and tada! it’s done. The knobs have a spring on them not for any functional reason other than feedback to the user. Without the spring, it is too easy for the knob to be over adjusted or knocked out of adjustment by a careless foot/leg/animal/child. The 100lbs sq/in tension spring keeps the adjustment firmly in place but is still easy for an adult to adjust. On my “less than even” floor (as Gene likes to call it) it took seconds to get the speaker sitting properly. That’s right, seconds. And when I was done, they were rock solid. Much better than anything I’d ever achieved before.
Soundocity Outriggers: Listening Tests
Yeah right.
Ok, OK… remember, my speakers were always spiked so even if you are a big believer in all that esoteric stuff, one spike shouldn’t have made a difference over another. And I didn’t hear any.
Let it go.
Recommendations
I have very little to say that could improve on this product (very little, of course, is a non-zero number). The Soundocity Outriggers do everything they say and more. I didn’t expect the interchangeable tips (this is a huge plus in my book). The aesthetics are great (love the way they look and the wife doesn’t hate them – the best you can hope for most of the time). On the other hand, I’d like to see some sort of change in the way the way the bar is connected to the speakers. As it is, from my seated position, you can sometimes catch a glimpse of the top of the bolt (that steel finish gleams). There are two possible solutions that I see – either use black bolts so that they blend better or create a lip around the rim of the Outrigger (or perhaps grind out a channel in the center so that the washer/bolt combo is inset). Either will render it less likely that you will notice the bolt (color change) or at least make it harder to see it (lip or inset). Other than that, I wouldn’t mind having the tips of the spikes “lock” into the spike base somehow (don’t ask me how – I’m no engineer). Like I said, very little to complain about.
Soundocity Outriggers: Conclusion
My problem – uneven floor, hard to adjust manufacturer supplied spikes, and medium pile carpet. The solution – Soundocity’s “Spike Bar” Outriggers. Easy to install, easy to adjust, and easy on the eyes. My speakers are more stable than ever, the spikes are perfectly seated on the floor, and, most of all, I’m not afraid to make adjustments. No more dread of moving my speakers. These Outriggers have brought back some of the fun that turns people into Audioholics in the first place. They are a little pricy (going to set you back around two c-notes for a pair of speakers) so this is product for someone that really wants them (or has a bit of money to burn). I’ve always been enamored with the look of Outriggers. Once I started having problems leveling my speakers it was a pretty easy decision for me. If you have tippy speakers, then these might be just the insurance policy you need.
Soundocity Outriggers
MSRP $96.25-$106.15/pair (one speaker)
Soundocity
PO Box 7591
Salem, OR
97303
(503) 569-0504
About Soundocity’s
Paul Stepanek
Paul has been in the DIY audio field
for many years, mainly as a consumer/hobbyist. About (2) years ago the company
he worked for shut down due to off shore manufacturing pressure. He was a
program manager/mechanical engineer for a contract manufacturer that
built chip testers for a chip manufacturer and actual servers for internet
server manufacturers. Not necessarily wanting to jump back into the same
market, he decided to go full time with this new product line. He’s
made custom component and speaker stands for several years but only
as a way to help feed his hobby. This Outrigger line is engineered
with several key characteristics based on his years of experience as a
hobbyist and an Engineer.
The Score Card
The scoring below is based on each piece of equipment doing the duty it is designed for. The numbers are weighed heavily with respect to the individual cost of each unit, thus giving a rating roughly equal to:
Performance × Price Factor/Value = Rating
Audioholics.com note: The ratings indicated below are based on subjective listening and objective testing of the product in question. The rating scale is based on performance/value ratio. If you notice better performing products in future reviews that have lower numbers in certain areas, be aware that the value factor is most likely the culprit. Other Audioholics reviewers may rate products solely based on performance, and each reviewer has his/her own system for ratings.
Audioholics Rating Scale
 — Excellent
- — Very Good
- — Good
- — Fair
- — Poor
| Metric | Rating |
|---|---|
| Performance | |
| Build Quality | |
| Fit and Finish | |
| Ease of Setup | |
| Performance | |
| Value |
As Associate Editor at Audioholics, Tom promises to the best of his ability to give each review the same amount of attention, consideration, and thoughtfulness as possible and keep his writings free from undue bias and preconceptions. Any indication, either internally or from another, that bias has entered into his review will be immediately investigated. Substantiation of mistakes or bias will be immediately corrected regardless of personal stake, feelings, or ego.
View full profile