
Peerless IM760PU In-Wall Flat Panel TV Mount Review
Peerless IM760PU mount
- Product Name: IM760PU In-Wall Flat Panel Mount
- Manufacturer: Peerless Industries, Inc
- Performance Rating:

- Value Rating:
- Review Date: May 14, 2009 06:05
- MSRP: $ 669
- IM760PU models include universal adapter plate to fit TVs with mounting hole patterns up to 29.4"W x 17"H
- Can be inverted to position screen to the right or left
- Decorative trim ring included for a clean look
- Installs between 16" centers
- Stud-locating tabs adjust 1/4" left or right to accommodate stud spacing
- Removable gang box and cable management access plates make installation easy
Pros
- Handles 32" - 60" flat panels
- Full controls for roll, tilt, and swivel
- Supports up to 200 lbs
- Beautiful scratch-resistant finish
Cons
- Very expensive
- Difficult control arm mounting
- Cable management could be improved
IM760PU Build Quality
 When you purchase a flat panel the biggest travesty
(in my humble opinion) is to set it on a piece of furniture as if it is
business as usual. With today's available inventory of flat panel TV wall
mounts, it's insane to not want to place these beautiful masterpieces of
technology up on the wall where they belong. And if you have an even newer flat
panel display that is less than two inches in thickness, why not try to get
that TV right up against the wall and as flat as it can be? With the Peerless
IM760 series you can. It allows installation of a full swing arm mount within
the stud cavity of your wall, enabling you to recess that cables, swing arm and
mount so that it is quite literally flush against your wall. Seeing is believing.
When you purchase a flat panel the biggest travesty
(in my humble opinion) is to set it on a piece of furniture as if it is
business as usual. With today's available inventory of flat panel TV wall
mounts, it's insane to not want to place these beautiful masterpieces of
technology up on the wall where they belong. And if you have an even newer flat
panel display that is less than two inches in thickness, why not try to get
that TV right up against the wall and as flat as it can be? With the Peerless
IM760 series you can. It allows installation of a full swing arm mount within
the stud cavity of your wall, enabling you to recess that cables, swing arm and
mount so that it is quite literally flush against your wall. Seeing is believing.
Peerless makes all kinds of flat panel and projector mount products. Some of my favorites include their quick-change universal mounts which facilitate easy adjustment and replacement of products without having to jump through all kinds of hoops. They make it easy for maintenance to be performed, such as bulb replacement and servicing of televisions. While many other products on the market assume you'll never remove that flat panel or projector from its mount, Peerless develops lots of products that take into consideration the fact that sometimes you just have to make an adjustment or send a unit in for repair.
Build Quality and Use
 I normally have a
discussion on build quality that goes something like this: "The unit was
amply constructed and seemed able to withstand the product it was designed
for". In this case, I'm happy to report that the IM760PU is probably
stronger than the stud wall you're putting it into. It's actually
"overbuilt" if you can take that comment as a good thing (which is my
intention). Because you are securing it into the face of twin studs with large
lag bolts - and it applies ample side
pressure between the studs themselves, this mount is actually able to hold up
to 200 pounds. That's the rating, my guess is that it could actually handle
300, but we weren't able (or willing) to test that theory in the field. All
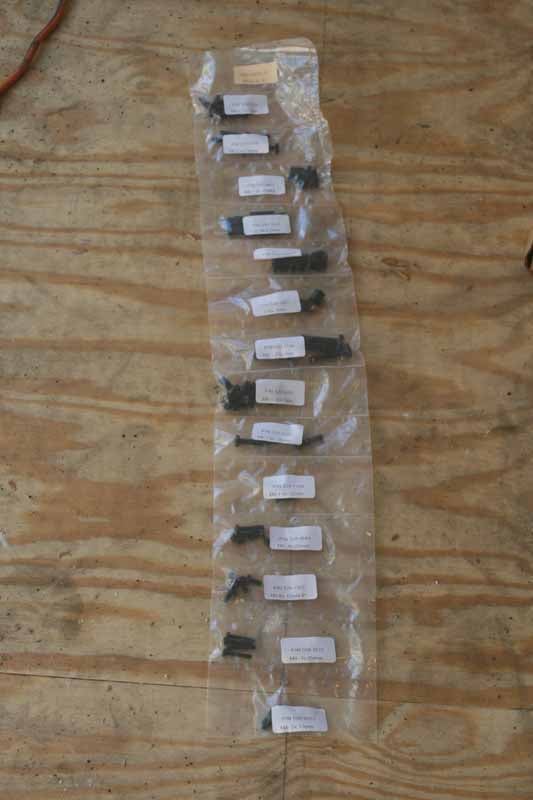
required accessories are included in terms of nuts and bolts and the tools
required to secure your cabling and get your display mounted. Since I ordered
the IM760PU, this mount was suited for plasma televisions in addition to LCD
displays - and the mount arrived in three separate boxes, all well-protected
through the use of internal padding and packaging.
I normally have a
discussion on build quality that goes something like this: "The unit was
amply constructed and seemed able to withstand the product it was designed
for". In this case, I'm happy to report that the IM760PU is probably
stronger than the stud wall you're putting it into. It's actually
"overbuilt" if you can take that comment as a good thing (which is my
intention). Because you are securing it into the face of twin studs with large
lag bolts - and it applies ample side
pressure between the studs themselves, this mount is actually able to hold up
to 200 pounds. That's the rating, my guess is that it could actually handle
300, but we weren't able (or willing) to test that theory in the field. All
required accessories are included in terms of nuts and bolts and the tools
required to secure your cabling and get your display mounted. Since I ordered
the IM760PU, this mount was suited for plasma televisions in addition to LCD
displays - and the mount arrived in three separate boxes, all well-protected
through the use of internal padding and packaging.

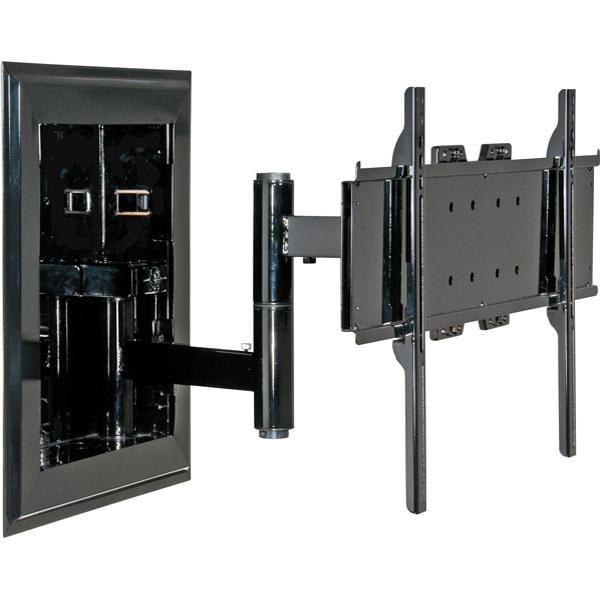
The IM760PU is designed to hold LCD and plasma displays from 32" up to 60" in size. There is even a model that is equipped to handle sizes up to 71". As you can guess, the construction is all steel, but what may surprise you is that the entire mount is coated in a scratch-resistant "fused" epoxy. I'm not sure of the exact process they utilize to make it, but it held up to our harsh installation environment (more on that later) and the high gloss finish provided an exceptional look to the finished product. It also comes with a flush-mount surround which covers the lag bolts used to secure the mount to the stud wall. Remember, this mount will be near-invisible when completed, so the fact that Peerless took so much care in providing a solid finish is commendable (and probably expected for the price).
What makes this mount unique is that it is designed to fit within the stud cavity of a wall. It comes with a left or right mount swing-arm that will allow you to manipulate a flat panel TV such that you can swing it out into the room and turn it left or right to "point" it where you need it. The articulating arm is made of steel tubing and the entire assembly is built well enough that you won't spend any time wondering if your flat panel investment is safe riding that far out from the wall.
IM760PU Installation and Conclusion
The way this particular mount works is that it hides the cables and swing arm assembly within the recessed part of the mount. This recessed portion sits, recessed in the wall, between two studs. It's an excellent design that will work perfectly in any stud wall that doesn't contain an existing electrical line or anything else that would block the area where the mount needs to be located.
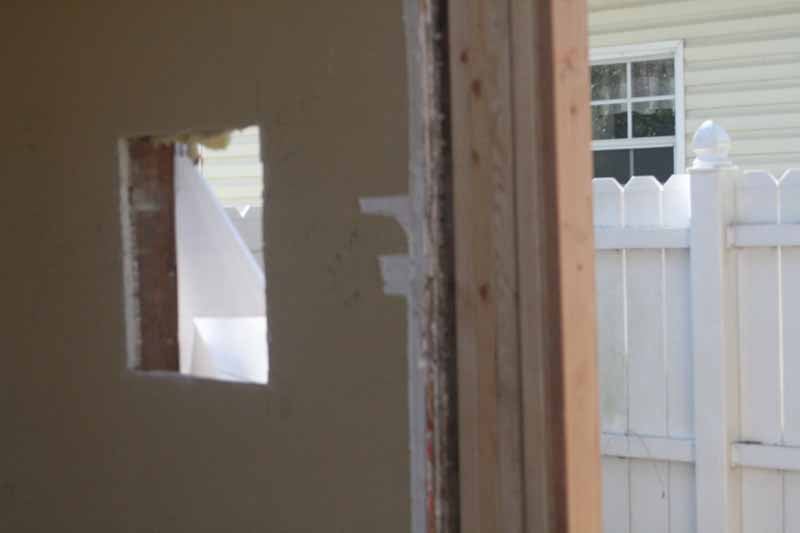 We decided to
install the IM760PU during a recent renovation to a master bedroom. We had the
opportunity to access the stud walls and place the flat panel mount and also
run all of the cabling we needed to send digital audio and video signals to our
flat panel TV. Since we also redid the siding of the home, we had a unique
chance to view both sides of the IM760PU during the installation. It's rare
that one gets such a universal perspective on a piece of hardware. We started out
by finding the location of the studs. After that we cut out the hole per the dimensions
provided by Peerless and rough fit the box.
We decided to
install the IM760PU during a recent renovation to a master bedroom. We had the
opportunity to access the stud walls and place the flat panel mount and also
run all of the cabling we needed to send digital audio and video signals to our
flat panel TV. Since we also redid the siding of the home, we had a unique
chance to view both sides of the IM760PU during the installation. It's rare
that one gets such a universal perspective on a piece of hardware. We started out
by finding the location of the studs. After that we cut out the hole per the dimensions
provided by Peerless and rough fit the box.
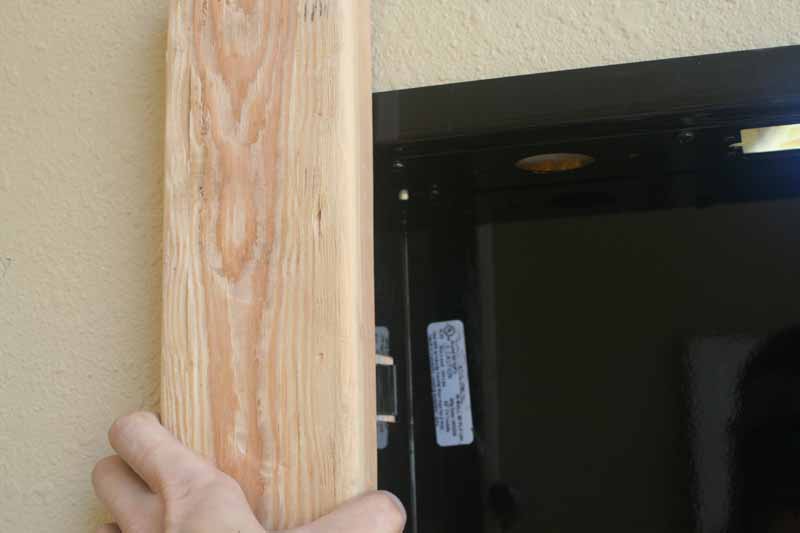 Once we determined
that the hole for the box was correctly made and that our studs were indeed the
requisite 16 inches on center (and believe me - with these older homes you
never know) we set the box in place and pushed it into the cavity. Before we
pushed to hard, we had decided on placing the articulating arm on the right. If
you notice, the mount has a welded piece that juts out from the center of one
of the sides which holds the top of the articulating arm base. Place this box
on the side you want the hinge to be located. Since it was a rather tight fit
(by design) we used a piece of 2x4 to protect the mount while we tapped it into
place with a hammer. The fit was perfect and we stepped back to appreciate the
mount and the snug fit that made us feel even more certain that it was more than
capable of holding our display (a 37-inch Panasonic LCD television we were
reviewing at the time).
Once we determined
that the hole for the box was correctly made and that our studs were indeed the
requisite 16 inches on center (and believe me - with these older homes you
never know) we set the box in place and pushed it into the cavity. Before we
pushed to hard, we had decided on placing the articulating arm on the right. If
you notice, the mount has a welded piece that juts out from the center of one
of the sides which holds the top of the articulating arm base. Place this box
on the side you want the hinge to be located. Since it was a rather tight fit
(by design) we used a piece of 2x4 to protect the mount while we tapped it into
place with a hammer. The fit was perfect and we stepped back to appreciate the
mount and the snug fit that made us feel even more certain that it was more than
capable of holding our display (a 37-inch Panasonic LCD television we were
reviewing at the time).

Once in place, we set the six lag bolts in place with a cordless drill gun and a Phillips bit. Pre-drilling the holes is recommended to avoid stripping out the heads - something that is quite easy to do when driving large bolts in old growth wood. Once completed there was no way this mount was going to pull out.
We placed the articulating arm into position on the right side of the mount. It was then a matter of securing it with the included bracket, screwing it down with a Phillips screwdriver. We quickly realized that a short screwdriver was needed as a normal-sized driver or cordless drill would be too long to fit into the enclosure above the bracket. While we had the correct tool handy, it would be good to include a right angle Phillips driver in the kit to ensure client installations doesn't stop dead in their tracks.


 Physically, it's easy to install the mount, but what
about wiring it up? Peerless allows installers to bring in wiring in a few
different ways. First, they have two single gang cutouts, one on top and one on
the bottom. There are also two circular cutouts for pulling additional cables.
Peerless even includes a flexible cover that allows the cables to pass-through,
but keeps the majority of the hole covered to minimize air loss to the wall
cavity. In our installation we utilized both types of access points. On top, we
placed a single gang plate with our 110V power which we wired using a dedicated
feed of 12/2 from our panel. On bottom we used both the single gang box to hold
a custom wall plate from
DVIGear and the general hole to pass-through RapidRun
HDMI cables from Cables2Go. When finished we had two nice Decora-style
plates for power and most of our connections, while the RapidRun Digital HDMI
and RapidRun component video cables came up and were wire-tied to the
articulating arm. From behind we had a unique view of the box, which you won't
often get in a typical installation:
Physically, it's easy to install the mount, but what
about wiring it up? Peerless allows installers to bring in wiring in a few
different ways. First, they have two single gang cutouts, one on top and one on
the bottom. There are also two circular cutouts for pulling additional cables.
Peerless even includes a flexible cover that allows the cables to pass-through,
but keeps the majority of the hole covered to minimize air loss to the wall
cavity. In our installation we utilized both types of access points. On top, we
placed a single gang plate with our 110V power which we wired using a dedicated
feed of 12/2 from our panel. On bottom we used both the single gang box to hold
a custom wall plate from
DVIGear and the general hole to pass-through RapidRun
HDMI cables from Cables2Go. When finished we had two nice Decora-style
plates for power and most of our connections, while the RapidRun Digital HDMI
and RapidRun component video cables came up and were wire-tied to the
articulating arm. From behind we had a unique view of the box, which you won't
often get in a typical installation:

Since power and low voltage cables came up within the same wall cavity, we were careful to separate them and staple the 12/2 electrical cable to the one side, while (not pictured) tie-wrapping and securing the low voltage audio and video signal cables to the other side.
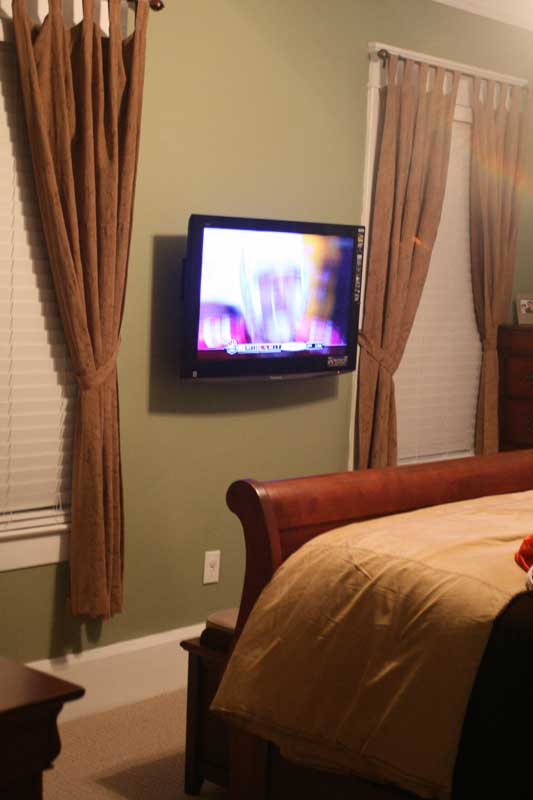
 We were extremely pleased with the results of our
install, and the television we installed did indeed sit extremely close to the
wall - only a few millimeters off due to the required plasma mounting hardware.
All HDMI cables and analogue A/V connections were able to recess into the wall,
giving us a very clean look that truly complemented the master suite. We
experienced easy motion of the swing arm and could fully extend the television
without binding the cables or feeling as if the television was in any way being
impeded by either friction or the cabling. In fact, it took only one finger to
manipulate the TV around the perimeter of the articulating arm's full range of
motion.
We were extremely pleased with the results of our
install, and the television we installed did indeed sit extremely close to the
wall - only a few millimeters off due to the required plasma mounting hardware.
All HDMI cables and analogue A/V connections were able to recess into the wall,
giving us a very clean look that truly complemented the master suite. We
experienced easy motion of the swing arm and could fully extend the television
without binding the cables or feeling as if the television was in any way being
impeded by either friction or the cabling. In fact, it took only one finger to
manipulate the TV around the perimeter of the articulating arm's full range of
motion.
Conclusion
Peerless has produced one of the nicest in-wall flat panel television articulating mounts we've seen to-date. What's truly impressive is the thought process that went into the device, all of which makes it a dream to install and a wonder to use. With plenty of options for running cables and making connections, the IM760PU In-Wall flat panel TV mount comes highly recommended for those who can afford it. For those who can't, be prepared to have your television sit a bit further off the wall and covet some of the mobility delivered by this mount. This beautiful mount is one of the finest we've seen. If you're looking for something different, to deliver a truly finished look as well as offer flexible image viewing, this is a product you can't afford not to check out.
Peerless Industries IM760PU
In-wall Flat Panel TV Mount
$753
Peerless
Industries, Inc.
3215 W. North Avenue
Melrose Park, IL 60160
800-473-3753
www.peerlessmounts.com
About Peerless Industries, Inc.
Peerless Industries, Inc is
a leader in the audiovisual mounting industry for over 40 years, provides
innovative mounting solutions that focus on quality, ease of installation and
functionality while providing an aesthetically pleasing look and ultimately the
best value. Peerless offers a comprehensive line of video and audio mounts and
installation accessories for residential and commercial markets. Peerless’ line
of mounting equipment includes a broad selection of solutions for televisions
and VCR’s, LCD and plasma screens, monitors, projectors, speakers and more.
The Score Card
The scoring below is based on each piece of equipment doing the duty it is designed for. The numbers are weighed heavily with respect to the individual cost of each unit, thus giving a rating roughly equal to:
Performance × Price Factor/Value = Rating
Audioholics.com note: The ratings indicated below are based on subjective listening and objective testing of the product in question. The rating scale is based on performance/value ratio. If you notice better performing products in future reviews that have lower numbers in certain areas, be aware that the value factor is most likely the culprit. Other Audioholics reviewers may rate products solely based on performance, and each reviewer has his/her own system for ratings.
Audioholics Rating Scale
 — Excellent
- — Very Good
- — Good
- — Fair
- — Poor
| Metric | Rating |
|---|---|
| Build Quality | |
| Ergonomics & Usability | |
| Ease of Setup/Programming/Integration | |
| Features | |
| Fit and Finish | |
| Performance | |
| Value |
Clint Deboer was terminated from Audioholics for misconduct on April 4th, 2014. He no longer represents Audioholics in any fashion.
View full profile