
StudioTech Ultra U-22T Component Cabinet
- Product Name: Ultra U-22T Component Cabinet
- Manufacturer: StudioTech
- Performance Rating:

- Value Rating:
- Review Date: July 23, 2006 20:00
- MSRP: $ 1099 ($1599 w/optional equipment)
Height: 22.75"
Width: 66.75"
Depth: 23.875"
Shipping Weight: 161 lbs
Internal height: 18.5"
Internal shelf width: 20 15/16"
Max. weight (total): 300 lbs
Max. weight (top shelf): 250 lbs
Number of casters: 6
Pros
- Price
- Plenty of ventilation/wiring routing options
- Back can be removed in sections
Cons
- May be some dampening and/or vibration issues
U-22T Build Quality and Setup
Home theater furniture - I mean really, how hard can it be? You need something to hold your equipment with a hole in the back for the wires, right? I don't know how many homes I've walked into and seen an old cabinet or armoire converted into an equipment cabinet. Of course, you need to drill holes in the back (killing any resale possibilities for the piece) and open the doors if you want to control anything. And God forbid you have a receiver that runs hot 舑 you'll have to install a fan or replace it every couple of months. Plus, the whole point is to hide stuff away so you don't have to see it all the time (keeping the doors open for IR control isn't helping this). And don't get me started with people that get custom cabinetry made and listen to the carpenter. "What do you mean I shouldn't have put the subwoofer in the cabinet next to the display?" Sheesh!
 First Impressions
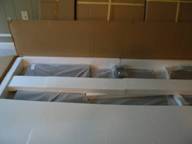
Eight boxes. That is what the guy on the phone said. He was confused because the invoice said "speaker stands." Heck, I'd be confused too. How big must those stands be? It was delivered on a pallet and again the driver had specific instructions not to help me move them inside. Luckily, they weren't all that heavy and I easily moved them by myself. Honestly, I've never in all my years of receiving things in the mail seen boxes in such pristine condition. I mean they looked like they just came from the factory. Usually there will be a nick or a puncture on them somewhere. This time - nothing. It was eerie.
Build Quality
 Everything was packed fairly well with solid styrofoam blocks surrounding all the pieces. I only noticed one bit of damage in the back of the unit where a thin piece that holds in the removable rear panel was damaged. I'm sure this happened before the furniture was packed. It didn't affect the functioning of the piece at all and was unnoticeable from the front.
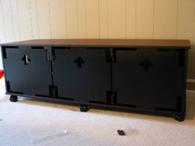
The entire unit is constructed out of 5/8 inch MDF including the top and bottom and all the walls. All the exterior surfaces are covered in a hardwood veneer and stained (a rosewood stain in my case) as is the bottom shelf of the unit. All the shelves, the back, and all the interior surfaces except the bottom are painted a flat black. This is great for reducing the visibility inside the cabinet. The doors have a perforated metal mesh that allows IR remote use while creating a fairly opaque surface. With some backlighting you will see through it and know that your components are on, but you can't read the displays. Black components are all but invisible but silver will still be visible with some front light. In a darkened room, you shouldn't have a problem.
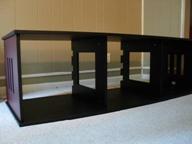
 The back of the unit is removable in sections (notice the convenient up arrows). The inside walls of the unit are mostly cut away (each has a 11" by 10" cutout). The outside walls of the unit have slits and a metal mesh (same as what is on the doors) under them. The back also has plenty of holes for ventilation. Add to this the metal mesh in the doors and you've got all the air circulation you'll ever need. As I was putting it together I was wondering how it could stay upright with all the cut out areas in the load bearing supports.
The only thing I noticed with the build quality was some dampening and vibration issues. The bottom and tops of the doors have a strip of the furry side of a piece of Velcro along the length of the edge as well as rubber bumpers to reduce any impact vibrations, but that may not be enough. The smallest impact creates a sound reminiscent of a piece of sheet metal being shaken (not surprising considering the make up of the doors). While I didn't notice it in my testing, I could see it being a problem in some applications. The way the backs sit free (and don't lock down) could create a similar problem (I'm less worried about this because of the weight of the wood). A bit of rubber insulation tape could tighten up both of these issues for a nominal investment by the user.
Author's Note: Ease of Use
Reviewers are a strange and mysterious bunch. We love to point out every little problem with offering very few solutions. Case in point, I muse that the backs of this unit may vibrate - but they are very easy to get into to make changes. If the backs of this unit were better secured, I'd complain that they were hard to get into. If StudioTech invented some sort of air bladder system to hold them in place while maintaining easy access, I'd probably complain that the unit was too expensive. Occasionally, someone hits that balance of form/function/cost perfectly. So then I complain about the remote. It's a cruel world.
 Set Up and Usability
Putting together furniture. I've got horror stories that'll make you cringe. I'm sure you have the same. I'm here to tell you that compared to some of my experiences - heck all of my experiences; this was a walk in the park. If I hadn't requested the optional equipment, I wouldn't have needed a power screwdriver at all. Hand tools would have been enough. The directions are simple and straightforward. I ran into no problems in the process until I got to the doors. Attaching the hinges is easy enough but I didn't want to screw it up (no pun intended) so I agonized over the directions. Snapping them in is not as hard as it seems. After each door I connected I'd think, "Why did I have so much trouble with this?"
 Except for a Phillips head screwdriver, all the tools you'll need are included with the furniture. Every hole is either pre-drilled or tapped for you. There is little you can do to mess this process up. Even the hinges have the screws already started so placing them is easy. As far as assembling furniture goes, this was by far the best experience I have had. I had no problems.
Wire management is a snap with all the ventilation holes. There is no way you can have a problem connecting your components. You have the option of running the wires either through the big center holes or around the back of the center supports. Personally, I ran all my interconnects through the center and the power cables around the back. Shelves are supported by easily removable metal pegs with rubber tips. The wooden shelves are heavy enough that they didn't vibrate when the unit was moved or during playback even when empty. The 20+ inch depth of the shelves should be plenty deep enough for more receivers and amplifiers. The 300lb weight limit should be adequate unless you are really into those boat anchor amps.
U-22T Optional Equipment and Conclusion
StudioTech has a number of options that are available including media drawers, fans, rack mounts and a lot more. If you've already purchased all your equipment, you'll know exactly what to order. If this is the beginning of your purchases, you'll have some figuring to do. For 90% of the people out there, the standard configuration will be more than adequate.
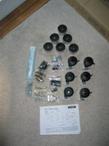
The casters are large, black, and plastic. In my profession, being able to easily get behind the unit is very important. The unit comes standard with rubber feet on a metal threaded rod and carpet spikes. They also include little metal half spheres with a dimple in them to place the spikes on if you want to use the spikes on hardwood or other damageable floors. Personally, I can't imagine trying to set up the unit with the spikes and those penny sized floor protectors. There are six of them! You'd need at least two people to hold it up while a third positioned the spheres.
 No, the casters are much more suited to me. Each of them as a little foot lever for locking them which is a nice touch. Personally, I found them kind of ugly and didn't really lend themselves to the style of the rest of the furniture. They are, however, useful.
The second piece of optional equipment was a pair of 30 inch stands. I was thoroughly impressed with these stands. Plenty heavy and sturdy, the stands are metal and have a side panel of wood veneer. The veneer was somewhat of a match to the color of the unit but not exact.
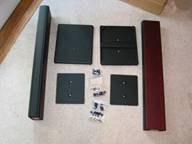 Though they are sturdy enough by themselves, you can fill them with sand (please make sure the sand is in bags if you've never done this) or shot to increase their weight and stability.
Of all the speaker stands I've ever used, these are probably the best to date.
A media drawer may be of limited value if you have a large movie collection. However, the media drawer offered by StudioTech had many possible uses. I fit 46 DVDs in it though you can buy separators for CDs or cassettes. The drawer is mounted via a couple of spacer blocks that have to be installed.
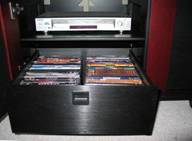 The installation is fairly easy though I was a bit confused by the instructions at first. If you skip the first general instruction page and just examine the diagram you'll be much better off. The drawer is constructed of aluminum and the front is brushed for a textured and fingerprint-resistant surface. The drawer is completely self-contained and covered so that when the doors are closed it disappears.
There is a latch mechanism that keeps the drawer closed (no lock). I would probably use the drawer to store extra cables, manuals and the like. The fact that it is covered is a big plus.
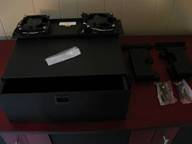
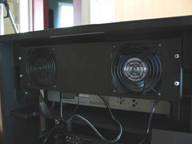 Lastly, I got a chance to check out the optional dual fan system. Similarly to the media drawer, the fan is mounted to a couple of spacer blocks. The only problem with this system is that the fans are permanently mounted to the cross members obstructing your access to the equipment. This means that you won't want to mount it behind your receiver (where it would probably be the most useful).
I placed it behind the shelf above my receiver by a CD player that I would rarely want to switch out the connections. I also used longer interconnects just in case so that I could pull it out the front.
The fans I found to be extremely quiet though some might find them audible depending on the loudness of the movie/music and their proximity to the piece. There isn't a speed control so you can't vary the loudness of the fans that way. As I said before, with the amount of ventilation available through the design of the furniture, fans would only really be necessary if you have equipment that runs quite hot. The fans are set up to provide exhaust, which is correct given the ample amount of venting available to bring fresh air into this cabinet.
Suggestions and Recommendations
As I mentioned before, there is a little concern about potential dampening and vibration issues. A few bits of rubber here or there would head off many of these problems. While the casters are useful and functional, I do wish they would either match the style of the unit better or be hidden behind some sort of skirting. While the unit sits low to the ground, there will inevitably be a wire or two running behind it. Skirting would help mask these as well. The fans would be better suited on a specially designed rear door panel rather than mounting inside the cabinet.
Author's Note: Upgrades
Bo Dragsdahl of StudioTech explained that a couple of my concerns will be addressed in future iterations of the U-22T. I look forward to seeing the implementations of these fixes. Of course, they claim that these were in the works long before my review. I'm sure that is the case - but I'm still taking credit. I'm calling the new version the 'Andry Signature Edition'. Of course you can too, but no one at StudioTech will know what you are talking about.
Conclusions and Overall Perceptions
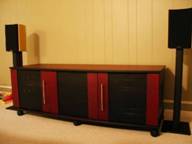 No matter what, the most important factor in determining furniture is the aesthetics. Furniture has to look good if it is going to be part of a functional décor. And no one can tell you what you will like. What I can tell you is that based on the Ultra U-22T, StudioTech furniture will perform well. And here at Audioholics, that is what we are worried about. I can tell you that the wire management is a snap, the ventilation is more than adequate, set up is a breeze, and the options are plentiful. Above all, the price is right. You can get into one of these cabinets for a reasonable amount and have something that will last you years. And that is what it is all about, isn't it?
The Score Card
The scoring below is based on each piece of equipment doing the duty it is designed for. The numbers are weighed heavily with respect to the individual cost of each unit, thus giving a rating roughly equal to:
Performance × Price Factor/Value = Rating
Audioholics.com note: The ratings indicated below are based on subjective listening and objective testing of the product in question. The rating scale is based on performance/value ratio. If you notice better performing products in future reviews that have lower numbers in certain areas, be aware that the value factor is most likely the culprit. Other Audioholics reviewers may rate products solely based on performance, and each reviewer has his/her own system for ratings.
Audioholics Rating Scale
 — Excellent
- — Very Good
- — Good
- — Fair
- — Poor
| Metric | Rating |
|---|---|
| Ease of Setup | |
| Build Quality | |
| Ease of Setup/Programming/Integration | |
| Features | |
| Performance | |
| Value |
As Associate Editor at Audioholics, Tom promises to the best of his ability to give each review the same amount of attention, consideration, and thoughtfulness as possible and keep his writings free from undue bias and preconceptions. Any indication, either internally or from another, that bias has entered into his review will be immediately investigated. Substantiation of mistakes or bias will be immediately corrected regardless of personal stake, feelings, or ego.
View full profile