
Yamaha MusicCast 1000 Digital Music Server & Client Review
Yamaha MusicCAST MCX-1000 Server
- Product Name: MusicCAST MCX-100 Server and MCX-A10 Client
- Manufacturer: Yamaha
- Performance Rating:

- Value Rating:
- Review Date: September 29, 2003 19:00
- MSRP: $ 2200
Pros
- Excellent PCM audio fidelity
- CD jukebox replacement
- Simple setup
- Works with existing wireless networks
Cons
- Pricey
- CD burning only works with more expensive audio CD-Rs, not data CD-Rs
Yamaha MusicCAST Introduction
Personal Video Recorders (PVRs) and set top DVD+/-R drives have long indicated a consumer response to digital set top recording devices, and Yamaha has done a good job of finding a simple to use solution to eliminating large, cumbersome CD collections. While some people are familiar with the tools necessary to create an MP3 server from scratch, it is not an easy task. The following items must be accomplished in order to have a truly useful solution:
- Ample storage space for your entire CD collection
- High MP3 bit rate playback for accurate sound reproduction
- Uncompressed PCM playback (optional, but desirable for optimal playback fidelity)
- Easy digitization/encoding of source CDs
- Artist/track/album labelling for easy search and retrieval of music in the database
- PCM digital output to receiver or processor pre-amp
In addition to this, the following is needed for setting up a client device to receive streamed audio content from the server, and (barring laptops) to my knowledge has only been partially achieved by Linksys, CD3O, Creative, and BridgeCo:
- Broadcast method to client device via 802.11a/b/g
- Client device (computer or other hardware device) to receive streaming content
- Remote browsable content of server media content
Yamaha MusicCAST Overview, Build Quality & Connections
Yamaha's MusicCAST system improves upon the PC/client solution and implements a server/client network. In fact, you can have up to 7 clients (5 wireless) all operating simultaneously. Why is this an improvement? Well, costs aside, a server/client solution means that your server, hosting your CD collection resides in your entertainment center and your clients can exist at other remote locations in your home (I have placed mine in the office and also in the bedroom). The server can send direct PCM digital audio to your receiver/processor without sacrificing quality. A wireless PC/client solution results in MP3 or PCM data being streamed to your home entertainment system. You can see how Yamaha's MusicCAST could potentially deliver more consistent higher fidelity.
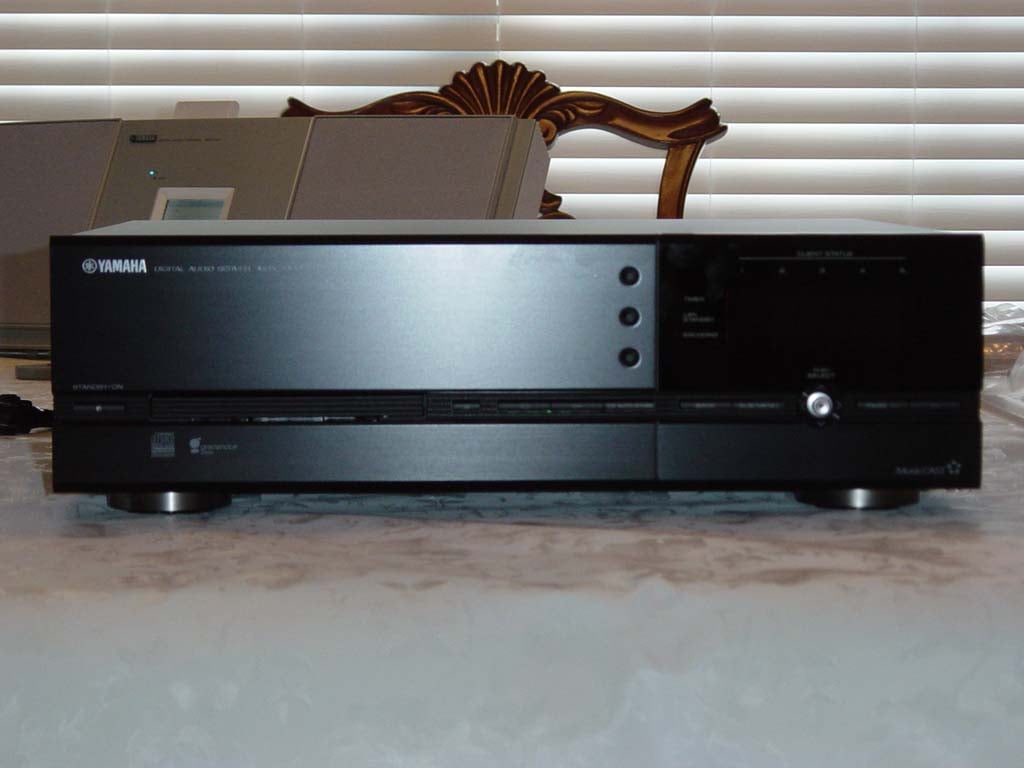
Build Quality - MusicCAST MCX-1000 Server
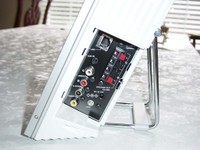
The MusicCAST Digital Audio Server comes securely packaged with a remote control, optical SPDIF cable, composite video cable and stereo RCA cable. In traditional Yamaha style, it even comes with a pair of AA batteries for the remote control. On first glance, the MusicCAST server looked to be a sufficiently built device, similar to a heavy duty CD player in size, but coming in at just over 25 pounds! This is a hefty unit, packing a hard drive, PCMCIA IEEE 802.11b card, DACs, power supply and CD-R/RW drive in an ergonomically-sized chassis.
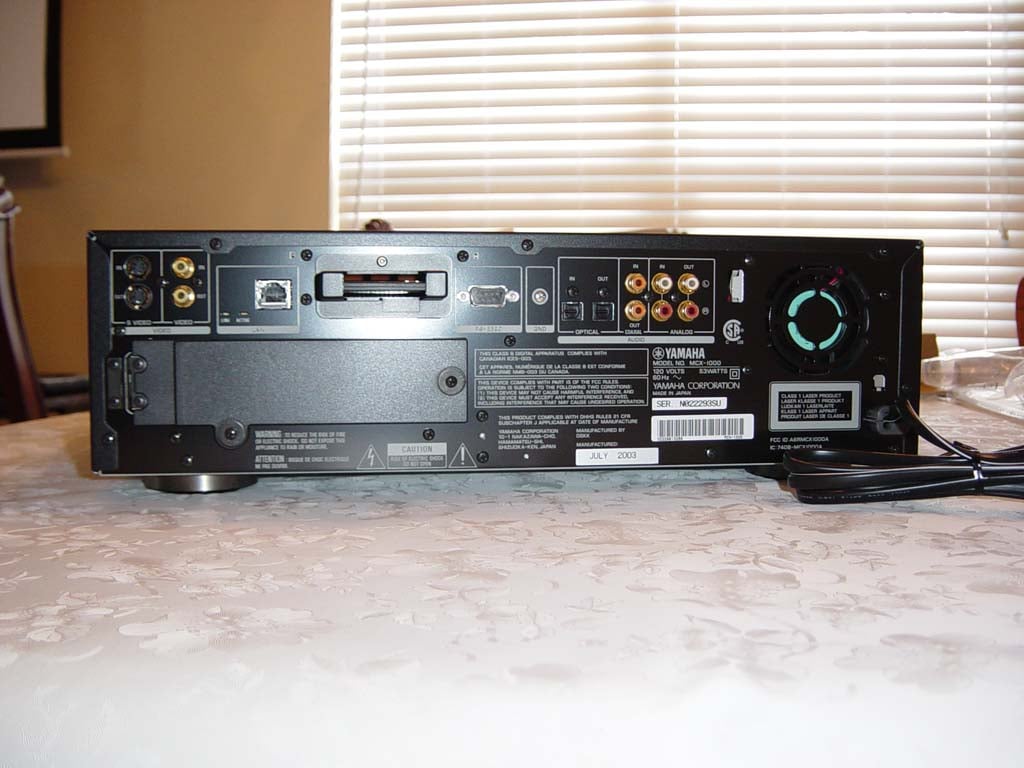
The Connections
The MCX-1000 has a (dare I say it) "plethora" of connections on both the front and back of the unit:
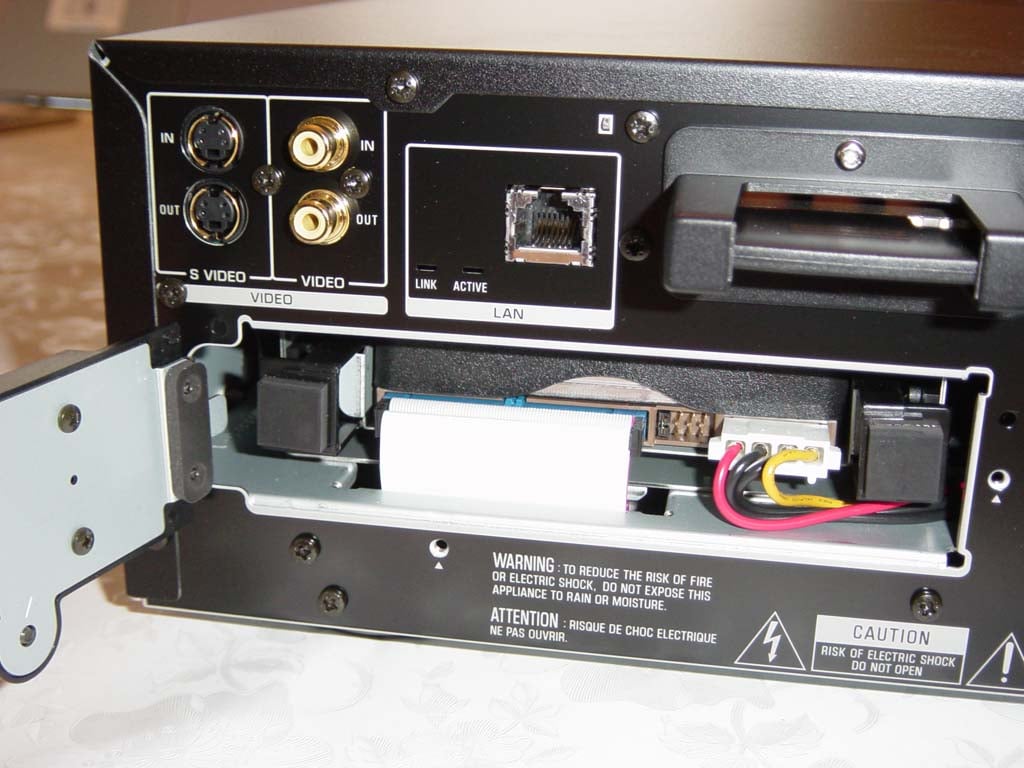
- S-video and composite inputs (pass-through only)
- S-video and composite outputs (for OSD GUI)
- 10/100 Base-T LAN terminal (RJ-45 ethernet connector) with Link and Active indicators
- Wireless LAN (IEEE 802.11b PCMCIA card pre-loaded)
- RS-232C connector (used with cross cable for controlling a compatible Yamaha receiver)
- Optical and coaxial SPDIF inputs
- Optical and coaxial SPDIF outputs
- Analogue RCA inputs
- Analogue RCA outputs
- PS/2 keyboard jack (front)
- Stereo headphones jack (front)
 The
rear of the unit also features a door that opens to
reveal the 80GB 7200 RPM hard disk drive. This is nice
in the event that you have a catastrophic failure or
want to upgrade the drive to something greater than
the included 80GB. Most likely, however, you will never
touch this part of the unit.
The
rear of the unit also features a door that opens to
reveal the 80GB 7200 RPM hard disk drive. This is nice
in the event that you have a catastrophic failure or
want to upgrade the drive to something greater than
the included 80GB. Most likely, however, you will never
touch this part of the unit.
The MCX-1000 server runs quietly, its rear fan only coming on periodically to cool the system when needed. The only sounds you will hear are the tracking noises of the CD-R/RW drive and the mechanical hard disk during seek and boot up. This is one of the advantages to utilizing a set-top device versus a home theater PC alternative.
Yamaha MusicCAST System Setup and Configuration
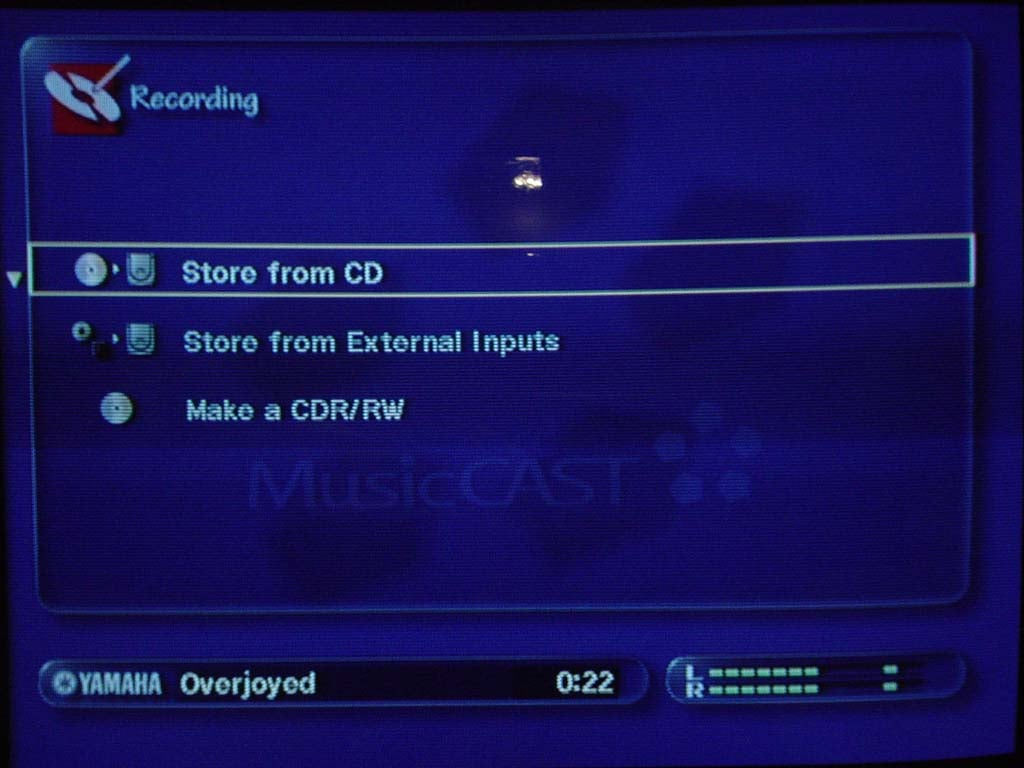
Setting up the system was fairly straightforward. I connected the digital optical outputs and the s-video output to my Yamaha RX-V3000. I then connected the MCX-1000 to my home network via the ethernet port and turned on the server. I was greeted with the Welcome to MusicCAST text display on the unit's front panel, echoed by the MusicCAST startup screen. The Top Menu follows, which allows you access to the following screens and menus:
- Library
- Recording
- AV Receiver
- Client Playback
- Timer Setup
- System Setup
- Information
System Setup Menu (sub-menus Italicized)
Beginning my setup, I navigated to the System Setup page where I was able to setup my MusicCAST Server and MCX-A10 client. Knowing that I had a DHCP server installed in my home, I realized that I would have to configure the MCX-1000 to receive its IP address from the existing server (you can only have one DHCP server on any network. Having decided to attempt setup without first consulting the owner's manual (just to see if it could be done), I began on the Network sub-menu where I located and clicked on Expert Settings. Here I was able to "Automatically obtain IP address with DHCP" under the IP Address sub-menu. This allowed the MCX-1000 server to obtain an IP address from my existing DHCP server. For those without an existing home network, the MusicCAST server is capable of acting as a DHCP server for its connection to the client modules (in fact this is the default configuration). Having the DHCP option was critical and showed Yamaha's foresight in writing the OS code.


At this stage, configuration for the client is simple. Merely activate Auto Configuration under the Network page at which point you will want to go to the MCX-A10 client unit(s) and navigate to its Network page (under Setup). Select Auto Configuration on the client and the client should register with the server. That's all there is to it. If you switch back and forth between DHCP on the server, you may need to reboot the unit before you get successful registration of the client. When the client registers itself with the server, you will see its LCD screen show "Searching for ESSID..." Press STOP to Cancel". This process may take several minutes followed by a "Connecting..." message at which point the server will show the client registered and music playback can commence. Keep in mind that you can cancel the server's search for additional (nonexistent) clients by clicking on the OK button once it has found your client(s).
I next attempted to set the Date/Time using an NTP time server, however, after trying several known NTP servers I gave up and set the time manually. Under the Video Out submenu, the MCX-1000 allows you to set the OSD to either remain on all the time (default) or only output during operation. I left this on the default setting.
Since I have an always-on internet connection, I activated the internet database functionality of the Gracenote CDDB (CD database). The fact that Yamaha chose to include a hefty version of this database onboard the server is a great decision. If you are lacking an internet connection, your song titles, artist, and album info will, in most cases, still appear when you insert a CD (more on this later.)
You can set the MusicCAST server to automatically begin Playback of the last song played before the unit is shut down. The Recording settings allow you to specify whether you will be storing PCM & MP3 data onto the server or only MP3 data. You are able to select from available encoding bitrates of 160 kbps, 256 kbps, and 320 kbps. I selected 320 kbps as this is where MP3 gets very close to perceived CD quality audio in my opinion. You are able to manually delete PCM audio at any time for an entire album, entire artist, or a single title using the submenu of the Library Menu.
 AV Receiver
allows you to configure a Yamaha RS-232 equipped receiver automatically for use
with the MusicCAST system. You can select the AV receiver input to which the
MusicCAST will be connected, synchronize/slave power on/off of the receiver to
the MCX-1000, change surround programs based on music genre, and even allow
MusicCAST clients to broadcast audio from your receiver's tuner section.
AV Receiver
allows you to configure a Yamaha RS-232 equipped receiver automatically for use
with the MusicCAST system. You can select the AV receiver input to which the
MusicCAST will be connected, synchronize/slave power on/off of the receiver to
the MCX-1000, change surround programs based on music genre, and even allow
MusicCAST clients to broadcast audio from your receiver's tuner section.
You can engage Auto Level Control to automatically apply a theoretical average base volume to your tracks to keep your CD collection playback at roughly the same volume. If you are eclectic like me, and go from classical, to hard rock, to pop, you may want to leave this function disengaged. In either case, auto leveling is only applied to MP3 tracks and not PCM audio playback.
The On Screen Display page sets whether the MusicCAST displays the top menu at Power On or the last page displayed. Under Client you can specify whether or not you will allow PCM streaming to a MusicCAST client, and which client will receive PCM streams. At present, and presumably for reasons of implemented 802.11b bandwidth control, the MCX-1000 server can only stream to one client at a time. The rest of the wireless clients, up to 5 total, will receive digital audio streamed as MP3 files.
Yamaha has informed us that a maximum of two (2) PCM streams can be played back within a single MusicCAST system, one via the server, and one to a single client via 802.11b wireless. If you are adding wireless clients, keep in mind bandwidth and performance will decrease with distance from the server via 802.11b limitations. When using multiple clients, I'd suggest limiting PCM to the server.
According to the manual, depending upon your proximity to the server, number of clients used, and local interference, you may experience problems using 5 clients at once if you encoded at 256 kbps or 320 kbps. I decided to do a stress test using the single client I had. Sending a PCM stream about 60 feet across the house, up the stairs and at the complete opposite end of the room, I was able to make the unit periodically pause and cache during playback. Moving the server just a couple feet closer allowed it to play uninterrupted. I was also able to sustain playback when I utilized MP3 files instead of PCM streams. This is typical behaviour for 802.11b, and I could duplicate the effect with my laptop.
The Keyboard Type page is self-explanatory, allowing you to specify whether you are using an English (default), French, German, or Japanese keyboard.
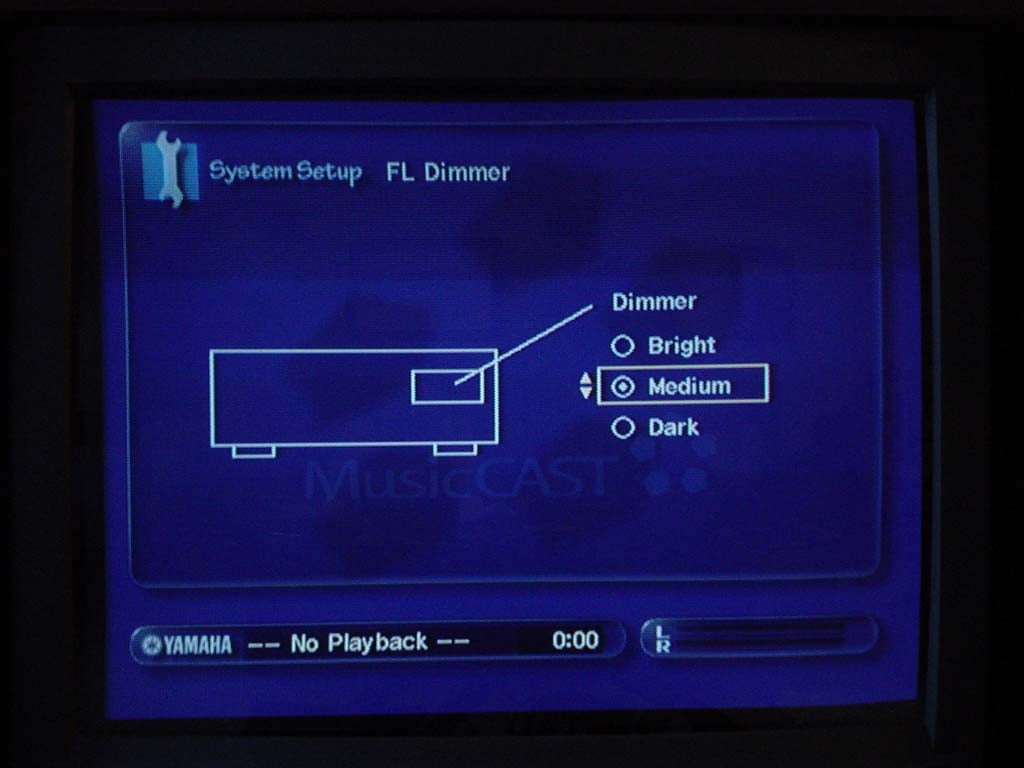
Standby Mode enables you to specify whether activating a client will turn on the MCX-1000 unit or whether the server can only be activated via the Standby/ON function of the remote or front panel. You can set the FL Dimmer (front panel display) to be either "Dark", "Medium" or "Bright". I set mine to "Dark" but would like to see another option: "OFF" as I really didn't use the front panel display during operation. The MCX-1000 may be classified as a consumer audio device, but to me it functions more like a limited PC audio server.
Using the Hard Drive Utilities you can delete all library songs (you get a warning!!! screen before all your hard work can be erased) or just delete PCM data. Unless you're really starved for space and have done the math, I recommend using the submenu in the Library Menu to delete selected albums or artists' PCM data. This will allow you to keep PCM data for the albums and artist you want in the highest fidelity possible, while your daughter's Britney Spears bubblegum classics can exist in their more than sufficient MP3 format. The last screen in the System Setup Menu is the System Utilities page where you can initiate a system reset or update your MCX-1000 OS with an update CD from Yamaha. I found it odd that Yamaha provided no way to receive OS updates via the Internet. This would be a great feature and presumably less hassle for them should they find a bug that needed squashing.
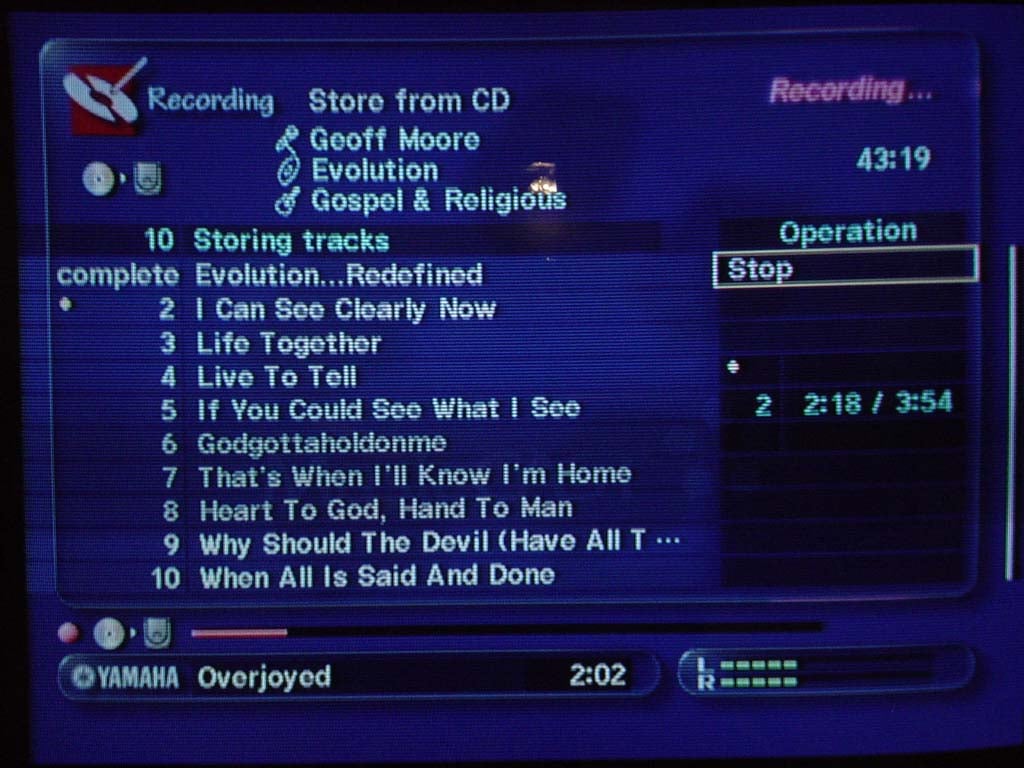
Yamaha MusicCAST Recording CDs and Managing the Library
First of all, I have to say that this is the greatest feature of the MusicCAST system. It is so unbelievably easy to record your CDs into the server that you wonder why all PCs can't do it as good (they can, but depending upon what software you are using it could take quite a bit of setup and elbow grease to accomplish).
 The
MusicCAST method of getting CDs into its music database and hard drive is akin to the Macintosh
experience circa 1999: It just works. And that's refreshing. Stick a CD into the
server's CD-R/RW tray and push the "CD AUTO STORE" button and you will
accomplish the following:
The
MusicCAST method of getting CDs into its music database and hard drive is akin to the Macintosh
experience circa 1999: It just works. And that's refreshing. Stick a CD into the
server's CD-R/RW tray and push the "CD AUTO STORE" button and you will
accomplish the following:
- The drive tray closes automatically
- The disc is read by the server and identified by the included Gracenote CDDB database (artist, album, title, and genre are assigned)
- If the CD is not recognized by the onboard database, the server uses the Internet to find the disc contents online. I tried some very obscure discs, like The Exit, which is a CD made by some friends of mine in Merrit Island, Florida, and the information was retrieved correctly.
- The disc contents are recorded to the hard drive in their native PCM format. This takes approximately 5 minutes for an entire CD!
- The entire disc is now able to be played by the server and streamed to clients (at least one client is able to stream the PCM data prior to completion of the MP3 encoding)
- Once the PCM data is copied, these tracks automatically begin getting transcoded by the server into MP3 (according to the bitrate settings in the setup menu)
When I first
experienced the efficiency of the MusicCAST server in digitizing some CDs, I was
determined to feed it as much of my collection as I could. I have now loaded
over 1500 songs from 90 artist with 128 total albums. It is so easy I couldn't
resist having the music at my fingertips. I still have many CDs I never loaded,
but its certainly not due to the complexity of the process!
You can use the Main Menu to access the Recording Menu and "Store from CD" function, but since you have to insert the disc anyway, I've found it best to just push the button on the main interface. The only reason I've found for going through the menu to record is that you can select particular tracks to record from a CD. Since the 80GB drive is hardly enough to store gobs of PCM data (we're talking about 120 albums or so), this might actually be something you would want to do. Another option, however would be to blow all the material into the unit and then delete what you do not want later.
 I'm Loaded Up - Now What Can
I do?
I'm Loaded Up - Now What Can
I do?

Well, you've got your songs in the system - now what can you do? Lots. First of all, you'll want to check over your library and correct any problems with album titles and genre selections. One of the funniest things I find are albums called "Greatest Hits" I had about 6 of these, which made navigating by album particularly difficult.
Using a Keyboard or Manually Editing Titles
The front of the MCX-1000 provides a handy PS/2 port for connecting just about any standard PC keyboard for making edits to track and album titles. You can also make these changes fairly easily with the remote control, but a keyboard makes for an easier time - trust me. Just borrow it from your PC, it'll save lots of time off the process.

Managing Hard Disk Space
One of the things you may need to do in order to fit your entire collection on the 80GB drive is decide which music to keep in its native PCM format, and which to play utilizing only MP3 audio. It's a good bet that your son's Barney & Friends Sing-a-Long tracks probably won't suffer much playing through at 320 kbps. I have taken the approach of deleting the PCM data from discs for which I do not expect to do any critical listening. That would be all my wife's stuff... I can say this with the utmost security, because although she loves music and enjoys a good action movie on the home theater, she almost never reads my reviews!
You can delete PCM audio from either an entire album, an entire artist, or just a single track. All you do is navigate to the particular level that you want to delete and bring up the MusicCAST sub-menu by hitting the SUB MENU button on the remote. At this point, hitting "Delete" will bring up a dialogue box that will allow you to either delete ALL audio from the selection, or allow you to check a box so that you merely remove the PCM digital audio. Remember, for each album for which you delete PCM audio, you regain approximately 600+ MB. Deleting PCM audio allows you to retain the MP3 audio for playback on either the client or server. I have to admit, the implementation of this feature was pretty ingenious. It could have been a tremendous pain or limitation if you were required to delete one song at a time, but instead, MusicCAST allows to to utilize the flexibility of the database structure to delete songs as well as listen to them.
Yamaha MusicCAST Burning CDs
Burn Some CDs - Some Considerations
Here's a thought... You've got all your songs digitized in one place. Why not make some great compilation CDs like you've always wanted? Yamaha's MusicCAST makes this an easy process. Simply select Make a CDR/RW from the Recording Menu Screen and you'll be able to either duplicate an existing CD, or record songs from your music library to a blank Audio CD-R/RW.
Editor's Note
The Yamaha MusicCAST can only record to AUDIO CD-R/RWs. This is due to the fact that the MCX-1000 is classified as a Consumer Audio Device, making it subject to the rules associated with SCMS (Serial Copy Management System) an outdated, useless copy protection system developed back when the RIAA was concerned with this new CD technology resulting in a loss of revenue due to pirating and CD-R/RW drives were not prolific in desktop PCs.SCMS prevents the illegal production of multiple generations of digital copies from a copyright-protected original. Making a single copy for personal use by owners of the Digital Audio Home Recorders is permitted. The SCMS status of an original is indicated by a copy bit which is present on an original CD and is placed on a recording at a frequency of 75 frames per second. For originals which are subject to copyright protection, the copy bit is continuously 'on' (high state). For so-called 'SCMS free' discs, to which no copyright restrictions apply, the copy bit is continuously 'off' (low state). For an original which has itself been copied from a copyright-protected original, the copy bit is toggled every 5 frames between 'on' and 'off' (high and low states). SCMS distinguishes between three possible copying situations, and provides appropriate copying strategies in each case.
While I may not be informed as to all of the logistical details involved. I would love to see Yamaha slap a VGA/DVI port on the back of the MusicCAST for the next model and re-classify the unit as a PC. It already has a PS/2 port, hard disk, ethernet port, PCM-CIA 802.11b card, an optical drive, and its own operating system. Face it, it's a computer. If Yamaha could reclassify the unit, they could allow several things to take place:
- Recording of songs onto standard (and less expensive) data CD-Rs
- Burning of MP3 discs, allowing all the hard work done by the Gracenote CDDB database to be transferred to portable MP3 players and other desktop computers in your home.
- Consideration of adding consumer-friendly digital video recording features
It may be just a dream, but since the unit is so close, it warrants some investigation for a future model. With the rise in popularity and interest in Home Theater PCs, exploration into this area by a major electronics company would be very welcome.
Yamaha MusicCAST MCX-A10 Client
Using the MCX-A10 Client to Listen to Music
Listening to music on the client couldn't be easier. Similar to the Library screen of the MCX-1000 server, the client allows you to call up music by either Genre, Artist, Playlist, Album or all songs. After 30 minutes of inactivity, the MCX-A10 client will put itself into standby mode (this can be turned off or adjusted in 30 minute increments up to 120 minutes). It takes 30 seconds to reconnect to the server from standby mode.

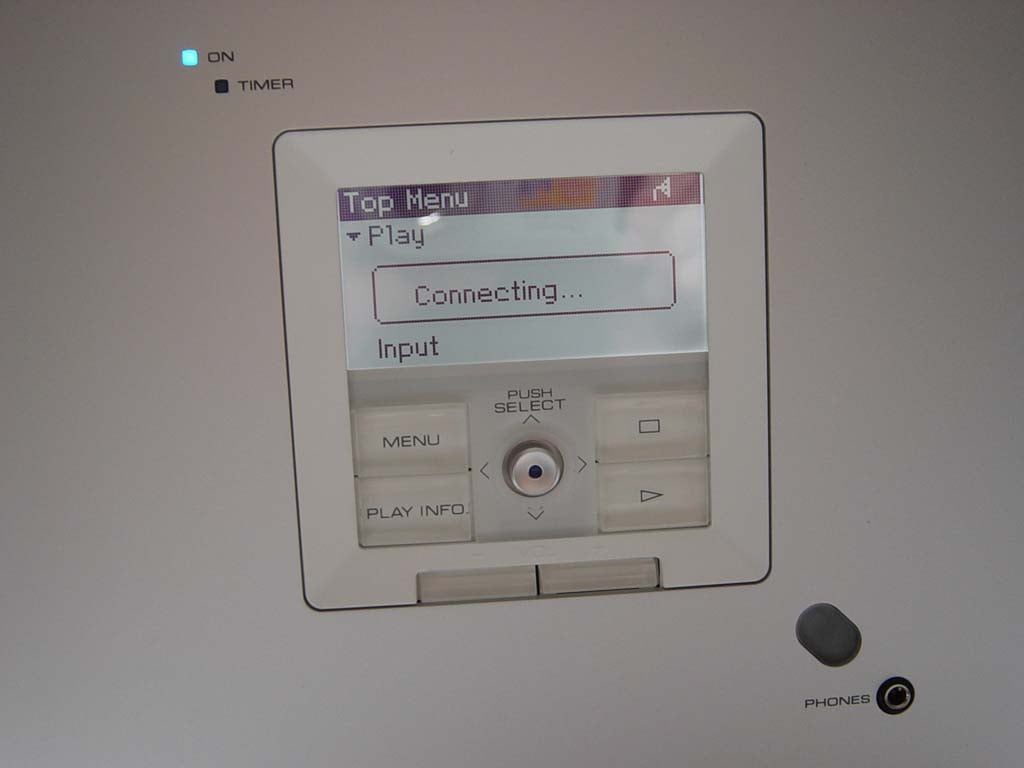
Streaming PCM Digital Audio
As noted earlier, the client will stream PCM digital audio from the server and a single client. The quality of the streamed audio is excellent though the streamed audio can only be output from the analogue line-out connectors on the client side panel. Conspicuously absent was a SPDIF output option, most likely due to the fact that this would potentially involve upsampling MP3 streamed audio back into PCM format.
The Connections
 LAN
Port
LAN
Port
The LAN port can be used in the event you want to forego the 802.11b wireless connection or desire a greater distance from the server than is possible.- AUX IN Jack
You can connect an external analogue source here. This would be utilized if, for example, you were using the optional MusicCAST speakers and wanted to feed an MP3 player, computer or other audio device into the system as well. - LINE OUT L/R
Jacks
Connect your MCX-A10 to a receiver using these 2Vrms line out jacks. These are full range line outputs. - SUBWOOFER Out Jack
If you are connecting the client to a receiver and speakers (as I did in my office configuration) you can also send signal to a subwoofer via the SUBWOOFER line output. This is a variable full-range mono output, so you'll want to engage your sub's crossover and set it to the appropriate frequency for your system. - VIDEO OUT Jack
Connecting the video output of the MCX-A10 allows you to view the contents of the LCD screen on an external monitor. This is nice if you happen to be configuring the client into another home theater system (like a bedroom system) or you plan to be too far away to read the LCD display. Other than this, the LCD provides ample feedback for your configuration and playback needs. - SPEAKER OUT
Terminals
The spring-clip speaker terminals are rated to drive 17W x 2 into 4-ohms and the optional speakers are very nice looking and don't sound bad for the $120 price. They are built nicely and weigh about 2.5 pounds each - not too shabby when you figure in the fact that a decent set of computer speakers will run you this much - and I'd much rather listen to these units. Like the MCX-A10 client, the speakers can also be wall-mounted or positioned side-by-side with the main unit for a clean, elegant look.

The client is what really rounds out this system. The server is truly impressive and can save you from having to deal with a CD jukebox or even have your CDs present, but the client makes the MusicCAST system a truly unique audio server solution. Until you experience a centralized music server with wireless client access, you haven't experienced what is probably the coolest new advancement in consumer audio devices.
Yamaha MusicCAST Remote Controls and Conclusion
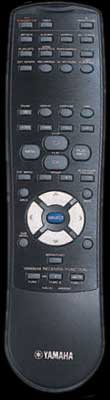
The remote controls provided with the MCX-1000 and the MCX-A10 are ergonomic and sufficient for allowing access to the playback and navigation functions of the client and server. I liked the direct access "top menu"button on the server remote, which allows you to jump back to the main menu without having to back out of each section. This came in handy in almost every listening session. Navigation on the client via hard buttons is via central joystick and play/stop buttons, so there's not much control unless you grab the remote. The credit card sized MCX2 remote control provides "pause" in addition to several other commonly used buttons (at least with my usage habits). Overall, these remotes are good at what they do, though I programmed the server remote into my MX-700 almost immediately - hey, if you have a Universal Remote, you gotta use it!

Note: Not to scale
Conclusions and Opinions
With regards to advances in the world of Consumer Audio, Yamaha has been making some incredible strides lately. The MCX-1000 and MCX-A10 units are no exception. The country's homes are going wireless and more and more people are integrating these kinds of technologies into their everyday lives. I am glad to see the world of consumer audio finally start to move in this direction. Yamaha's implementation of this technology is excellent, however we do have a few suggestions. First of all, as mentioned previously, we would love to see the MusicCAST server be able to burn files onto data CDs (this may involve reclassifying the MusicCAST device as a computer, thus allowing it to avoid SCMS restrictions, which are largely useless with today's technology). The next thing I would like to see is for the unit to be positioned at a more consumer-friendly price point. I suspect that Yamaha could sell exponentially more units if the MusicCAST system were priced at around $1000. This may seem like a tremendous price drop, but I believe that once early adopters pay for the R&D involved in creating such a new device, Yamaha may be able to introduce a lower priced model in the future. We can always hope! The final thing we'd like to see is a larger hard drive*. 80GB is not capable of eliminating my CD collection at PCM quality, and that is what I'd like to see in a revised edition. For a $2800 price tag, I feel the MusicCAST should have at least a 160GB drive.
*Currently, larger hard drives are available for purchase via authorized Yamaha dealers. Pricing is determined by the dealer and is not standardized.
Overall, we LOVE this device
and hope to see more of this kind of innovation from other consumer electronics
companies. Until then, Yamaha is leading the pack and other companies will have
to play catch-up.
UPDATE (10/16/2003) According to Yamaha, the November 2003 firmware release/update will add the following:
- Broadcast function - The same song is sent to all locations (excellent for parties)
- Multicast function - 3 locations play one song, 2 locations play another song
- Recall - Clients can recall/transfer playback lists from other clients
- Addition of RX-2400 and RX-Z9 receivers to controllable receivers list.
The Score Card
The scoring below is based on each piece of equipment doing the duty it is designed for. The numbers are weighed heavily with respect to the individual cost of each unit, thus giving a rating roughly equal to:
Performance × Price Factor/Value = Rating
Audioholics.com note: The ratings indicated below are based on subjective listening and objective testing of the product in question. The rating scale is based on performance/value ratio. If you notice better performing products in future reviews that have lower numbers in certain areas, be aware that the value factor is most likely the culprit. Other Audioholics reviewers may rate products solely based on performance, and each reviewer has his/her own system for ratings.
Audioholics Rating Scale
 — Excellent
- — Very Good
- — Good
- — Fair
- — Poor
| Metric | Rating |
|---|---|
| Analogue Audio Performance | |
| Build Quality | |
| Ergonomics & Usability | |
| Ease of Setup | |
| Features | |
| Remote Control | |
| Performance | |
| Value |
Clint Deboer was terminated from Audioholics for misconduct on April 4th, 2014. He no longer represents Audioholics in any fashion.
View full profile