
Logitech Wireless DJ Review
Logitech Wireless DJ
- Product Name: Wireless DJ
- Manufacturer: Logitech
- Performance Rating:


- Value Rating:
- Review Date: August 03, 2007 06:40
- MSRP: $ 99.99 + $79.99 for each additional receiver (theoretical)
Frequency: 2.4 GHz
Transmission format: digital
Compatible Applications
-
StreamPoint software accesses the media libraries of:
-
Apple® iTunes® 6.0.2 (and higher)
-
Windows Media® Player 9 (and higher)
-
Musicmatch® Jukebox 9.0 build 508x (and higher)
-
Plays any format your PC can play:
-
MP3 & WMA
-
iTunes® (AAC)
-
Internet Radio
Pros
- Easy setup and integration
- Great range on the remote
- Very good remote with easy to understand interface
Cons
- No digital out on base
- Some dropouts of audio
Logitech Wireless DJ Introduction
 Logitech
has their fingers in so many pots it sometimes seems really hard to put them in
a category. All things wireless seems to fall under their domain but there are
plenty of other products including speakers, remotes, keyboards, webcams, and
gaming peripherals. So when I received the Wireless DJ Music System I had two
questions - the second spurred by the first. The first was "What the heck
is this thing?" and, once I found out I said, "Hey, aren't these the
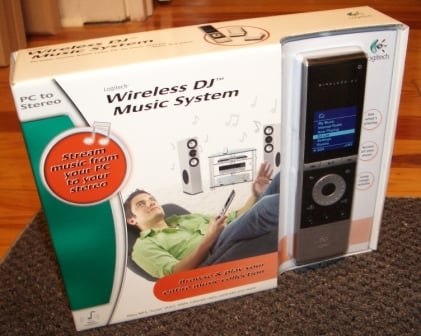
same people that recently purchased the Squeezebox?" The Wireless DJ
System is, in essence, a device that streams music and Internet radio from your
computer to your home theater. While there are plenty of devices that do this
(including Logitech's own Squeezebox) the Wireless DJ has enough unique
qualities that it more than holds its own in very full market.
Logitech
has their fingers in so many pots it sometimes seems really hard to put them in
a category. All things wireless seems to fall under their domain but there are
plenty of other products including speakers, remotes, keyboards, webcams, and
gaming peripherals. So when I received the Wireless DJ Music System I had two
questions - the second spurred by the first. The first was "What the heck
is this thing?" and, once I found out I said, "Hey, aren't these the
same people that recently purchased the Squeezebox?" The Wireless DJ
System is, in essence, a device that streams music and Internet radio from your
computer to your home theater. While there are plenty of devices that do this
(including Logitech's own Squeezebox) the Wireless DJ has enough unique
qualities that it more than holds its own in very full market.
Logitech Wireless DJ - Build Quality and Setup
Squeezebox vs. Wireless DJ
In the world of wireless media streaming Squeezebox is a well recognized leader in the field. Why provide a competing solution? Well, 'cause they target different people.
|
Squeezebox - $299 |
Wireless DJ Music System - $249 |
|
Mac or PC compatible |
PC only |
|
Shelf mounted device with IR remote |
RF remote with on-remote display |
|
Digital and analogue outputs |
Analogue outputs |
|
Requires wired or wireless network |
Provides wireless network |
It is easy to see how different consumers would be interested in each product. Have a Mac? Squeezebox is for you. Don't have an internal network and don't want one? Check out the Wireless DJ. Concerned about audio quality first and foremost? The DACs and digital output options on the Squeezebox may seal the deal. Hate the idea of being tethered to your home theater by an IR remote? Can't see the little display on the front of the Squeezebox? Check out the RF remote with its own display. With the Wireless DJ's recent price reduction to $99, this makes it an even more attractive option.
Build Quality
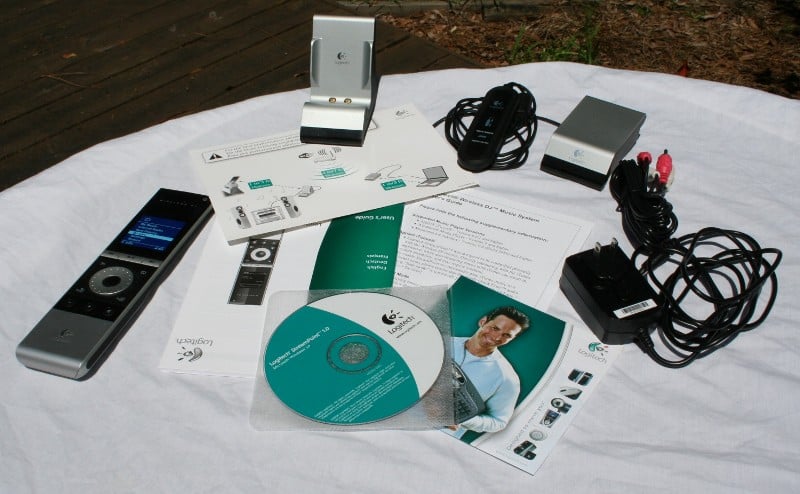 The Wireless DJ Music System comes well
packed (to the point that you'll never get it back in the box the exact same
way) with a remote, cradle, USB wireless transmitter, installation CD, RCA
cable, and manuals. The remote has a heftier-than-it-looks feel and tends to be
cool to the touch. The profile of the remote is very thin which isn't as
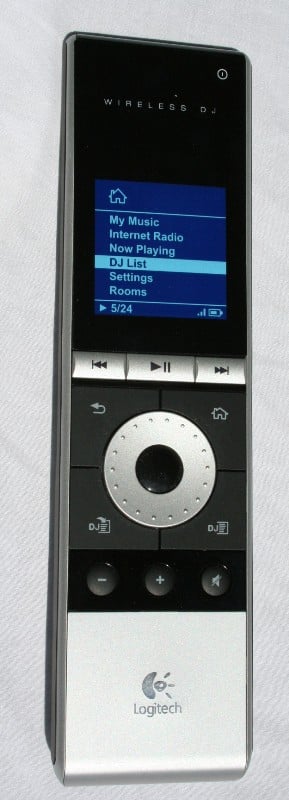
comfortable as it could be but overall the remote feels good in the hand. The Generation-1
iPod-eske wheel control clicks as you rotate it and you use the center button
for most selections. The Home and Back buttons are located above the wheel with
two DJ buttons just below. Above the Home and Back buttons are your normal Skip
Forward/Back and Play/Pause. Under the DJ buttons there are Volume and Mute
controls.
The Wireless DJ Music System comes well
packed (to the point that you'll never get it back in the box the exact same
way) with a remote, cradle, USB wireless transmitter, installation CD, RCA
cable, and manuals. The remote has a heftier-than-it-looks feel and tends to be
cool to the touch. The profile of the remote is very thin which isn't as
comfortable as it could be but overall the remote feels good in the hand. The Generation-1
iPod-eske wheel control clicks as you rotate it and you use the center button
for most selections. The Home and Back buttons are located above the wheel with
two DJ buttons just below. Above the Home and Back buttons are your normal Skip
Forward/Back and Play/Pause. Under the DJ buttons there are Volume and Mute
controls.
Just below the control panel is a removable cover for the rechargeable battery. The remote sits on a cradle in your home theater (or whatever room you want the DJ connected to). The cradle must be both plugged into the wall (power) and the RCA cables connected to your sound system. The provided RCA cables are of the generic, throwaway type. The cradle is heavier than it looks which helps keeps it in place under the weight of the connected cables. The front of the cradle has a LED that glows red when there is no wireless connection in place and blue when there is. The USB wireless transmitter is light and easy to hide. Again, there is an LED on the front that glows red when there is no wireless connection and blue when there is.
 The
Wireless DJ Music system does not operate on the normal wireless frequencies
you are used to. No 802.11g or any of that. Instead it relies on Bluetooth
technology for its wireless connectivity. Now, I have, much like many of you,
used Bluetooth before for a headset connected to my cell. They often claim that
it has a 10 meter range but I find that I'm lucky if I can get a clear signal
with my cell in my pocket. If Logitech hadn't reported that they used Bluetooth,
I'd have never believed it. From all over my house, I have near perfect
connectivity with almost no misfires on the remote. Sometimes there is a delay,
but I rarely have to press a button twice. I tried the remote from the farthest
room from my Home Theater and outside with no problems. Logitech says this is
because they utilize Bluetooth 1.2 A2DP (Advanced Audio Distribution Profile)
protocol with a Class I range (50 meter/165 feet) and a 2.4 GHz frequency. The
advantage of the Bluetooth is that it has a painless setup, works independently
of other wireless networks in your home, and can transmit files with DRM since
it is unencrypted by the sound card and re-encrypted via the Bluetooth
transmitter. Therefore, you can stream music that you may not have access to
with other wireless solutions.
The
Wireless DJ Music system does not operate on the normal wireless frequencies
you are used to. No 802.11g or any of that. Instead it relies on Bluetooth
technology for its wireless connectivity. Now, I have, much like many of you,
used Bluetooth before for a headset connected to my cell. They often claim that
it has a 10 meter range but I find that I'm lucky if I can get a clear signal
with my cell in my pocket. If Logitech hadn't reported that they used Bluetooth,
I'd have never believed it. From all over my house, I have near perfect
connectivity with almost no misfires on the remote. Sometimes there is a delay,
but I rarely have to press a button twice. I tried the remote from the farthest
room from my Home Theater and outside with no problems. Logitech says this is
because they utilize Bluetooth 1.2 A2DP (Advanced Audio Distribution Profile)
protocol with a Class I range (50 meter/165 feet) and a 2.4 GHz frequency. The
advantage of the Bluetooth is that it has a painless setup, works independently
of other wireless networks in your home, and can transmit files with DRM since
it is unencrypted by the sound card and re-encrypted via the Bluetooth
transmitter. Therefore, you can stream music that you may not have access to
with other wireless solutions.
Of course, using Bluetooth is not without its disadvantages. Mostly what you have to worry about is interference. While Bluetooth is generally resistant to interference, other devices, particularly those operating on the 2.4 GHz frequency (cordless phones, 802.11b/g networks), may cause problems. The Logitech instructions specify over and over to keep the transmitter, the cradle and the remote away from PCs, wireless routers, and other wireless devices. They suggest keeping the USB transmitter at least 2 meters away from a Wi-Fi router and 1 meter from your PC. The remote is suggested to stay a minimum of 1 meter from the cradle. Metallic items (like just about every piece of equipment in your HT) may also interfere with signal reception. While this sounds pretty restrictive, I threw the transmitter where I wanted (a bit closer than they suggested) and the cradle on my rack (right next to my DVR which is both metal and a PC (of sorts)) without any deleterious effects. You should test out different locations to see if it makes a difference in your environment.
Setup
The instructions provided by Logitech are extremely detailed and easy to follow. If you just start off inserting the disc, you can even follow the instructions on the screen as it will tell you when to hook up each of the components. I had no problems during installation.
Step 1: Insert disc and
start the StreamPoint Software installation process.
During
this step you'll build your library by telling the program where all your music
is located. It will allow you to select Windows Media, Apple iTunes, and
Musicmatch Jukebox. If you don't use one or more of these programs you can
deselect it. You can also let the program know if you have additional files in
other places. For example, I wanted to make sure all my AVRant and OurFirstMarriage podcasts were on
there so I selected the folders where they are located (since I don't download
them via iTunes or any other program). If you have a third party Podcast
download program like Juice, you just need to select the file where it stores
the media.
One thing I REALLY like about this process is that it is completely reversible. If you decide you don't want to include a folder or access your iTunes library, it's no problem, you can always deselect it later. I remember way back in the day when I let Windows Media player "find" music on my hard drive and ended up with every sound effect, bleep, bloop, and whir my computer makes. Was there an undo function, oh no. I was stuck with all that until I went through and manually removed them from the database. Fun? No, but the Wireless DJ does away with all that. Sure, you'll need to manage your music well (most people that have iPods or MP3 players are already familiar with the horrors of renaming all your music that you "acquired" from P2P networks so that they show up correctly on your player) but you probably already did that, right?
Step 2: Connect the USB
Music Transmitter
You'll
be prompted for this and the program will display a green checkmark when it
detects that the transmitter is correctly connected. This is just a matter of
waiting for the computer do to that voodoo that it does so well and getting the
driver installed. Less than a minute for me.
Step 3: Turn on the
Wireless Remote
While
the instructions had some difference from what I had in my hand (most
curiously, they showed the battery outside of the remote), the battery had more
than enough charge to test the system. Once you power on the remote, it will
try to make a connection to the transmitter. Once this connection is
established, another green checkmark will appear on the screen (see a pattern
here?). If, for some reason, your battery is completely dead, a quick 5 minute
charge on the cradle should be more than enough to complete the installation
process. Again, I had no problems here.
Step 4: Turn on the
Music Receiver/Cradle
Um…
plug it in, wait for the green checkmark
Step 5: Connect the
Music Receiver/Cradle to your Home Theater
At
this point, you need to connect the RCA cables up to your receiver/preamp.
While you'll be forced to use the DACs in the Cradle, the setup is as easy as
pie. Once you've connected the unit, you will be prompted to send a short test
song. Later on, when I had problems with the connection, I used this test song
over and over rather than subjecting my house (and speakers) to the distorted
music that was playing over the connection. It turned out that upgrading my
iTunes caused a bit of a problem with stuttering music. All I needed to do was
to press the connection reset button on the back of the cradle and everything
was fixed.
Logitech Wireless DJ - Use and Remote
 There
are two main interfaces for the Wireless DJ system - the remote and the
StreamPoint computer interface. Let me tackle the latter first. The menu system
of the StreamPoint interface is basic but intuitive. There are five categories
listed down the side of the interface that you can click on in order to change
or view your settings. There are descriptions in the manual for its use but as
long as this isn't the absolute first program you've every used, you'll
probably be able to wing it without much of an issue.
There
are two main interfaces for the Wireless DJ system - the remote and the
StreamPoint computer interface. Let me tackle the latter first. The menu system
of the StreamPoint interface is basic but intuitive. There are five categories
listed down the side of the interface that you can click on in order to change
or view your settings. There are descriptions in the manual for its use but as
long as this isn't the absolute first program you've every used, you'll
probably be able to wing it without much of an issue.
Room/Receivers - from this menu you can select which room you want the music to be streamed too. Theoretically, you should be able to buy additional cradles or wireless receivers. I say "theoretically" because I can find no mention of them online, I see nothing on the Logitech website or a link the specifically tells me which receiver is the right one for the Wireless DJ System. I don't know if they have discontinued this sort of support or what but I can't find much information on it. From this menu you can add additional rooms (in theory), manage those rooms (rename, delete, etc), and send a short snippet of test music to each zone.
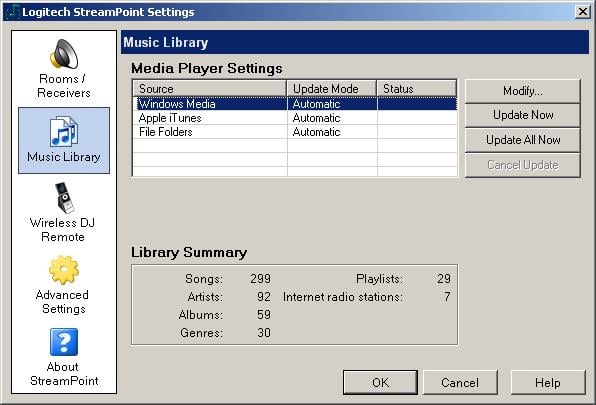
Music Library - This menu gives you access to the different locations on your computer where your music is stored. You can add or subtract sources, select which types of media it should access (Songs, Playlists, Internet radio stations), and select synchronization options (Automatic, Manual, or Do Not Include). Personally I selected Automatic for each though you have the option of forcing a manual update if you've loaded in some music and you want instant access. While you can add folders, don't forget that you have access to every computer that is on your network. I was able to successfully (and painlessly) stream the Podcasts on my laptop across my wireless network and through the Wireless DJ without any sort of stuttering or delay. The Music Library also lists the stats for the files it has access to (number of songs, artists, albums, genres, playlists, and Internet radio stations).
Wireless DJ Remote - This menu gives you access to the remote stats including the battery level, firmware version, and device ID number. In the manual it shows a lot more control here but it never showed up on my interface.
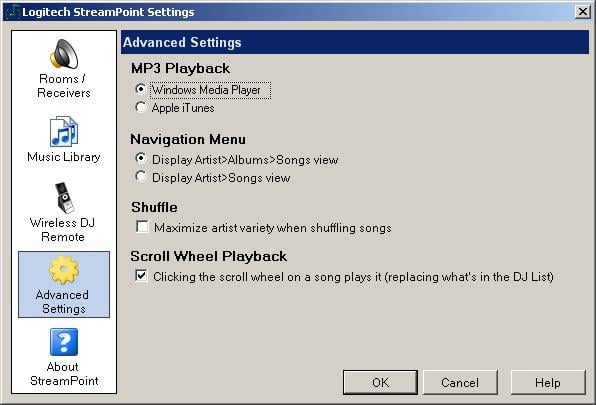 Advanced
Settings - Select whether you want iTunes or Windows Media Player to be used
for MP3 playback and set the order for displaying songs for an artist (either
Artist -> Album -> Song or Artist -> Song). You have check boxes for
maximizing the artist variety when shuffling songs and for clicking the scroll
wheel on a song plays it (replacing what's in the DJ List).
Advanced
Settings - Select whether you want iTunes or Windows Media Player to be used
for MP3 playback and set the order for displaying songs for an artist (either
Artist -> Album -> Song or Artist -> Song). You have check boxes for
maximizing the artist variety when shuffling songs and for clicking the scroll
wheel on a song plays it (replacing what's in the DJ List).
About StreamPoint - While I thought this would just be a little box telling the software version, it also contained checkboxes so that you can tell the program to check for updates during launch and whether or not to launch the program on Windows startup. Also, you can force an update check if you need to and there is a link to the support website.
As I mentioned the interface is extremely intuitive and easy to configure. I like how everything you selected during the installation is simple to adjust so you don't have that, "I'm not sure what I should click" stress. Rest assured that you can change it all later if you mess it up. The product, its software, and its implementation are obviously built with "ease of use" in mind. There is very little in this interface I would change.
Remote
 The
heart of the Wireless DJ Music System is the remote. Sleek in appearance, its
scroll wheel is reminiscent of the Generation 1 iPod players. The LCD is plenty
bright enough even in a well lit room or outside (and this is in Florida, mind you) and
each of the buttons is well placed and marked. Some part of me misses a
"stop" button though that is, by far, a minor gripe. I'd really like
to thank from the bottom of my heart the person who was responsible for
ensuring that this remote didn't have a motion sensitive On function. While
that seems like a cool idea in theory, in practice it ends up eating your
batteries (even rechargeable ones) and lighting up at inappropriate times (like
every time your subwoofer hits).
The
heart of the Wireless DJ Music System is the remote. Sleek in appearance, its
scroll wheel is reminiscent of the Generation 1 iPod players. The LCD is plenty
bright enough even in a well lit room or outside (and this is in Florida, mind you) and
each of the buttons is well placed and marked. Some part of me misses a
"stop" button though that is, by far, a minor gripe. I'd really like
to thank from the bottom of my heart the person who was responsible for
ensuring that this remote didn't have a motion sensitive On function. While
that seems like a cool idea in theory, in practice it ends up eating your
batteries (even rechargeable ones) and lighting up at inappropriate times (like
every time your subwoofer hits).
The most important part of the remote is the display. The top of the display shows a graphical representation of the amount of the current track that is left (a bunch of dots that count across the top of the screen), how much time is elapsed in the track (numerically) and the total length is just below the graphic. In the center is the track info or menu list depending on the screen you are on. You have a total of seven lines of text available with two lines of header information. Under that is a status indicator (play, pause, and track number out of track numbers), signal strength, and battery indicator. There are six selection options on the home menu - most of which don't need detailed description. The My Music menu allows you to select your track by all the usual suspects - Artists, Playlists, Genres, Albums, or Songs. The Internet radio option just lists all the stations you've chosen in alphabetical order with no groupings of any kind. The Now Playing option is fairly self explanatory and when something is playing, eventually the remote will default to this screen. The last option on the list (Rooms) allows you to change, on the fly, which room is receiving the streaming music (assumes the use of multiple receivers).
DJ List - Those of you familiar with playlists will understand the concept of a DJ List implicitly. While playlists are permanent, a DJ List is a on the fly playlist that you can create from the remote. All you need to do is browse through your albums and songs and choose what you'd like to add. If you are adding songs, you simply need to browse to said track and hit the DJ add button. If you'd like to add an album, genre, or your entire library, you can, from a special option at the top of each of these screens. While DJ Lists aren't permanent, the last one you created does stick around until you delete it (which can consist of just selecting a new song to listen to and clicking on it rather than adding it to your DJ List). While you have access (if you choose) to each of your playlists already, this is a convenient way to throw together a few songs for a special occasion or just because you feel like it. Lastly, you can either hit "Play" on the DJ Menu or "Shuffle and Play". I was really impressed with how it not only shuffled the list for you, but it changes the order on the screen so you still know what is coming next. Don't like the order? Hit Pause and select Shuffle and Play again.
 Settings - There are a number of
options you can adjust under the Settings tab:
Settings - There are a number of
options you can adjust under the Settings tab:
-
Artist View - set whether you want your music displayed by album or just a song list under the Artist view (same as the computer interface).
-
Shuffle Mode - Applicable only for DJ List. Select either Artist Variety or Random. Both are random modes but the Artist Variety seeks to ensure that you aren't hearing the same artists songs back to back. This would be good if you have a large number of songs from a one artist and a few songs from a bunch of others.
-
Scroll Wheel Playback - choose either Replace DJ List and play or Do nothing. This sets whether scrolling though your music and hitting the scroll wheel (accidentally) will change your DJ List or just beep at you. A nice feature if you've set up a DJ List and someone wants to browse your library. You can let them do so without fear of them messing anything up. Otherwise, if they select a song rather than the Add button, it overwrites your DJ List completely. Listening to Internet radio does not clear your DJ List regardless of this setting.
-
Keypad Backlight - Select backlight setting of Never on, 1 min, 2 min, 5 min, Always on
-
Screen Timeout - Select how long before the screen on the remote shuts down 1 min, 2 min, 5 min, 10 min, 20 min, Always on.
-
Contrast - Set the screen contrast High, Medium High, Medium, Medium Low, Low
-
Sleep Timeout - Set how long before the Wireless DJ goes into sleep mode 10 min, 20 min, 30 min, 60 min, Always on (it took my system all of about 3 seconds to go from sleep to power on so this is really only for battery saving and not because it takes so long to boot up).
Logitech Wireless DJ - Listening Tests and Conclusion
 There are plenty of people out there with music burned to
their computers. Unfortunately, most of them think that MP3 is just fine (it
isn't, it really isn't). For all of you, skip to the next section and take my
word for it that it sounds just fine. For those of us that actually care about fidelity, we've stored our
music in a lossless or (at the very least) high bitrate compression format. The
Wireless DJ is compatible with MP3, WMA (including lossless), and AAC. This pretty much covers all the
formats used by the three players that the Wireless DJ accesses. It would be
nice if it had FLAC support but this product opts for the more mainstream
formats.
There are plenty of people out there with music burned to
their computers. Unfortunately, most of them think that MP3 is just fine (it
isn't, it really isn't). For all of you, skip to the next section and take my
word for it that it sounds just fine. For those of us that actually care about fidelity, we've stored our
music in a lossless or (at the very least) high bitrate compression format. The
Wireless DJ is compatible with MP3, WMA (including lossless), and AAC. This pretty much covers all the
formats used by the three players that the Wireless DJ accesses. It would be
nice if it had FLAC support but this product opts for the more mainstream
formats.
Being the dutiful reviewer, I did my best to observe the differences in the Wireless DJ DAC compared to the one in the Denon AVR-2307CI. I burned a copy of Bang & Olufsen's Sound of Perfection Vol. XIII to my computer (lossless WMA, of course) and streamed that over the Wireless DJ. Next I played the disc on the Oppo 970HD that is connected to the Denon via HDMI. I disabled all bass management and engaged Pure Direct mode. To my ears, the feed from the Wireless DJ was tinnier and had a reduced soundstage. Of course, this was all overshadowed by the occasional dropout.
Streaming media wirelessly can be a crapshoot as the strength of your connection can have a major impact on performance. For the most part I didn't have problems (and I stress this - it was a fairly rare occurrence) but I was far from never having issues. Dropouts would happen as little as none for hours at a time to once every couple of minutes. Generally, they were very infrequent but rarely was there a listening session that didn't contain at least one. And therein lays the problem for the audiophile. While the audio quality may be fine for general listening and even some critical, the dropouts are just unacceptable. In remembering my lackadaisical placement of the components I made sure to give the Wireless DJ every the benefit of the doubt and repositioned the transmitter and receiver. making sure to follow the manufacturer's recommended distances for each of the components. There was still the occasional dropout. For the general consumer that just wants a way to enjoy their music in a room other than their office this is a perfectly valid solution. For me, it has given me access to music that I'd long ago written off as lost. I just gave up on it. The Wireless DJ allowed me to finally remember why it was I had searched out all those songs so long ago. There is a big difference between critical listening and listening for enjoyment. And I thoroughly enjoyed listening to the Wireless DJ.
Recommendations
 Sometimes
a product is so good (or so bad) that there are no recommendations. While I'm a
big fan of the Wireless DJ, I still have a few things I'd like to see:
Sometimes
a product is so good (or so bad) that there are no recommendations. While I'm a
big fan of the Wireless DJ, I still have a few things I'd like to see:
-
Reduce/eliminate dropouts - I'm can't be certain that this wasn't an interference issue (though I see nothing that indicates that it was) or if it is a limitation of the Bluetooth protocol. I do know people with Squeezeboxes and they say they don't have dropouts. I want that too.
-
Stop button - sometimes I just want the music to stop. Sure, I can pause it or mute it but I still look for that stop button.
-
I'd like to see the DJ List remain until you manually delete it with a warning indicating that you are about to delete it. I can see no reason why browsing to a single song and playing it should overwrite your entire DJ List.
-
The manual and the components don't always match. There were instructions that didn't match the condition of the components, controls that weren't available where they were reported to be, and buttons (particularly the connection reset button on the back of the cradle) that was never mentioned. I'd like to see a more updated and accurate manual ship with this product - not that it really needs it. But it should have it.
Conclusion
There has been a lot of music stuck on my computer since the early days of Napster (while they were still debating the legality of all that). Marginal bitrates and substandard quality has stopped me from transporting it in one form or another to my Home Theater. While the Wireless DJ may have its faults, it gives you an easy and painless way to access the music that has been stranded there for so long. To say that I like this product is a massive understatement. It has given me a new lease on music I've long since written off.
Logitech Wireless DJ
Music System
$99.99
Logitech
6505 Kaiser Dr.
Fremont, CA
94555 USA
+1 510-795-8500
www.logitech.com
About Logitech
Logitech is a world leader in personal peripherals,
driving innovation in PC navigation, Internet communications, digital music,
home-entertainment control, gaming and wireless devices. Founded in 1981,
Logitech International is a Swiss public company traded on the SWX Swiss
Exchange (LOGN) and on the Nasdaq Global Select Market (LOGI).
The Score Card
The scoring below is based on each piece of equipment doing the duty it is designed for. The numbers are weighed heavily with respect to the individual cost of each unit, thus giving a rating roughly equal to:
Performance × Price Factor/Value = Rating
Audioholics.com note: The ratings indicated below are based on subjective listening and objective testing of the product in question. The rating scale is based on performance/value ratio. If you notice better performing products in future reviews that have lower numbers in certain areas, be aware that the value factor is most likely the culprit. Other Audioholics reviewers may rate products solely based on performance, and each reviewer has his/her own system for ratings.
Audioholics Rating Scale
 — Excellent
- — Very Good
- — Good
- — Fair
- — Poor
| Metric | Rating |
|---|---|
| Analogue Audio Performance | |
| Build Quality | |
| Ergonomics & Usability | |
| Ease of Setup | |
| Features | |
| Remote Control | |
| Fit and Finish | |
| Performance | |
| Value |
As Associate Editor at Audioholics, Tom promises to the best of his ability to give each review the same amount of attention, consideration, and thoughtfulness as possible and keep his writings free from undue bias and preconceptions. Any indication, either internally or from another, that bias has entered into his review will be immediately investigated. Substantiation of mistakes or bias will be immediately corrected regardless of personal stake, feelings, or ego.
View full profile