
WireTracks WT-RF-01-10 Wire Management System Review
WireTracks Wire Management System
- Product Name: WT-RF-01-10 Wire Management System
- Manufacturer: WireTracks
- Performance Rating:


- Value Rating:
- Review Date: December 21, 2005 18:00
- MSRP: $ 199.50
- WT-RF-01-10 (10 each 8 ft pieces)
- 8 ft long, 2.5 inches wide, 0.5 inches thick
- White paintable surface
- Also available in 5 ft pieces
Pros
- Cost effective alternative for pre-wiring home theater
- Relatively easy to install
- Paintable surface
- Large enough to accommodate all wiring needs
Cons
- Factory end cuts not square
- Plain rectangular styling
- No inside or outside corners
WireTracks WT-RF-01-10 Introduction
Over the past few years, we have received numerous inquiries and questions about how to install and run wiring for home theaters in pre-existing homes. Most often this can be a difficult and daunting task, especially if you have a two-story home with no attic crawl space or a home that has tile or wood floors. These types of homes can be nearly impossible to pre-wire without extensive demolition to walls and ceiling surfaces.
All this work may be too much for the average DIY home theater hobbyist. Hiring a pro may be cost prohibitive considering all the finish work that may need to be done.
Now a recent upstart company, Wire Tracks, located in the great Pacific Northwest has introduced a unique product that can help the average home theater DIY'er pre-wire their home theater easily and cost effectively. The Wire Tracks kit can be installed behind existing baseboard or surface mounted. There is also a kit for crown molding installation. The wires are neatly hidden within the plastic molding in a large chamber.
For the purpose of this review we will limit the discuss to surface mounting only because that will require the least amount of work for the DIY'er.
WireTracks WT-RF-01-10 Setup and Conclusion
 The installation process is relatively simple. All
that is required is a cordless screw gun, hammer, tape measure, level, pencil, and saw for straight runs.
For complex mitering inside and outside corners or back cutting, a power miter saw is recommended.
Basically, all you need to do to install Wire Tracks is replace the existing baseboard molding with the
Wire Tracks molding. The wire tracks moldings are available in 5 ft or 8 ft sections.
The installation process is relatively simple. All
that is required is a cordless screw gun, hammer, tape measure, level, pencil, and saw for straight runs.
For complex mitering inside and outside corners or back cutting, a power miter saw is recommended.
Basically, all you need to do to install Wire Tracks is replace the existing baseboard molding with the
Wire Tracks molding. The wire tracks moldings are available in 5 ft or 8 ft sections.
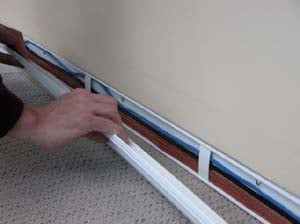
Comprehensive instructions are included with the kit that explains how to lay out rooms of various sizes and shapes. It even guides you through the set up of the miter saw if you need it. Installing the Wire Tracks behind the existing molding is a little more time consuming than simply replacing the existing molding. This will require you to carefully remove the existing baseboard molding and do some minor demolition of the wall surface.
The use of an automotive dent puller as shown below can be helpful for removing existing baseboards. Simply drill a pilot hole in the baseboard, screw in the dent puller and carefully tap the baseboard from the wall. If you have caulking applied to the top of your baseboard it may be helpful to score it with a razor blade before removal. Take your time as to not break the existing baseboard if you plan on reusing it. The Wire Tracks channel can also be installed around a doorframe.
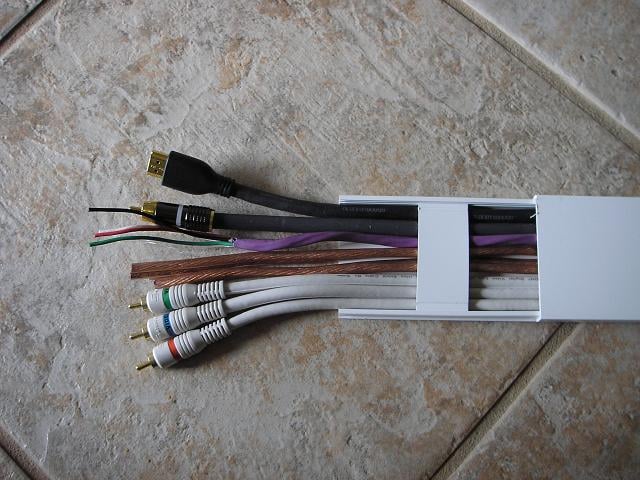 The channel is
large enough to accommodate many wires. I was able to place a set of component video cables, one pair of
twelve gauge speaker wire, one run of 16-4 CL#3 in wall speaker wire, one Impact Acoustics subwoofer
cable and one HDMI cable in the channel and still snap the cover on without incident. The cables are
neatly kept in place with the use of plastic straps that snap into the channel.
The channel is
large enough to accommodate many wires. I was able to place a set of component video cables, one pair of
twelve gauge speaker wire, one run of 16-4 CL#3 in wall speaker wire, one Impact Acoustics subwoofer
cable and one HDMI cable in the channel and still snap the cover on without incident. The cables are
neatly kept in place with the use of plastic straps that snap into the channel.
The most time consuming part of the installation process is laying out the room and making corner cuts. Bending the wires around outside or inside corners can be a little tricky, but with some patience it can be accomplished. The use of a level is highly recommended to keep the runs of track straight. It is also advised that you check the factory end cuts to make sure they are square. Several times I found the cuts to be slightly angled which has the potential of making it difficult to create a seamless run. There are no covers provided for where the Wire Track runs come together but paintable silicone can be used if you have a small gap at the butt joint.

Conclusion
I have to say this is a pretty good viable cost effective alternative for those individuals that don't have the ability to pre-wire their home theaters before drywall. If you have average mechanical skills, the installation will be relatively easy and can look very nice. The space provided in the track is large enough to accommodate all of your wiring needs and will give you the ability to add or remove wires as needed.
The inclusion of inside or outside corner pieces would have been nice. A selection of molding with a little detail would be more aesthetically pleasing than the plain rectangular type. However, those are minor complaints considering the price of the kit. I recommend this kit with the caveat that you must have some mechanical skill to complete the installation. The end result sure look's a whole lot nicer than having wires exposed throughout your home theater.
Wire Tracks LLC
PO Box 19243
Seattle, WA, 98109
www.wiretracks.com
888-886-9473
The Score Card
The scoring below is based on each piece of equipment doing the duty it is designed for. The numbers are weighed heavily with respect to the individual cost of each unit, thus giving a rating roughly equal to:
Performance × Price Factor/Value = Rating
Audioholics.com note: The ratings indicated below are based on subjective listening and objective testing of the product in question. The rating scale is based on performance/value ratio. If you notice better performing products in future reviews that have lower numbers in certain areas, be aware that the value factor is most likely the culprit. Other Audioholics reviewers may rate products solely based on performance, and each reviewer has his/her own system for ratings.
Audioholics Rating Scale
 — Excellent
- — Very Good
- — Good
- — Fair
- — Poor
| Metric | Rating |
|---|---|
| Build Quality | |
| Ergonomics & Usability | |
| Ease of Setup/Programming/Integration | |
| Features | |
| Performance | |
| Value |