
Planet Waves DIY Home Theater Cable Making Kits Review
- Product Name: Planet Waves DIY Home Theater Cable Making Kits
- Manufacturer: Planet Waves
- Performance Rating:

- Value Rating:
- Review Date: April 24, 2008 12:45
- MSRP: $ 249-$400 per kit
Cable Specs All cable meets below specs:
|
|
Pros
- Easy to use self terminating cable solution
- Infinite choice of connector types
- CL2 rated cable that is easy to run behind drywall
Cons
- 18AWG limits reach for high resolution video
- Soft cable jacket prone to ripping if not carefully pulled through in wall installations
- Pricey package options
Planet Waves DIY Home Theater Cable Making Kits Introduction
 Planet Waves (a division of D’Addario) has entered the custom install market with the release of their new DIY solder-less self terminating cables. I grew up knowing the D’Addario name quite well with a family of passionate jazz and blues guitarist that regarded them as the industry leader in guitar strings. I never took to guitar in terms of playing, but I certainly appreciated the quality of products they offered and how well they are still to this day revered by their ordinary customers and professional musicians.
Recently the Planet Waves division of D’Addario was launched introducing cable kits that not only provide you with the cable and the connectors, but with a solder-less “screw on” solution! Basically all you need to do is cut the cable, twist on the connector, and fasten the set screw. If this seems too complicated, they even offer an online video on their website to show you how to accomplish this feat. It all sounds good on paper, but how do these cables perform and are they snake oil free? Keep reading to find out….
Planet Waves DIY Cable Kit Packaging and Installation
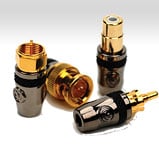
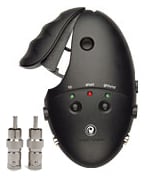
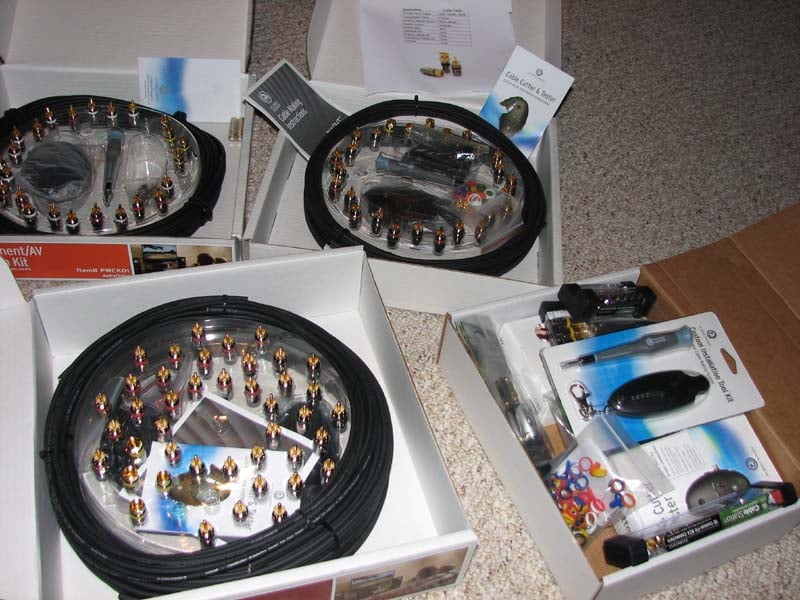 Coaxial cable is easily the most commonly used cable in the AV world. It is used for RCA connections, composite video, component video, coaxial digital audio, and subwoofer cables. Each of the Planet Waves kits come with cables (all 75 ohm and shielded) and black chrome finished connectors with gold-plated contacts and color coding rings so that you can label them as you wish. In addition, with each of the new Planet Waves kits you’ll be provided with a cable cutter / tester so that you’ll know before you ever plug anything in that the cable works as well as a flat head screw driver to terminate your cables.
 The priciest of the kits (the “Home Theater Installation Kit” at $399.99) includes a 25 foot run of a single cable (for your coaxial and subwoofer runs), dual cable (for your red/white RCA audio runs), and triple cable (for your component video runs). Of course you also get 38 RCA connectors, 4 F connectors, and 20 elastic ties (for cable management). The other two sets cost $249.99 and come with either simply a 25 foot run of triple cable or a 25 foot run of single and a 25 foot run of double cable (works out to be the same amount of cable) and 20 connectors.
The thing to remember is that these cables can be mixed and matched. If you need a short run of analogue cables for your SACD player (or HD-DVD player), you can either cut a bunch of single cables or some combination of single, dual, and triple cables. It doesn’t matter. It is also important to note that the connectors are completely reusable. So if you make a bunch of cables and connect everything up and then decide to move that piece of gear, you can back off the fastening screw, twist off the connector, trim the cable, and reattach the connector. This gives you a level of flexibility that should put a smile on your face. It did on ours.
I tabulated the packages below for convenience:
| PWCK01 | PWCK02 | PWCK03 |
| 25' Triple Cable 20 RCA Male Connectors 4 F Connectors 4 Elastic Cable Ties 1 Cable Cutter/Tester 1 Screwdriver |
25' Single Cable 25' Dual Cable 20 RCA Male Connectors 6 F Connectors 8 Elastic Cable Ties 1 Cable Cutter/Tester 1 Screwdriver |
25' Single Cable 25' Dual Cable 25' Triple Cable 38 RCA Male Connectors 4 F Connectors 20 Elastic Cable Ties 1 Cable Cutter/Tester 1 Screwdriver |
| $250 | $250 | $400 |
Accessory items:
- Cable cutter & tester $40
- Screwdriver (regular) & Triple Cutter: $26
Personally I feel these packages are a bit overpriced simply because the provided cable lengths are too short. If you go with PWCK01 and cut up the cables into 5 equal lengths of 5 feet each, you still have 10 RCA connectors left over and essentially each cable length just cost you $50. I would really like to see Planet Waves offer double the cable lengths in these packages and also offer the option to purchase the cable and terminations in quantity as needed by the installer or consumer.
Termination Instructions & Installation
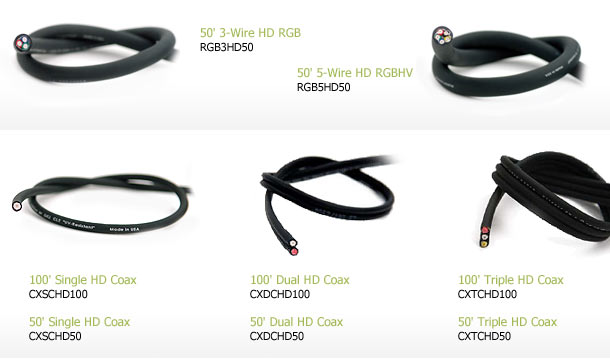
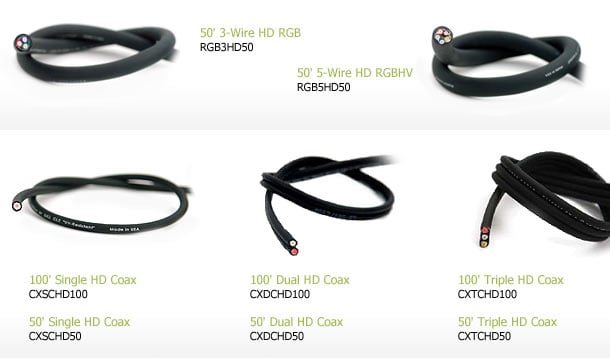 cableThe component cable build quality is very good. It is very flexible and the color coded insulator made the cable easy to identify for termination. Foot markers were easy to read. The interchangeable color bands for identification were also a nice touch. Terminating the cable was relatively easy however the Installer must utilize the tester/cutter to ensure a good termination was made prior to connecting to your equipment.
Following the 6 Step Procedure listed below will ensure a high degree of positive terminations each time:
- Cut the cable to length using the Planet Waves Cable Cutter/Tester.
- Trim clean and loose or overhanging strands of shielding (if any)
- Back out the screw of the connector until the cable channel is clear
- Push the cable into the termination while twisting down on it
- Tighten the screw completely until it will not turn any more
- Test the continuity of tip and ground connections with the Planet Waves Cable Cutter/Tester. Green LED’s indicate a good termination, Red indicated a short and you must redo this procedure
Additional Termination Notes for Consideration
The cable must be cut square to minimize bad terminations. Caution must also be used when pushing the RCA on the cable. Applying too much pressure may result in collapsing the jacket and causing a bad termination. The setscrew must be all the way out of the RCA ground shell when pushing on the RCA connector. If this is not done a miss termination will likely occur.
The small size and flexibility of the cable allow the installer to drill smaller holes in framing plates and blocking.
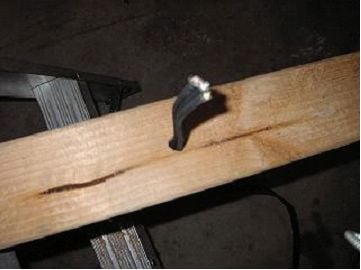
I found that a ½ inch paddle bit hole was the smallest hole I could effectively pull the cable through. The Custom Installer, because of their speed often uses paddle bits or spear bits but they occasionally create wood splinters around the perimeter of the hole. I was able to replicate this. When I pulled the cable through the hole, I split the outer casing exposing the shield braiding.
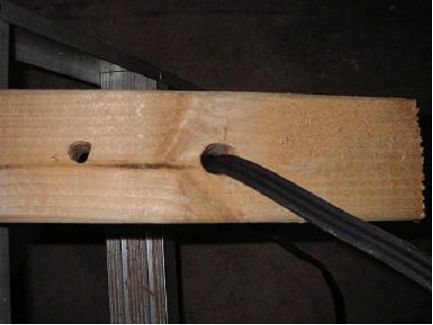
Drilling a ¾ inch hole reduced this occurrence, but I did find that the jacket was relatively easy to compromise when pulling. This test was performed to simulate an installer in an attic or crawl space in a retro installation. My advice here is to do your best to clean out any wood splinters and be careful when pulling the cable through to avoid snagging it and potentially compromising the protective jacket.
Termination Experience
 Self termination is simple for the two and three conductor cable packages. I did find it a bit more challenging to terminate the single cable package since the cable was so flexible. If great care wasn’t applied, the cable would flex during insertion into the connector. As a result, I had a few poor terminations which were easily discovered by using the Planet Waves Cable Tester. To minimize flexing, hold the cable near its end while installing the connector.
The Cable Cutter was easy to use and as previously mentioned the Cable Tester was invaluable for determining proper contact, shorts, etc. I found the screw on connector takes a bit of care as you must really provide good twisting force for the center conductor to make contact. The Cable Cutter tool worked great for the most part.
The screw on terminations didn’t fluctuate even when pulled hard. I found them to make firm contacts with the equipment I used them on (Yamaha/Denon receivers, Denon DVD players, Sony RPTV). The 6 leaf RCA connectors are sturdy and lock onto an input post with little effort. They won’t rip off the connector when disconnecting from your equipment like the various turbine Monster connectors.
Editorial Note about Connecting Cables to Components
Installers and consumers should be advised to twist clockwise when installing the cables onto their components and twist counterclockwise when taking them off to avoid excessive wear or damage to the components and/or the cable terminations. Using a counter clockwise twisting motion when removing is a necessity, and often forgotten by consumers leading to equipment damage.
Application Performance Test Results
I tested the Planet Waves cables using a variety of displays varying resolution all the way up to 1080i which is the maximum you can get form component video connections (with the exception of Xbox 360 and a few upconverting DVD players). Most DVD players only output up to 480p via component video, but many cable set top boxes work all the way up to 1080i.
|
Test |
Resolution |
Phillips 30” HDTV |
Hitachi 70” HDTV |
|
6.75 MHz Bust Pattern |
480i |
Pass |
|
|
480p |
Pass |
||
|
540p Pal |
Pass |
||
|
720p |
Pass, slight softening and ringing
|
||
|
1080i |
Pass, slight ringing |
||
|
Test |
Resolution |
Phillips 30” HDTV |
Hitachi 70” HDTV |
|
6.75 MHz Bust Pattern |
480i |
Pass |
|
|
480p |
Pass |
||
|
540p Pal |
Pass |
||
|
720p |
Pass |
||
|
1080i |
Pass |
||
Test Results
 Terminating
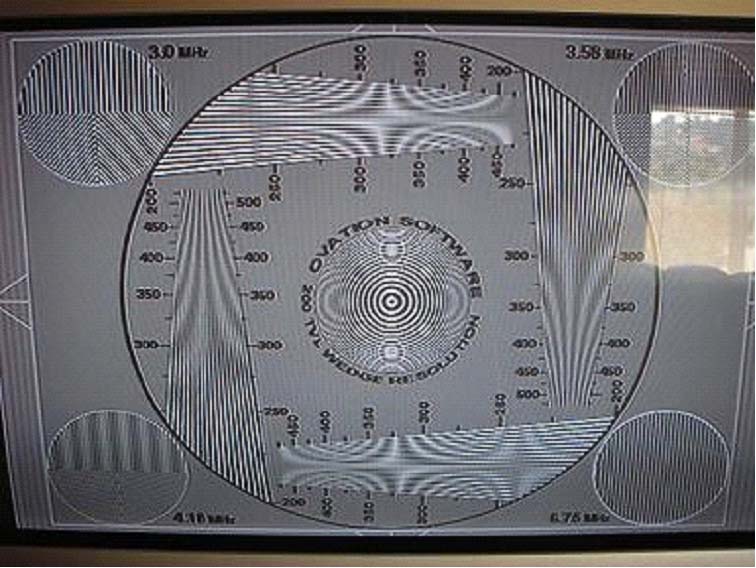
the single lead 200ft roll (wire left on spool) with RCA connectors and testing
at 480i composite, the cable passed the 6.75MHz burst pattern with little to no
ringing. The significance of this test is the ability to use this cable in long
runs at low resolutions for multi-room installations. Composite 200ft termination 480i from standard
DVD producing a clear 6.75MHz test pattern and a clear zone plate past 500MHz.
Terminating
the single lead 200ft roll (wire left on spool) with RCA connectors and testing
at 480i composite, the cable passed the 6.75MHz burst pattern with little to no
ringing. The significance of this test is the ability to use this cable in long
runs at low resolutions for multi-room installations. Composite 200ft termination 480i from standard
DVD producing a clear 6.75MHz test pattern and a clear zone plate past 500MHz.
Editorial Note on Resolution Testing vs Real World Performance
It’s important to note that while you can start seeing a softening of the image with longer cable lengths using test patterns, it won’t be as evident using real world video signals from your DVD player or cable box. Only a discerning eye will pick this up and in most applications of long cable runs, the customer isn’t always running video beyond 480p resolution.
COAX Cable Measurements & Analytical
Calculations
24AWG Planet Waves
|
Metric |
@ DC |
@ 10 kHz |
@ 100 kHz |
@ 500 kHz |
|
Rs (total) |
30.9 mΩ/ft |
32.0 mΩ/ft |
32.3 mΩ/ft |
44.0 mΩ/ft |
|
Cp |
NA |
18.3 pF / ft |
18.3 pF/ft |
18.4 pF/ft |
|
Ls |
NA |
.120 uH/ft |
.120 uH/ft |
.119 uH/ft |
|
Rshield |
4.57 mΩ/ft |
5.68 mΩ/ft |
5.97 mΩ/ft |
7.55 mΩ/ft |
|
Zo (sqrt(L/C)) |
81.0Ω |
|||
Cable Metric Definitions
|
Rdc - |
Commonly referred to DCR which is the series resistance of a cable at zero frequency. |
|
Rac - |
The resistive portion of the cables series resistance as a function of frequency due to skin effect. |
|
Rs - |
Total Series Resistance (mohms) measured tip to shield at one end of the cable while the other end is shorted. Note: Rs = Rac + Rdc (minus instrumentation inaccuracies identified below) |
|
Ls - |
Series Inductance (uH) measured tip to shield at one end of the cable while the other end is shorted. |
|
Cp - |
Parallel Capacitance (pF) measured tip to shield at one end of the cable while the other end is open circuited |
Cable Measurement Test Set-Up Notes
All of the above measurements were completed on a fully calibrated and
certified, Wayne
Kerr 6420 Impedance Analyzer. The 6420 was calibrated for full frequency
bandwidths and for greater accuracy the measurements and calibration process
was repeated twice for consistency.
All cable lengths measured were 10 feet or greater and divided by their length for a normalized per foot measurement. At low frequencies in cases where Rs measures lower than Rdc, this is not inaccurate, as Rs tends towards Rdc as frequency approaches zero or DC. The LCR measurement derives Rs from signal phase and amplitude, while a DC meter measures exactly what it is looking for. Thus when this discrepancy occurs, it is likely due to a meter resolution issue, as the meter in AC mode does not sport the high accuracy it would in DC mode. The cable should ideally be modeled as multiple parallel resistors, and those resistors treated as a lumped element in series with an ideal inductor.
Each resistor is a frequency dependent element, and the inner ones fall out as the frequency increases. It is important to note the difference in measuring techniques, and caution the reader not to attempt to derive any relationships with the two numbers, as the absolute accuracy between the methods has not been established. However, the rising trend of Rs vs frequency is indicative of increased Rac due to skin effect and should also be noted.
Cable Analysis
The Planet Waves cable contains Single Braid and Foil Shield combination shielding using 24AWG stranded center conductor measures about three times the resistance of standard 18AWG RG6 coax cables. For long runs (>50ft) we would have preferred to see 18AWG to minimize insertion loss and avoid issues of with some video drivers inabilities to cope with excessive signal loss due to high source resistance loading. For example, 100ft of Planet Waves cable would have about 30 ohms of AC conductor resistance at 30MHz while 18AWG equivalent cable would have about half that. When terminated into a 75 ohm load would result in about -3dB of signal loss compared to -1.6dB of loss with standard 18AWG RG6 Coax cable. Please see the tables below which calculate AC resistance and loss vs frequency for 20ft and 100ft lengths of 18AWG and 24AWG coax cables.
|
for 20ft |
Frequency (Hz) |
18 AWG |
Loss (dB) |
24 AWG |
Loss (dB) |
|
|
1000000 |
0.57 |
-0.07 |
1 |
-0.14 |
|
3000000 |
0.97 |
-0.11 |
2 |
-0.23 |
|
|
5000000 |
1.24 |
-0.14 |
3 |
-0.30 |
|
|
10000000 |
1.74 |
-0.20 |
4 |
-0.41 |
|
|
30000000 |
2.98 |
-0.34 |
6 |
-0.69 |
|
|
100000000 |
5.41 |
-0.61 |
11 |
-1.21 |
|
|
for 100ft |
Frequency (Hz) |
18 AWG |
Loss (dB) |
24 AWG |
Loss (dB) |
|
|
1000000 |
2.87 |
-0.33 |
6 |
-0.69 |
|
3000000 |
4.84 |
-0.54 |
10 |
-1.11 |
|
|
5000000 |
6.19 |
-0.69 |
13 |
-1.39 |
|
|
10000000 |
8.68 |
-0.95 |
18 |
-1.89 |
|
|
30000000 |
14.90 |
-1.57 |
31 |
-3.00 |
|
|
100000000 |
27.06 |
-2.68 |
56 |
-4.85 |
Editorial Note on COAX Bandwidth Requirements
The sample rate for 1080i HDTV is 74.25 Mhz. This is arrived by taking 1920 horizontal pixels plus 280 samples for sync per line times 1125 lines including sync (1080 +45) times 30fps. With a factor of 2 (based on Nyquist theorem) the highest analog frequency you can theoretically achieve is 37.125 Mhz. This approximates to a real world number of about 30 MHz for 1080i with about 20% overhead.
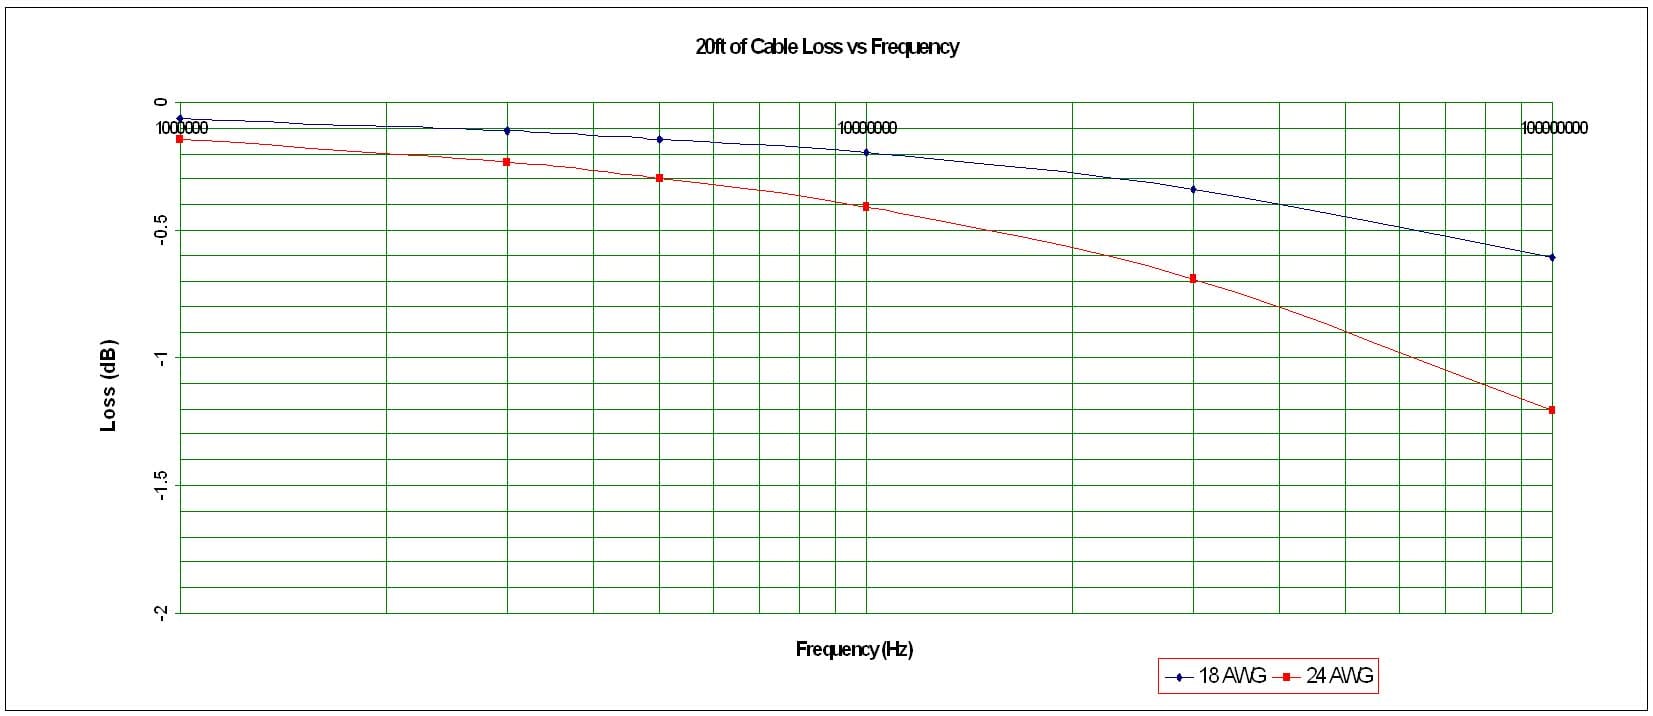
Figure 1. 20ft Cable Loss vs Frequency
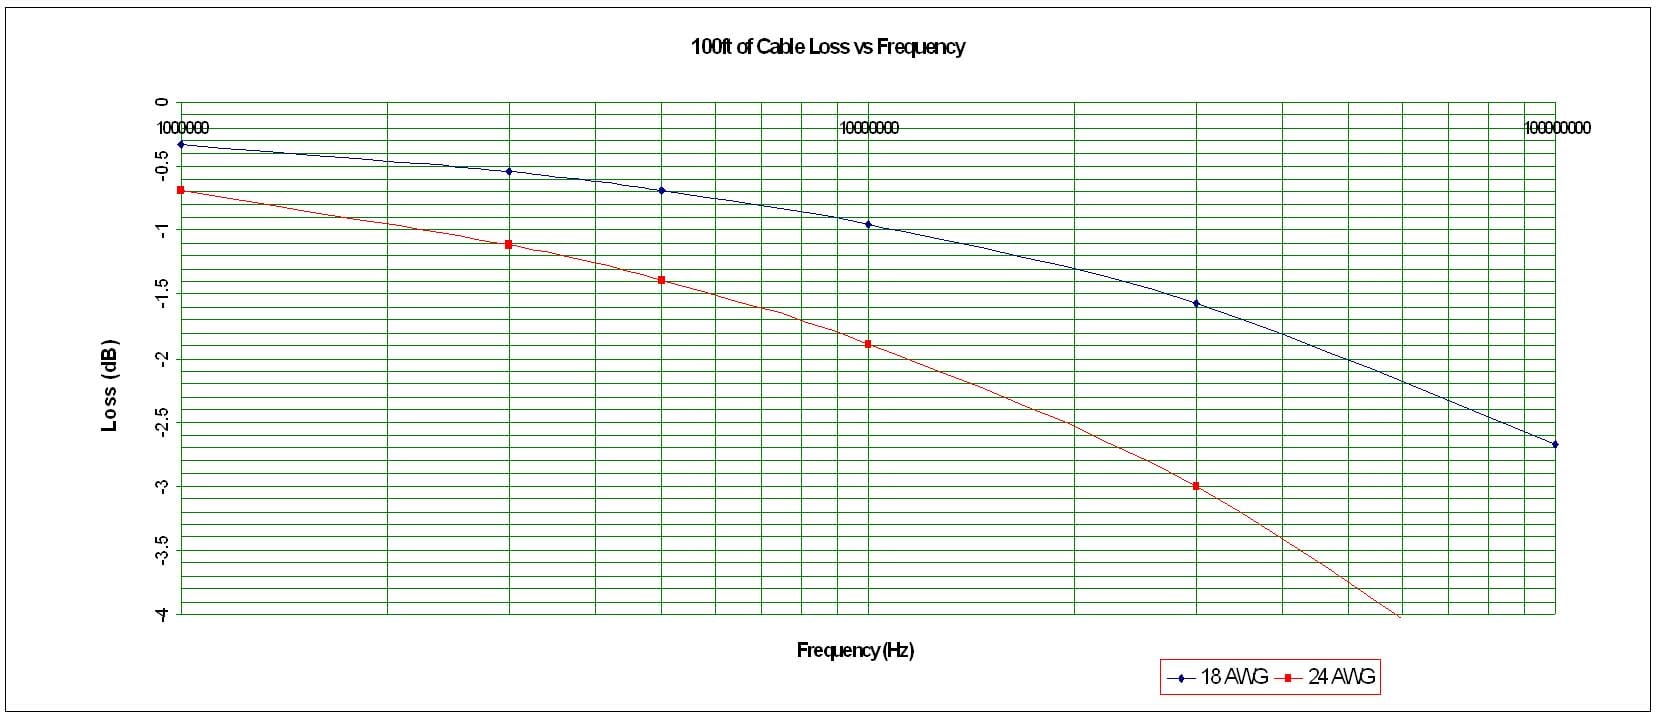
Figure 2. 100ft Cable Loss vs Frequency
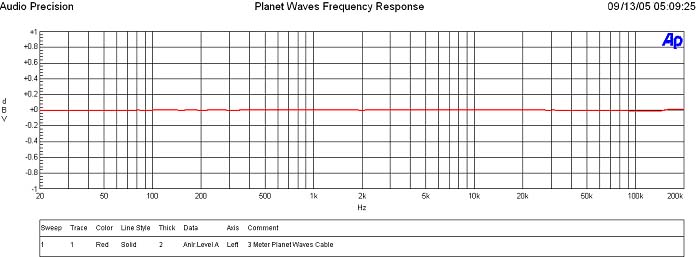
Figure 3. 20ft Planet Wave Cable Frequency Response
A frequency sweep out to 200kHz verified the cable termination was good and functioned fine for audio applications. This cable was used for connecting analog audio and subwoofer components and no audible issues were found even at max lengths of greater than 100 feet. The dielectric of the Planet Waves cables appears to be of good quality as indicated by the constant capacitance over frequency measurements.
Recommendations
 All of the
Planet Waves cables are intelligent solutions for the consumer DIY and Custom Installer
based marketplaces. The 6 leaf connectors
for the COAX cable make excellent contact with component equipment, as do the
other terminations (ie. F, BNC, female RCA).
Since these cables target DIY and
Custom Installers, and are an ideal solution for installation beyond the sheet
rock barrier, it was a good call to get CL2 approval from a safety concern. The Planet Waves COAX cable solutions are well-suited
for consumer audio and HD video applications.
The main benefits of using a 24AWG solution here are costs, and ease of
termination and insertion to already existing drywall.
All of the
Planet Waves cables are intelligent solutions for the consumer DIY and Custom Installer
based marketplaces. The 6 leaf connectors
for the COAX cable make excellent contact with component equipment, as do the
other terminations (ie. F, BNC, female RCA).
Since these cables target DIY and
Custom Installers, and are an ideal solution for installation beyond the sheet
rock barrier, it was a good call to get CL2 approval from a safety concern. The Planet Waves COAX cable solutions are well-suited
for consumer audio and HD video applications.
The main benefits of using a 24AWG solution here are costs, and ease of
termination and insertion to already existing drywall.
However, if this cable is intended to be used for HD applications (720p or higher resolution) and/or SDI pro video transmission over long runs (greater than 50ft) such as the tests previously conducted, I would advise considering an alternative Coax cable of 18AWG and ensure the supplier can guarantee the characteristic impedance of the cable within 75Ω +- 2Ω to minimize return loss issues which can surface as ghosting and/or ringing in the video signal. In most applications such as 480i/p outputs of DVD players or set top boxes, this won’t be an issue.
Conclusion
The Planet Waves DIY Home Theater Kit proved to be a versatile product for the end user and custom installer alike. It’s probably the easiest self terminating system I have come across and the fact that you can pretty much utilize any conceivable analog termination on the market with a simple twist on connector and fastening screw is something every home theater aficionado and cable installer should have in their bag of tricks. While it didn’t score very high on value, it topped the charts for convenience and ease of use. I requested that Planet Waves should sell the cable and connectors in bulk to allow consumers to buy as much as they need. This should help provide better value to the end user.
Peering the Planet Waves website, I didn’t detect any snake oil literature pimping the wonders of this product so that scores a lot of points in my book since the product and company is snake oil free. This is a solid product that will work in virtually any installation (used within the guidelines of this review) requiring a precise cable length and termination. If you are looking to shorten your cable lengths behind your rack to reduce the cable spaghetti, and want a simple solution that even your grandmother could use, I highly recommend the Planet Waves DIY Home Theater family of products.
Planet Waves
D'Addario & CO Inc
595 Smith St.
Farmingdale, NY 11735
Phone: 631-439-3300
Test Equipment List
- Modified Liteon LVD-2001 DVD upconverting player 480i NTSC and Pal 480p 720p 1080i
- JVC GD 723 DVD player 480i,480p
- Denon DVD-5910 Player 480p for Component, 1080i for HDMI/DVI
- Yamaha RXV-2700 receiver
- Denon AVR-5805mkii receiver
- Sony VPL 400Q LCD projector
- Hitachi 70 VS 810 LCD
- Sharp XV-Z200U DLP
- Syntax Olevia LT-30HV 30” LCD Display
- Sony KP-51WS500 51” HDTV RPTV
- Phillips HD-30" Direct View
- High Definition Box from DISH Network
- Standard Digital DVOM
- Wayne Kerr 6420 Impedance/Magnetic Analyzer
- Audio Precision SYS2722 Audio Analyzer
- RBH Sound Signature T-30LSE Loudspeaker System
- RBH Sound 66-LSE Signature speakers with Status Acoustics Upgrade
- Axiom Audio EP500 Subwoofer
The Score Card
The scoring below is based on each piece of equipment doing the duty it is designed for. The numbers are weighed heavily with respect to the individual cost of each unit, thus giving a rating roughly equal to:
Performance × Price Factor/Value = Rating
Audioholics.com note: The ratings indicated below are based on subjective listening and objective testing of the product in question. The rating scale is based on performance/value ratio. If you notice better performing products in future reviews that have lower numbers in certain areas, be aware that the value factor is most likely the culprit. Other Audioholics reviewers may rate products solely based on performance, and each reviewer has his/her own system for ratings.
Audioholics Rating Scale
 — Excellent
- — Very Good
- — Good
- — Fair
- — Poor
| Metric | Rating |
|---|---|
| Performance | |
| Versatility | |
| Build Quality | |
| Ease of Setup/Programming/Integration | |
| Features | |
| Performance | |
| Value |
Gene manages this organization, establishes relations with manufacturers and keeps Audioholics a well oiled machine. His goal is to educate about home theater and develop more standards in the industry to eliminate consumer confusion clouded by industry snake oil.
View full profile