
IOGEAR Powerline Stereo Audio System Review
IOGEAR Powerline Stereo Audio System
- Product Name: Powerline Stereo Audio System
- Manufacturer: IOGEAR
- Performance Rating:

- Value Rating:
- Review Date: October 20, 2008 06:35
- MSRP: $ 444.95 (additional adapters 219.95)
- Brings music to multiple rooms without expensive audio cable installation
- Enjoy whole-house music in any room in your home of office
- Stream music to up to 4 Powerline Stereo Audio Adapters from 1 Powerline Stereo Audio Station
- 3 ways of connecting your audio source to your Powerline Stereo Audio Station: an iPod® or audio source with RCA or 3.5mm audio connection
- Remote access your iPod® for volume control, track selection and to play and pause
- Uses HomePlug® powerline technology for a robust problem-free digital connection
Pros
- Convenient
- Pretty
- Well constructed
- Works perfectly when SRS is disabled
Cons
- Sub-par fidelity with SRS
- Expensive
IOGEAR Powerline Stereo Audio System Introduction
 I'm always on the
lookout for new ways to connect up speakers (especially those pesky rear
speakers) so when IOGEAR connected me to review their Powerline Stereo Audio
System I jumped at the chance. A little known fact (at least to the common
consumer) is that "wireless" speakers still need power. The Powerline
Stereo Audio System uses those same power wires to transmit audio signals. This
could give you an easy way to transmit your audio information without all the
drawbacks that a wireless connections offers (like interference and dropouts).
The only question is how well it works.
I'm always on the
lookout for new ways to connect up speakers (especially those pesky rear
speakers) so when IOGEAR connected me to review their Powerline Stereo Audio
System I jumped at the chance. A little known fact (at least to the common
consumer) is that "wireless" speakers still need power. The Powerline
Stereo Audio System uses those same power wires to transmit audio signals. This
could give you an easy way to transmit your audio information without all the
drawbacks that a wireless connections offers (like interference and dropouts).
The only question is how well it works.
IOGEAR Powerline Build Quality and Remote
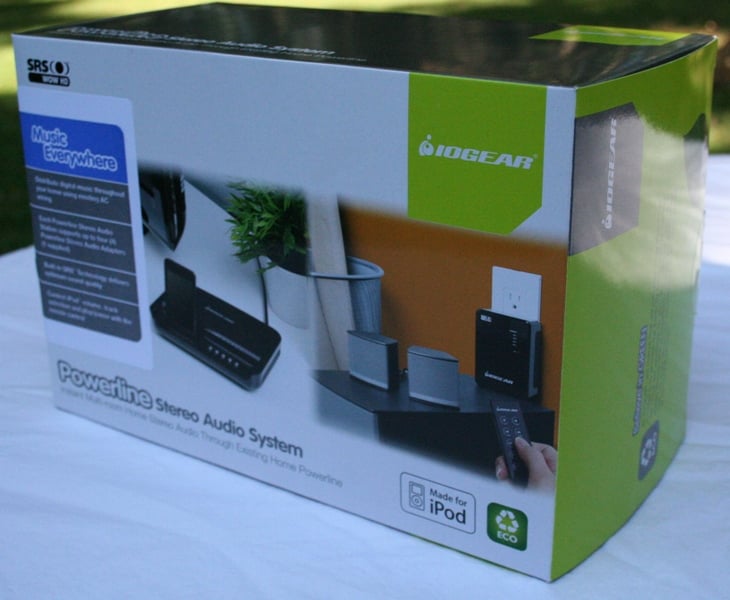
 The
packaging of the IOGEAR Powerline Stereo Audio System is impeccable with a
single transmitter on top, a receiver underneath, and a hole full of wires,
cables, a remote, and a "wall-wart" receiver. The wires are all of
the throwaway kind red and white RCAs. The power cord is detachable (a good
thing) and the remote is small and thin. The transmitter looks like an alarm
clock without a digital display and in its place an iPod dock. IOGEAR provides
adapters so that nearly every flavor of iPod and MP3 player will work. There
are control buttons on the front for the iPod and to select the input.
The
packaging of the IOGEAR Powerline Stereo Audio System is impeccable with a
single transmitter on top, a receiver underneath, and a hole full of wires,
cables, a remote, and a "wall-wart" receiver. The wires are all of
the throwaway kind red and white RCAs. The power cord is detachable (a good
thing) and the remote is small and thin. The transmitter looks like an alarm
clock without a digital display and in its place an iPod dock. IOGEAR provides
adapters so that nearly every flavor of iPod and MP3 player will work. There
are control buttons on the front for the iPod and to select the input.
 There are three ways to get
information into the transmitter - iPod direct, 3.5mm cable (from a computer or
headphone output), and red and white RCA. Each input is labeled. The
transmitter can send to up to four different receivers. The kit comes with only
one receiver but you can purchase more separately. This is a bit misleading
implying that you can stream to four zones. In actuality, you get four channels
so if you want to send the same audio to 15 different receivers at the same
time, you just have to set them to the same channel. If you want to have audio only
in a specific room (and not to the other receivers), you can use a specific
channel for that. At that point, you can't use the transmitter to send to any
other channel.
There are three ways to get
information into the transmitter - iPod direct, 3.5mm cable (from a computer or
headphone output), and red and white RCA. Each input is labeled. The
transmitter can send to up to four different receivers. The kit comes with only
one receiver but you can purchase more separately. This is a bit misleading
implying that you can stream to four zones. In actuality, you get four channels
so if you want to send the same audio to 15 different receivers at the same
time, you just have to set them to the same channel. If you want to have audio only
in a specific room (and not to the other receivers), you can use a specific
channel for that. At that point, you can't use the transmitter to send to any
other channel.
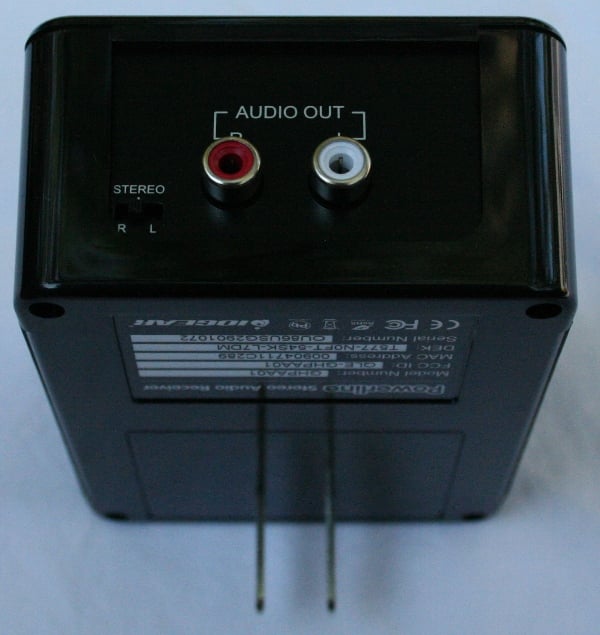 The
receivers are fairly large wall-warts that have red and white RCA outputs on the
bottom. Don't fear, if you need to connect up a 3.5mm equipped amp (like you'd
find in computer speakers), IOGEAR provides a cable for that. There is a
Left/Stereo/Right switch on the bottom as well. This will come in handy if you
are using the IOGEAR Powerline Stereo Audio System to pipe audio to the back of
your room in a 5/7.1 setup. The front sports a readout to tell you if it is
connected and to which input. All of the components sport a glossy black finish
that is both attractive and well executed. The wall-warts are large and
ungainly but they fit very snuggly in the wall which should help any of you
insisting on using heavier cables from pulling it from the wall.
The
receivers are fairly large wall-warts that have red and white RCA outputs on the
bottom. Don't fear, if you need to connect up a 3.5mm equipped amp (like you'd
find in computer speakers), IOGEAR provides a cable for that. There is a
Left/Stereo/Right switch on the bottom as well. This will come in handy if you
are using the IOGEAR Powerline Stereo Audio System to pipe audio to the back of
your room in a 5/7.1 setup. The front sports a readout to tell you if it is
connected and to which input. All of the components sport a glossy black finish
that is both attractive and well executed. The wall-warts are large and
ungainly but they fit very snuggly in the wall which should help any of you
insisting on using heavier cables from pulling it from the wall.
Remote
 The remote is small, thin, and easily lost. It has all the required
buttons including controls for the iPod and volume and a "switching"
button for each channel (cycles through the channels). There is also a SRS
button to engage the SRS WOW HD. You'll DEFINITELY want to keep this remote
safe and out of the bottom of the couch. Considering that nearly every remote
these days has some universal properties, any room you'd need to control the
volume or iPod functions, these should be programmed into a one of the remotes
already in the room. The dedicated remote for the Powerline Stereo Audio System
should be tucked away safe as once it is lost, you'll probably need some sort
of specially trained dog to find it. Other than it's size, it has all the
requisite buttons and was responsive enough.
The remote is small, thin, and easily lost. It has all the required
buttons including controls for the iPod and volume and a "switching"
button for each channel (cycles through the channels). There is also a SRS
button to engage the SRS WOW HD. You'll DEFINITELY want to keep this remote
safe and out of the bottom of the couch. Considering that nearly every remote
these days has some universal properties, any room you'd need to control the
volume or iPod functions, these should be programmed into a one of the remotes
already in the room. The dedicated remote for the Powerline Stereo Audio System
should be tucked away safe as once it is lost, you'll probably need some sort
of specially trained dog to find it. Other than it's size, it has all the
requisite buttons and was responsive enough.
Set-Up
Setting up the IOGEAR Stereo Audio System is just about as easy as you'd expect. All you really need to do is to plug everything in and select the right channel for each of your receivers. You'll want to remember that this is not an amplified solution. You are either going to have to connect to powered monitors or use an external amp. Also, make sure the amp/speakers are off before you connect the receiver or you will get an ear splitting surprise. One of the nice things is the IR receiver is NOT on the transmitter but on the wall-wart receivers so you can control each of your rooms individually. This also makes integration into a universal remote system a snap. There is a dedicated 3.5mm jack for discrete IR input on the transmitter but it is not in use (according to the very, VERY minimal manual). There is volume control if you want it though for a surround solution, this won't be needed. You can control the iPod through the IR on the receiver with the remote. The transmitter does not have an IR receiver so you'll have to control that manually or through the dedicated 3.5mm jack connected via a universal remote IR blaster. If something goes horribly wrong and you lose your remote, the wall-warts do have a channel cycling button but it is very small and you'll probably have to press it with a pen or a sharp fingernail (which keeps the kids off it so that's a pretty good feature).
To simplify this whole process, let me break it down for you. The remote controls the channel that that receiver is on only. The buttons on the transmitter control the source and channel on the transmitter only. You can't send more than one source out to different channels. So, the remote is only really good for controlling the iPod, volume and turning the receiver to the right channel, wrong channel, or no channel (which is the same as the wrong channel). There is an IN button on the remote but I think it stands for "Incase you need a button to push" since it doesn't do anything. It seems like it should change the input on the transmitter (which would be nice) but it doesn't. Instead, every time you want to switch inputs, you'll need to go to the transmitter and do it manually.
IOGEAR Powerline Measurements, Listening, and Conclusion
My first thought was that I'd measure the differences between a test signal sent direction to an amp and one sent over the IOGEAR Stereo Audio System. Using the Sencore SP395A FFT Audio Analyzer and a Seymour AV 500x1 Ice Amp, sent a pink test tone to a Salk SongTower QWT speaker. I level matched the each of the inputs and settings. I wasn't so worried about mic position so don't look at it to see the true measurement of the speaker response (if you want to see that, look at the review) but to see differences. I used Impact Acoustics cabling (where applicable).

What I hoped to see was two lines overlapping perfectly (I'd have been happen with nearly perfectly). That’s exactly what I got with the pink and yellow line. I'm assuming that the orange line the SRS WOW HD engaged and it shows deviation pretty much everywhere but especially in the upper and lower regions. The SRS WOW HD was (as far as I can tell) engaged out of the box. There is no LED on any of the devices to let you know it is on or off. This presents a serious problem as the differences between the on and off audio quality is quite startling (as you can see). Not the least of which is the SRS on (I think) decreases the overall volume by about 2-3dB (I had to bump up the volume from the SRS off position). If you are using the IOGEAR Powerline Stereo Audio System to send audio to the back of the room, this could make a pretty huge difference. From SRS Labs website:
To address this challenge, SRS has developed SRS WOW HD, an advanced version of its SRS WOW audio enhancement technology. It is the industry's most comprehensive solution from a single provider. SRS WOW HD adds new user-selectable high frequency contouring as well as definition enhancement to SRS Labs' WOW technology, further improving the perception of clarity and acoustic space.
Apparently, IOGEAR has taken the "user-selectable" out of it and selected it for you. Remember, SRS is only really designed to make radio and MP3s sound better and probably shouldn't be used with higher fidelity sources. What is important from the measurements was that the IOGEAR Powerline Stereo Audio System was able to pass the signal cleanly.
Listening Evaluation
 Next, I connected up
the IOGEAR to an Oppo
DV-970HD and the receiver to a set of Swan S200A
speakers. These speakers have RCA inputs on the back and an internal amp. This
allowed me to connect the Oppo directly to them with the same cables that the
IOGEAR receiver was using. The fidelity of the speakers is very good for a
computer monitor to the point that I would have no real problem recommending
them for mixing (I use them weekly on the AV
Rant podcast). First, I connected the IOGEAR transmitter up in another room
and then in the same room to make sure that the fidelity was unchanged. It was,
so I kept the transmitter in the same room just for easy of switching the Oppo
back and forth easily and quickly. I level matched the two using my SPL meter
and got to listening.
Next, I connected up
the IOGEAR to an Oppo
DV-970HD and the receiver to a set of Swan S200A
speakers. These speakers have RCA inputs on the back and an internal amp. This
allowed me to connect the Oppo directly to them with the same cables that the
IOGEAR receiver was using. The fidelity of the speakers is very good for a
computer monitor to the point that I would have no real problem recommending
them for mixing (I use them weekly on the AV
Rant podcast). First, I connected the IOGEAR transmitter up in another room
and then in the same room to make sure that the fidelity was unchanged. It was,
so I kept the transmitter in the same room just for easy of switching the Oppo
back and forth easily and quickly. I level matched the two using my SPL meter
and got to listening.
Comparing the IOGEAR to direct connection revealed absolutely no audible differences. Now, switching time wasn't instantaneous but it was as fast as I could make it. Given the measurements above, I really wouldn't expect to hear a difference. Next, I listened to a number of albums with the SRS engaged but really, it only took a few seconds to know that something was askew. The Oppo through the IOGEAR was grainy and distorted, especially through the midrange. It sounded like bad radio reception. The Oppo connected directly, however, sounded crisp and clear. The difference was night and day. Whatever the SRS was doing is obviously not making good music sound better. With Internet radio or a bunch of squashed MP3s, it might make a difference for the good but it will take experimentation on your part on whether or not you like it. Personally, even with Internet radio, I didn't. It made the soundstage a bit wider but overall the increased brightness and the grain in the midrange made the tradeoff too costly for me.
Recommendations
It isn't hard to pick up on some of the things I'd like to see in future iterations of this product. The transmitter needs either to enable that IR input on the back or include an IR receiver on the front. There needs to be a way of knowing if the SRS is engaged or not. I'd love to see the ability to stream different inputs to different channels. I'd also like to have a way to disable the volume control so that once you set your levels, they won't be changed by a conflicting IR code or a curious child. Most importantly, however, is a BETTER MANUAL. This is a pretty straightforward piece of gear, you'd think, but there were some pretty important omissions:
- Nearly no mention of the SRS or that it will seriously affect the sound
- No mention to keep your speakers/amp powered off while connecting everything
- A list of IR codes to use when programming a universal remote
My last suggestion is to have discrete codes for each source and input. As I mentioned there was no list of codes in the manual so I contacted IOGEAR's online "chat" support. After explaining in great detail just what IR is (you know you are starting off right when the tech support doesn't know what IR is) and taking them through why I might want discrete codes, they informed me that there were none. My best guess is that they don't so I tend to believe the tech support even though I got the impression that they were just guessing.
Conclusion
![]() When I decided to take on the review of
the Powerline Stereo Audio System, I was hoping that I would have a new
recommendation to make on Audioholics and AV
Rant for multi-room audio or to get sound to the back of your room in a
difficult installation. I do, to an extent. With the SRS off, the IOGEAR definitely
performed exactly the way I'd hoped. The big problem is the price. At nearly
$450 with $220 for additional receivers, it may well be cheaper to get someone
to come to your home and wire it. Now, if you are looking for distributed audio
through the home, you maybe can make more of a case. If IOGEAR had included an additional
receiver or two, the entry price might be more palatable. In the end, what is
important is the performance and the IOGEAR delivers. For the ones that need
and for which the Powerline Stereo Audio System is a cost effective solution,
that's all that matters.
When I decided to take on the review of
the Powerline Stereo Audio System, I was hoping that I would have a new
recommendation to make on Audioholics and AV
Rant for multi-room audio or to get sound to the back of your room in a
difficult installation. I do, to an extent. With the SRS off, the IOGEAR definitely
performed exactly the way I'd hoped. The big problem is the price. At nearly
$450 with $220 for additional receivers, it may well be cheaper to get someone
to come to your home and wire it. Now, if you are looking for distributed audio
through the home, you maybe can make more of a case. If IOGEAR had included an additional
receiver or two, the entry price might be more palatable. In the end, what is
important is the performance and the IOGEAR delivers. For the ones that need
and for which the Powerline Stereo Audio System is a cost effective solution,
that's all that matters.
IOGEAR Powerline Stereo Audio System
$444.95 (additional adapters 219.95)
IOGEAR, Inc.
23 Hubble
Irvine, CA
92618
Phone: 949-453-8782
About IOGEAR
IOGEAR, Inc., headquartered in Irvine, CA, is a leading connectivity
manufacturer that provides complete KVM (Keyboard, Video, Mouse), Connectivity,
Networking, Digital Audio/Video, Mobility, and Desktop solutions. The company
targets home users, small-to-medium sized businesses, and mobile professionals.
IOGEAR consistently provides products that incorporate innovative technology,
delivering outstanding functionality and capability. As one of the only true
manufacturers in the industry, IOGEAR offers high quality products backed by
the service and support that consumers demand. The company distributes products
throughout North and South America, Europe,
Asia-Pacific. For further information, please visit IOGEAR’s Web site at www.iogear.com.
The Score Card
The scoring below is based on each piece of equipment doing the duty it is designed for. The numbers are weighed heavily with respect to the individual cost of each unit, thus giving a rating roughly equal to:
Performance × Price Factor/Value = Rating
Audioholics.com note: The ratings indicated below are based on subjective listening and objective testing of the product in question. The rating scale is based on performance/value ratio. If you notice better performing products in future reviews that have lower numbers in certain areas, be aware that the value factor is most likely the culprit. Other Audioholics reviewers may rate products solely based on performance, and each reviewer has his/her own system for ratings.
Audioholics Rating Scale
 — Excellent
- — Very Good
- — Good
- — Fair
- — Poor
| Metric | Rating |
|---|---|
| Audio Performance | |
| Build Quality | |
| Ergonomics & Usability | |
| Ease of Setup/Programming/Integration | |
| Features | |
| Remote Control | |
| Performance | |
| Value |
As Associate Editor at Audioholics, Tom promises to the best of his ability to give each review the same amount of attention, consideration, and thoughtfulness as possible and keep his writings free from undue bias and preconceptions. Any indication, either internally or from another, that bias has entered into his review will be immediately investigated. Substantiation of mistakes or bias will be immediately corrected regardless of personal stake, feelings, or ego.
View full profile