
Impact Acoustics RapidRun Interconnect Review
Impact Acoustics RapidRun Cabling
- Product Name: RapidRun
- Manufacturer: Impact Acoustics
- Performance Rating:


- Value Rating:
- Review Date: February 14, 2006 18:00
- MSRP: $ 115.97
- 50-foot RapidRun HT cable
- 50-foot RapidRun PC/Video cable
- Component/SPDIF coax Termination Module
- Component/SPDIF coax Breakout cable
- S-VHS/Analog Termination Module
- S-VHS/Analog Breakout cable
- HD-15VGA Termination Module
- HD-15VGA Breakout cable
Pros
- Very high performance to cost ratio
- Easy to install
- Flexible near future proof design
- Very good build quality
- Takes guess work out of pre-wire
Cons
- Termination module wont fit in some low-voltage boxes
Impact Acoustics RapidRun Introduction
Pre-wiring your home for multi-media can be one of the most difficult challenges you will face. Heck it’s even tough for professional installers to get it right; and many times we don’t. Think for a moment about the following example. You want to be able to view DVD and satellite in your bedroom. You instruct your installer to pre-wire the room. He runs RG-6 to your room and up goes the sheetrock.
Now, you’re all comfy in your room but decide you want HDTV or to be able to use the system downstairs to view content. Uh oh, Houston, we have a problem! There are no component video cables or digital connections in the bedroom. What if you want dual displays in the bedroom; one for you and one for your significant other?
We see this situation all the time! In the past, I’ve always instructed the homeowner to put un-terminated cables in the wall just in case they need it later. Even in the best of circumstances, we have run into shortfalls because of changes or upgrades in the system’s ability.
Impact Acoustics recently introduced an ingenious system that solves many of the problems associated with pre-wire. They take most of the guesswork out of the process and create a near foolproof way to pre-wire your home for multi-media called RapidRun.
Impact Acoustics RapidRun Technology and Build Quality
Your Job, Your Choice of Runners
The system consists of two different breakaway main wire runners: PC/Video or Home Theater. Basically, the main wire runner is installed in the framework of your home. Then later you choose the termination module and break out cable that you want to screw onto the wire runner.
The choice of termination modules and break out cable configurations are vast. However, you must make the correct runner selection, when doing the initial pre-wire installation. The HT runner consists of five mini coax cables. Popular terminations include but are not limited to: Component and S-Video simultaneously, Component and SPDIF, S-Video and Analog, Composite and Analog or SPDIF and Component or a multitude of other variations.
The PC
Runner cable will allow UXGA graphics. Popular terminations include YUV, YCbCr,
YPbPr or YIQ, S-video or composite HD-15 or HD-15 on one end and 5 BNC on the
other. This cable would be the perfect solution for PC workstations or computer-based multimedia entertainment systems.
Many other termination variations are possible with the PC runner or the HT runner.
The PC/Video Runner
consists of three mini coax with impedance values of 75ohms. The mini coax
cables use 28 AWG stranded copper center conductor with a foil and minimum 85%
copper braid shield. There are also three 24AWG copper twisted pairs.
Build Quality
The Runner cables used for evaluation are 50 feet in length. The build quality of the cable is impressive. The HT runner consists of five mini coax cables with an impedance value of 75 ohms. The coax cables are a 28AWG stranded copper center conductor with foil and minimum 85% copper braided shield. The 100% Aluminum Mylar foil and 85% copper braided shield provides the cable with outstanding RF rejection capabilities beyond the typical inexpensive cabling you may find installed by builders looking to spend as little as possible.
For the purpose of this review we will limit the evaluation to component video and SPDIF simultaneously, S-video, stereo analog termination and a HD-15VGA termination.
The connectors have a screw on cap with a pull ring that has pull strength of 15lbs. We can attest to the strength of the pull ring because we broke our pull chain before the ring gave out.
The Runner cable can be installed in new construction or retro installations. We built a mock up wall and added an active 115-volt outlet for the evaluation. The runner cable will fit through a 3/4-inch paddle bit hole as shown below. We normally recommend routing all low voltage audio/video cables away from high voltage Romex runs to prevent RF ingress. However, we realize that many do not have this option. So, we decided to see what would happen if we installed the cables directly beside an active 115 volt Romex run and through the same blocking hole.

We were very surprised that we were unable to detect any anomaly or signal degradation in the image when we installed the cable this way. This indicates that the cable has significant shielding properties. While we don’t recommend this type of installation, we feel you would be relatively safe installing the cable in close proximity to a high voltage Romex run.
A more
conventional way to route the runner in the same framing bay would be to use
Romex staples and keep the runner on the opposite side of the bay for the entire
run. This will yield safe 14-inches of separation between the 115 volt Romex run
and the cable runner.
The best way to route the runner would be to use conduit. We realize that this is only practical in new construction homes. Both the HT runner and the PC/Video runner will fit and pull easily through ¾-inch flex conduit with 90 degree sweep bends.
One thing we did note during the installation process is that if you use open back low voltage boxes you must choose them carefully. We had problems trying to fit the termination module into the box because the pig tale exits the module from the bottom. We also found that the mounting screw holes were slightly misaligned from the box making it difficult to secure the termination module to the low voltage box.
Impact Acoustics RapidRun Evaluation and Conclusion
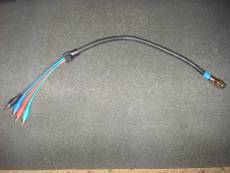
We chose the component video/SPDIF coax module, HT runner cable, and Component/SPDIF coax break out cable for the first evaluation.
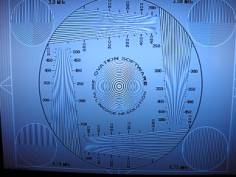
 We used a modified DVD player with 480i, 480p, 1080i, and 720p video up
conversion and SPDIF coax output. We also used the Panasonic
PT-44LCX65-42-inch 1280x720 LCD HDTV. We began testing the capabilities
of the 50-foot HT runner, component termination module, and component
RCA break out cable.
We used a modified DVD player with 480i, 480p, 1080i, and 720p video up
conversion and SPDIF coax output. We also used the Panasonic
PT-44LCX65-42-inch 1280x720 LCD HDTV. We began testing the capabilities
of the 50-foot HT runner, component termination module, and component
RCA break out cable.
The cable transmitted the 480i, 480p, and 1080i video and SPDIF audio bit stream perfectly with no signal degradation or loss of resolution. The 6.75Mhz burst pattern was easily discernable. There was no sign of ringing or fixed pattern noise with any of these resolutions. A slight amount of softening of the 6.75Mhz burst pattern line structure at 720p was noticed. This may be attributed to the 28 AWG wire used in the construction of the cable and the long 50-foot length. Check out our RapidRun FAQ for more details. The audio bit stream for both Dolby Digital and DTS was flawless with no dropouts or lag at all.
One thing we noted was the quality of the RCA connectors on the break out cable. The connectors are functional but we would like to have seen better RCA connectors than the standard nickel plate thin wall type used here. But considering the price of the cable system, this is something that we can overlook.
Editorial Note on RCA Connector Issue:
Based on our feedback with Impact Acoustics on this review, the RCA connector issue has been addressed back in summer of 2007 and this is no longer a problem.
The bottom line is that the HT/Runner Cable, termination module
and the component/SPDIFcoax break out cable is easy to install.
It was built to high quality standards, very well shielded and
preformed near flawlessly in every test we threw at it.
Next, we decided to evaluate the S-video/Stereo analog termination module, HT Runner, PC/Video Runner and S-video/Stereo Analog break out cable. The S-Video/Stereo analog termination module will work with either the HT runner or PC cable. Consequently, we decided to test them both. Generally, we have found that very long runs of S-Video can create serious problems with excessive ringing and noise.
This is by and large due to small gauge conductor and poor shielding used in most mass marketed s-video cables. This type of construction creates high resistance and signal loss for the very long run.
Testing the Rapid run cable surprised us; we found no amount of
ringing or excessive noise in the image. We compared the 50 ft RapidRun
cable to our 6 ft Impact Acoustics S-video cable and found no
difference in image quality at all.
The analog signal was equally impressive with no signal dropouts or problems of any kind. Both the HT runner and PC/Video runner cables were outstanding in their ability to transmit pristine signal from the source to the monitor and amplifier.
This would be the perfect solution for guest bedrooms, game rooms, or rooms where you want low-resolution display devices and analog sound.
Finishing the evaluation, we decided to test the PC/Video runner, HD-15 VGA termination
module, and VGA break out cable.
We decided to perform the evaluation with two types of monitors: a Samsung 17 inch Sync Master CRT and the Panasonic PT-44LCX65. We tested the cable at 800x600, 1024x768, and 1280x720 @60Hz refresh rates. We used a Radion 8500 and NVIDIA 6800 Graphics cards for the evaluation. Both monitors and both graphics cards sync'd perfectly when using the 50ft PC/Video Runner, VGA termination module and VGA breakout cable. Text was razor sharp and there were absolutely no anomalies in the static images or video when using the DVD drive.
We compared the RapidRun cable to a high quality 6ft VGA cable and we could find no discernable difference in the resolutions we tested. This cable system would be the perfect choice for the individual wanting to install PC work stations or Multi-media PC's in their home.
It would also be a great solution for a laptop center. All an individual would need
to do is connect a VGA cable between the VGA modules, the laptop and view their work on a larger pre
installed flat screen. The VGA modules'clean appearance would also make it perfect for placing
beside a bed for those of us who like to work or surf the net in a relaxed position.
Another use for the RapidRun PC/Video or HT runner would be to use the runner cable for your front projection component video input and use the termination module with five RCA inputs. This would allow the installer to use the extra two inputs for triggers, I/R repeaters or pickup feeds.
Installing the termination module in close proximity to the ceiling mounted projector and using a Decora wall plate will make a nice clean installation.
Conclusion
Concluding the review of the RapidRun cable system, we must say
that this is a break through (pun intended) product. This is the
perfect cable system for the DIY homeowner or custom installer. The
ease of installation and ability to change terminations at both ends
make it flexible and near fool proof. The RapidRun Cable systems'
low cost, expansive selection of termination modules, and break out
cables make it a no brainer and obvious choice for our
2005
Product of the Year award
for the most innovative cable solution.
Planning, installing and terminating a home for multi-media can be a real headache even for the professional. The RapidRun cable system is the perfect medicine for that headache. Highly Recommended!
Rapid Run Multi Use Versatile Interconnect
System
1501 Webster Street
Dayton, OH 45404
http:/www.impactacoustics.com
The Score Card
The scoring below is based on each piece of equipment doing the duty it is designed for. The numbers are weighed heavily with respect to the individual cost of each unit, thus giving a rating roughly equal to:
Performance × Price Factor/Value = Rating
Audioholics.com note: The ratings indicated below are based on subjective listening and objective testing of the product in question. The rating scale is based on performance/value ratio. If you notice better performing products in future reviews that have lower numbers in certain areas, be aware that the value factor is most likely the culprit. Other Audioholics reviewers may rate products solely based on performance, and each reviewer has his/her own system for ratings.
Audioholics Rating Scale
 — Excellent
- — Very Good
- — Good
- — Fair
- — Poor
| Metric | Rating |
|---|---|
| Audio Performance | |
| Video Performance | |
| Build Quality | |
| Ergonomics & Usability | |
| Ease of Setup/Programming/Integration | |
| Features | |
| Performance | |
| Value |