
Impact Acoustics Digital RapidRun Cable Review
- Product Name: RapidRun Digital Modular Cable System
- Manufacturer: Impact Acoustics
- Performance Rating:


- Value Rating:
- Review Date: February 07, 2007 10:15
- MSRP: $ 209.97 complete 25-foot Passive HDMI
-
65-foot RapidRun Digital Runner Cable
-
25-foot RapidRun Digital Runner Cable
-
Active HDMI Wall Plate Module
-
Passive HDMI Wall Plate Module
- Passive HDMI DVI Wall Plate Module
Pros
- Very Clever
- Easy to install
- Flexible near future proof design
- Very good build quality
- Takes guess work out of pre-wire
- Can be field terminated
- Fault free performance even under extreme conditions
- Lifetime product warranty
- Money back guarantee
Cons
- Wall Plate Modules currently only available in white.
- Considering you will need to purchase additional HDMI cables, the system becomes a little pricy at MSRP.
Impact Acoustics Digital RapidRun
Last year when we had the opportunity to install and review the very innovative and impressive Impact Acoustics PC/Video, Home Theater RapidRun cabling system, the cabling system removed much of the guess work from the pre-wiring process and made a difficult task much easier for the DIY home owner or professional A/V installer. The RapidRun cabling system became wildly popular for its ability to instantly instill flexibility into pre-wiring. Custom installers rapidly adopted the system for their client’s pre-wire installs. HDMI and to a lesser extent DVI connections (for video) are now the industry standard for high performance digital audio and video connections. Not one to rest on its laurels, Impact Acoustics has now broadened the RapidRun cabling system line with the introduction of the RapidRun Digital cabling system. When we received word that Impact Acoustics would be introducing the new digital version we were anxious to get the new system for testing and evaluation.
Impact Acoustics Digital RapidRun Description
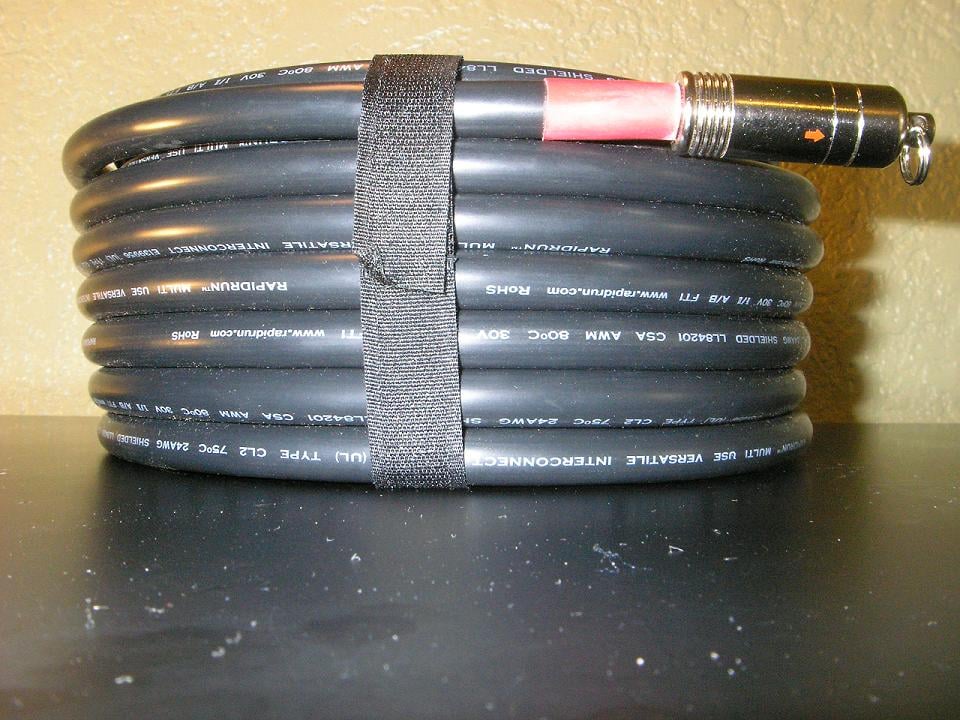 Just like the PC/Video, Home Theater analogue version of RapidRun the new RapidRun Digital is a completely modular cabling system. The main runner cable is a versatile multi-use cable available in lengths of 15, 25, 35, 50, and 65 feet. The Digital Runner is constructed using high quality 24 AWG wire and is heavily shielded with Mylar foil and copper braid. The cable is CL-2 rated for in-wall use and each end of the cable has a screw on protective cap designed for tough pulls. The cap is rated to 15 pounds of pulling tension. When the 15 pound rating is exceeded the split-ring will open up to prevent the cable from being damaged. The connectors have an arrow indicator to insure proper connection alignment and a bright red band is used to identify the cable to the corresponding termination. This guarantees you won’t use the wrong termination on the Runner Cable. We found the overall quality of the cable to be excellent. The Runner Cable is very flexible, termination points appear to be very good, and the connectors are of very high quality.
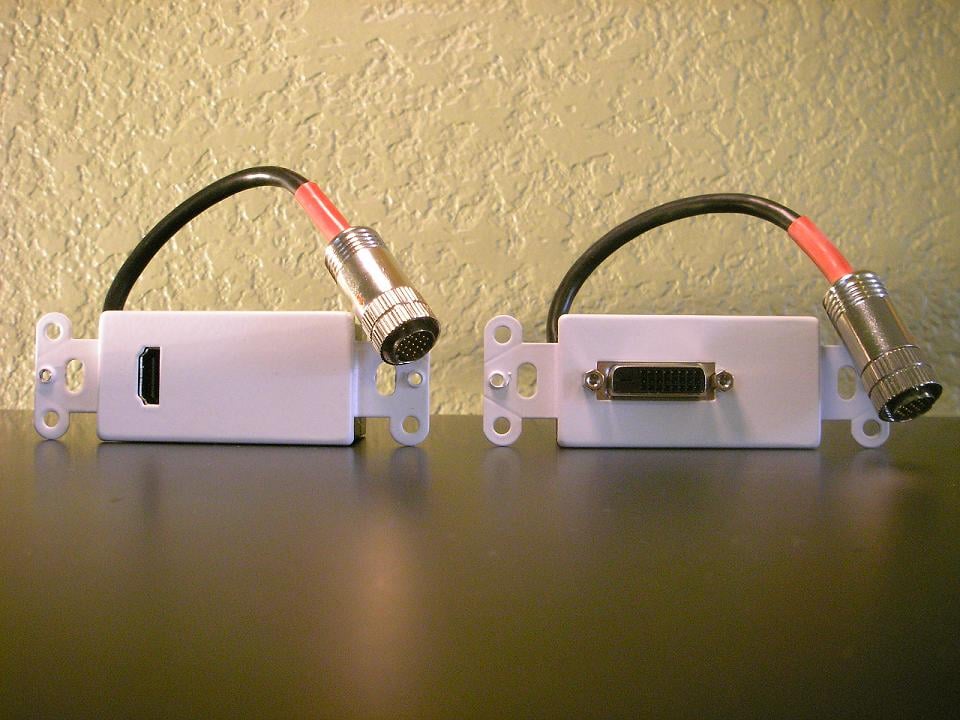
After the RapidRun Runner Cable is installed it can be terminated in many different configurations. For lengths up to 35ft, passive HDMI and passive DVI Wall Plate Modules can be used. The cable can also be terminated using a HDMI/DVI Flying Lead or any combination of the two. According to Impact Acoustics, active Flying Leads should be available by summer of 2007 at around the same MSRP of the active wall plates. The HDMI and DVI Break-Away Flying Leads are available in various lengths between 1.5 and 10 feet. If you are a professional A/V installer, the RapidRun Digital’s unique design gives you the ability to terminate HDMI and DVI connections at the job site. Now digital cabling can evolve as your client’s system changes. I don’t know about you, but as a custom A/V installer I find that just plain “cool”. Needless to say if your client needs you to change the system configuration and it takes you less than five minutes to accomplish, it will make you look like one very smart installer.


For longer lengths between 35 and 65 feet, Impact Acoustics offers an active version of their HDMI Wall Plate Module. The Active HDMI Wall Plate Module is installed at the source end of the cable run and has an integrated amplifier and extender which will correct attenuation and impedance for the longer runs. The really ingenious and cleverly engineered part of the Active HDMI Wall Plate Module is freedom from being tethered to an external power supply! Yep, you read that correctly. All HDMI based sources like DVD players and HDMI switching A/V receivers have a 5-volt buss built into their HDMI outputs. The Active HDMI Wall Plate Module uses this power to amplify the signal. Only one Active HDMI Wall Plate Module is necessary for cable runs longer than 35-feet. The Passive HDMI Wall Plate Modules, Passive DVI Module or Flying HDMI/DVI Lead’s can be installed at the other end of the Digital Runner Cable.
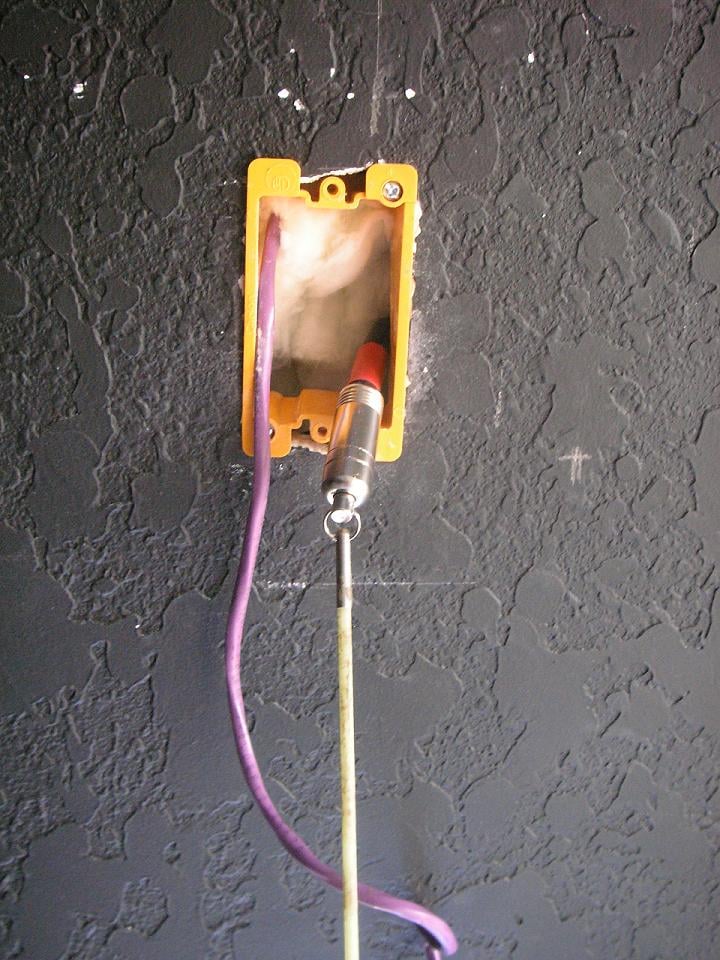
The HDMI/ DVI Passive and Active Wall Plate Modules are constructed fairly well. We found that when the HDMI cables were inserted into the HDMI Wall Plate Module input connector it was held firmly in place. The white metal face plate is paintable, but we would have liked to have seen a color option for off-white and black.
One issue we discovered with the cable termination on our Active HDMI Wall Plate Module review sample is that the connector became partially dislodged from the cable. This may have occurred during the installation into the low voltage box. Care should be taken when installing the lead as to not bend it at the connection point. Impact Acoustics has since then address this issue we have found on our pre production units by adding molded strain relief beneath the metal shell that encompasses the soldered terminals and bonds the jacket to the strain relief.
Impact Acoustics Digital RapidRun Installation
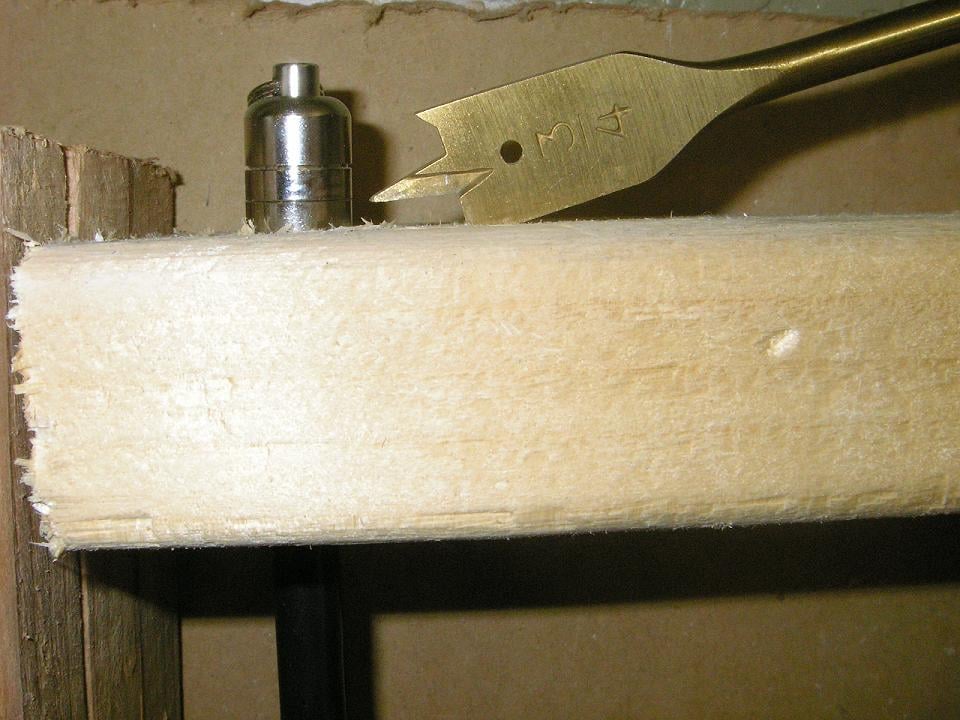
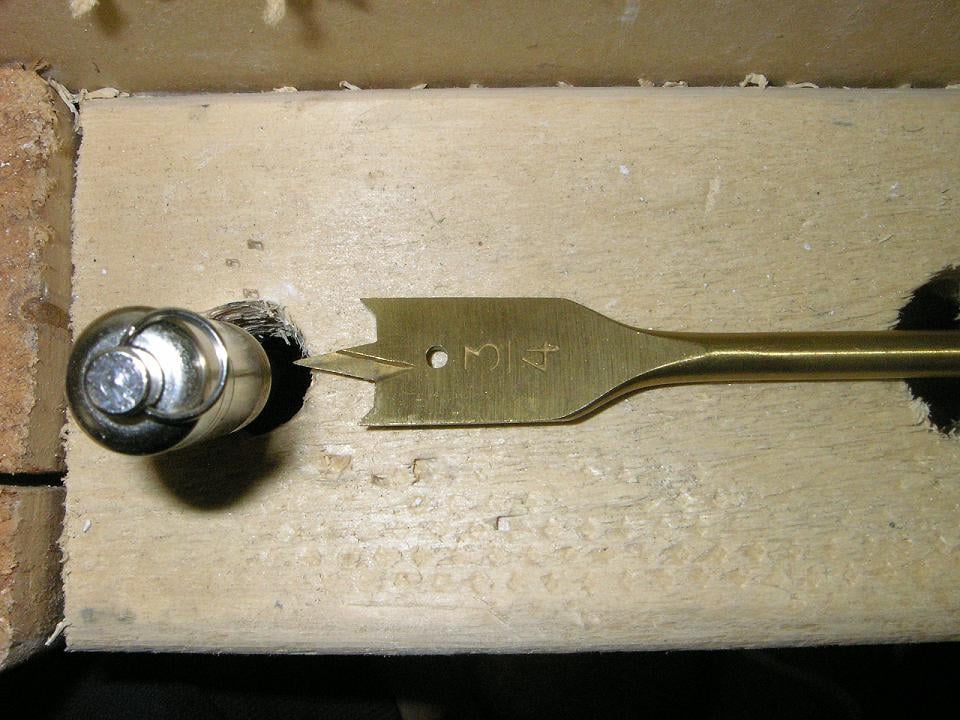
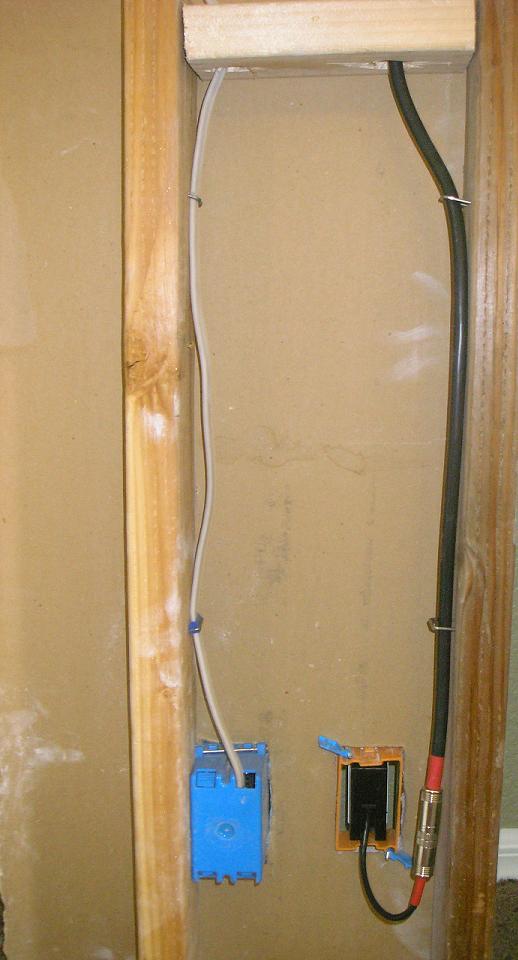
The RapidRun Digital Runner Cable can be installed in new construction and pre-existing homes. We used our mock up wall with an active (hot) 115-volt outlet in the same stud bay for the purpose of illustration and testing. We also pulled the Digital Runner Cable through an interior wall with R-12 insulation for the purpose of installation evaluation. Many times in retro construction installations, the installer has to drill through 2x4 and 2x6 framing top plates to fish wire runs up through attics and crawl spaces. We found that the RapidRun Digital Runner Cable would easily fit through a 3/4-inch wood boring drill bit hole. Impact Acoustics has improved the pull cap installed on the Runner Cable making it bullet shaped. The new shape makes it less prone to snag on insulation or other obstructions hidden in the stud bay. The fact that the cable will fit through a 3/4–inch hole is nice because the installer may need to drill more holes in the same stud bay to accommodate additional wire runs. Drilling too many or too large a hole in one stud bay may violate building codes or weaken structural framing. Check with your building and inspection office.
If you have conduit installed in the stud bay, the RapidRun Digital Runner Cable will pull very easily through 3/4 - inch conduit with sweeps up to 90 degrees. Once the connector is through the conduit, there will be enough room for additional wires inside the conduit.
 Pulling Cables
Pulling cables in mock walls can’t really give us an idea of how well a cable will pull though a loaded wall with insulation and other obstructions behind the sheetrock or wall surface. With this in mind, I decided to pull the wire through a loaded wall from the attic to simulate a flat panel or ceiling mounted projector pre-wire installation. First, drilling a 3/4 -inch hole in the framing top wall plate, I fished my glow rod through the hole down the wall and out of the low voltage box. Then, I connected the glow rod directly to the split ring on the RapidRun Digital bullet cap and pulled the wire through the wall. Even though the Runner cable is relatively thick it pulled through the framing and insulation very easily and exited the low voltage box without so much as a scratch.
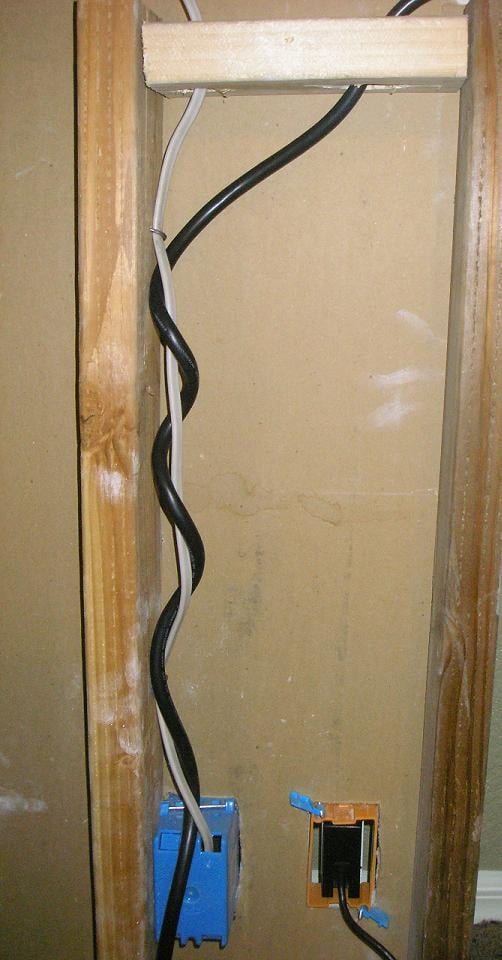
In new construction homes, installers have the ability to route pre-wiring away from electrical Romex and we encourage as much distance between electrical circuits and pre-wire runs as possible. The use of Romex staples is a convenient way to route low voltage pre-wiring on the opposite side of the stud bay. If you decide to use Romex staples to secure wire runs, nail them into the framing so they just hold the cable; the staple should not make contact with the wire and the wire should slide freely in the staple. In retro installations (existing homes), installers often need to route their wire runs in the same stud bays where the electrical circuit is installed and the cable may have to be in close proximity to the electrical circuit wiring. With this scenario in mind, we really wanted to test the limits of the RapidRun Digital Runner cables shielding capabilities. We wrapped the Digital Runner Cable around the “hot” 115-volt Romex and connected a desk top PC to the electrical outlet for evaluation. Obviously it would be impossible to install the cable like this in an enclosed wall and the worst case would be that the cable would run in parallel to the Romex but we wanted to see what would happen anyway.
Ceiling Mounted Projection Systems
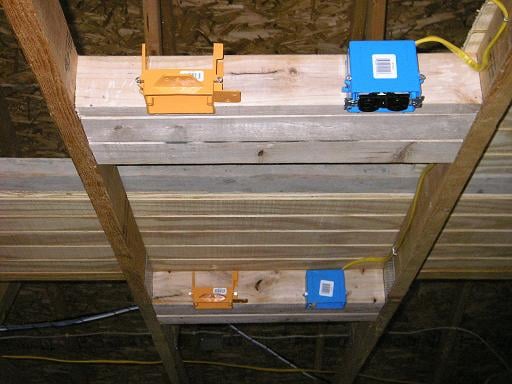
Ceiling mounted front projection
systems require a little more attention and planning because an electrical
circuit and outlet needs to be installed in close proximity to the projector's
ceiling mounted location. Another important step is to box in the ceiling
framing to provide a secure surface in which to anchor the projector’s mount.
As seen in the picture, we have planned for dual projector locations, one short
throw and one long throw. 2x4 studs are cut to the width of the ceiling framing
or roof trusses and then installed horizontally. 115-volt electrical circuits
are installed on one side of the box framing and low voltage boxes are
installed on the other side to separate the wire runs. The RapidRun Digital
Cable System would be perfect for this type of installation because the
installer could pre-wire the runner cable to the low voltage box and wait for
room completion.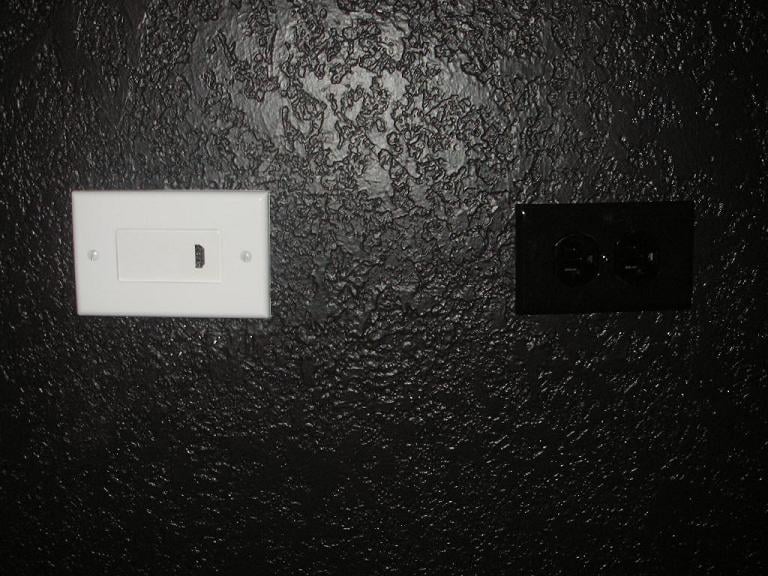
After the room is complete and the projector is ready to be installed, the installer may choose the termination type. The use of the HDMI wall plate with a short HDMI cable would be easy to conceal and look ascetically pleasing. This is where it would have been nice to have options on the wall plate color.
Impact Acoustics Digital RapidRun Evaluation
We used the Active HDMI Wall Plate Module, 65-foot Runner Cable and Passive HDMI Wall Plate Module for our evaluation. We also tested the 25-foot Runner Cable, Passive HDMI Wall Plate Module and Passive DVI Wall Plate Module. As previously stated, all tests were conducted with the RapidRun Digital Runner Cable wrapped several times around a “hot” 115-volt wire circuit with a running desk top PC connected to the outlet. Additionally, we used generic 2-meter HDMI cables for our evaluation. All tests were conducted using the Toshiba HD-A1 HD DVD player set to 720p resolutions. Impact Acoustics states that the RapidRun Digital Cable System will provide dependable fault free transmission of 1080p resolution signals to lengths of 65-feet with the use of the Active Wall Plate Module. In the future when we receive the soon to be released 1080p version of the HQV Bench Mark DVD we will have the ability to test at true 1080p resolutions.
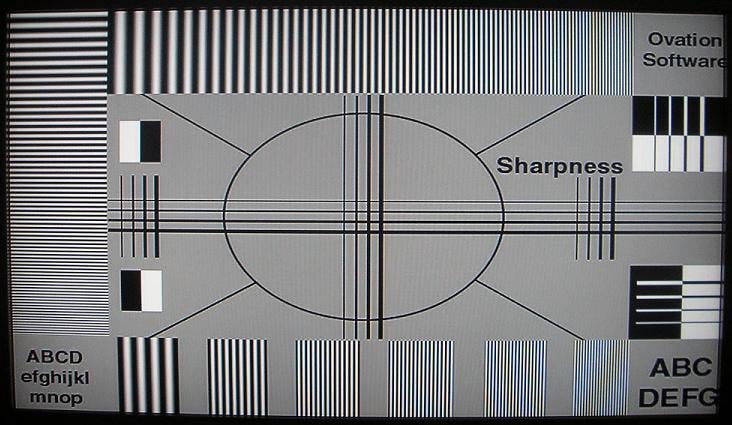
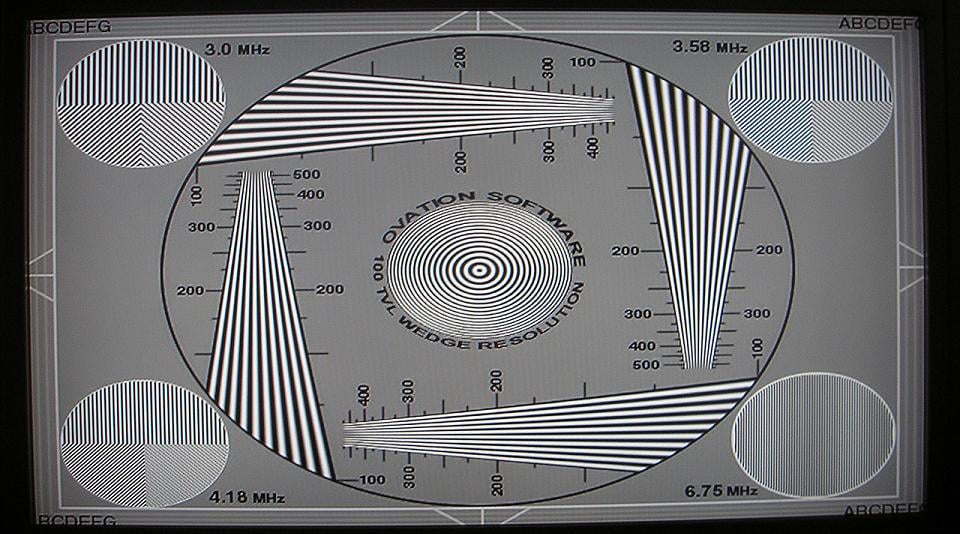
Starting with Avia Guide to Home Theater Chapter seven, we selected the 100TVL resolution test. With the resolution pattern displaying on our Olevia 532H LCD HDTV, we carefully viewed the image. We found that the 65-foot cable run transmitted the up-converted 720p signal flawlessly. The line structure present in the horizontal and vertical resolution wedges were easily discernible and reproduced accurately. The static zone plate looked clean, sharp and well focused. We decided to try different resolutions of 480i, 480p and 1080i. Each resolution synced perfectly between the DVD player and the HDTV. Moving to the Sharpness pattern, we viewed no excessive ringing, flickering, or ghosting on the displayed image. We thought a subjective A/B comparison between the very good 10-meter Impact Acoustics SonicWave HDMI cable and the 65-foot RapidRun Digital cable would be helpful in determining if any softening was occurring in the displayed resolution images. We viewed each image several times disconnecting one cable and swapping it out for the other. We could view no discernible differences between the 10-meter Velocity HDMI cable and the Active RapidRun Digital Cable System. The RapidRun Digital Runner Cable’s 24 – AWG wire size and the Active Wall Module obviously had a significant role in the performance level obtained by the system.
 Next, we wanted to see if the 350
watt power supply in the running desk top PC that we connected to the outlet
could breach the shielding capabilities of the Digital Runner Cable. Remember that
we wrapped the cable around the 115-volt Romex wire run circuit. We were unable
to detect any noise in the static Avia resolution tests but we wanted to
confirm our findings using the HQV Benchmark DVD noise test. We first viewed
the noise test with the active 65-ft RapidRun Cable, and then switched to the
10-meter Velocity HDMI cable. Although the test is subjective, we could view no
appreciable differences in the image quality between the RapidRun Cable that we
wrapped around the Romex and the 10-meter Velocity HDMI cable that was not. Our
findings indicate that the RapidRun Digital HDMI Cable System has stellar
shielding properties. Home theater pre-wire should always be routed correctly
but in a typical installation we think RF and AC noise ingress is unlikely with
the RapidRun Digital Cable System.
Next, we wanted to see if the 350
watt power supply in the running desk top PC that we connected to the outlet
could breach the shielding capabilities of the Digital Runner Cable. Remember that
we wrapped the cable around the 115-volt Romex wire run circuit. We were unable
to detect any noise in the static Avia resolution tests but we wanted to
confirm our findings using the HQV Benchmark DVD noise test. We first viewed
the noise test with the active 65-ft RapidRun Cable, and then switched to the
10-meter Velocity HDMI cable. Although the test is subjective, we could view no
appreciable differences in the image quality between the RapidRun Cable that we
wrapped around the Romex and the 10-meter Velocity HDMI cable that was not. Our
findings indicate that the RapidRun Digital HDMI Cable System has stellar
shielding properties. Home theater pre-wire should always be routed correctly
but in a typical installation we think RF and AC noise ingress is unlikely with
the RapidRun Digital Cable System.
We evaluated the 25-foot RapidRun Digital Runner cable with HDMI and DVI Passive Wall Plate Modules the same way as the 65-foot Active system. Our testing and evaluation produced nearly identical results. The RapidRun Digital Passive system performance was stellar and we could view no appreciable differences between the 25- foot RapidRun System and the 10-meter Velocity HDMI cable in our testing.
Many DIY Home Owners and Custom A/V Installers will route HDMI connections through A/V receivers for audio and video source switching. We wanted to see if the RapidRun Digital Cable System could accurately transmit 720p HDMI signals that were switched through our Yamaha RX-V4600 receiver. The test is significant because it adds two more termination points, one for the source and one for the A/V receivers HDMI monitor output. This configuration also adds two additional HDMI cables into the system. There are two ways the RapidRun system can be configured through the A/V receiver. The most common way is to use the A/V receiver to switch audio and video sources.
HDMI source output-> A/V receiver HDMI source input-> A/V receiver HDMI monitor output-> RapidRun Active Wall Plate Module-> RapidRun Digital Runner Cable-> RapidRun Passive Wall Plate Module-> HDTV display HDMI input.
The second and less likely installation scenario would be to use the RapidRun Digital Cable system to transmit HDMI signal from a source in a remote location to the A/V receiver’s HDMI source input.
HDMI source output-> Active Wall Plate module-> RapidRun Runner Cable-> Passive Wall Plate Module-> A/V receiver HDMI source input-> A/V receiver HDMI monitor output-> HDTV display HDMI input.
We found that in both installation scenarios the RapidRun Cable System provided fault free HDMI video and audio transmission. At no time during the evaluation of either system configuration did we experience syncing issues, noise, delay, or HDMI HDCP errors.
Impact Acoustics Digital RapidRun Conclusion
Last year when we reviewed the RapidRun system we really thought that Impact Acoustics hit a home run. This year with the introduction of the RapidRun Digital Cable System, Impact Acoustics knocks it out of the ball park with the bases loaded. This innovative cable system and its ease of installation will surely be a hit with DIY home owners and home theater hobbyists. The fact that the cable can be installed first then field terminated later in multiple configurations should make the cable system a “no brainer” for smart custom A/V installers. The RapidRun Digital Cable System provides faultless high resolution HDMI signal transmission even under extreme circumstances and in different types of installations. We think its excellent shielding properties, overall great build quality, and clever engineering make it a grand slam.
The Score Card
The scoring below is based on each piece of equipment doing the duty it is designed for. The numbers are weighed heavily with respect to the individual cost of each unit, thus giving a rating roughly equal to:
Performance × Price Factor/Value = Rating
Audioholics.com note: The ratings indicated below are based on subjective listening and objective testing of the product in question. The rating scale is based on performance/value ratio. If you notice better performing products in future reviews that have lower numbers in certain areas, be aware that the value factor is most likely the culprit. Other Audioholics reviewers may rate products solely based on performance, and each reviewer has his/her own system for ratings.
Audioholics Rating Scale
 — Excellent
- — Very Good
- — Good
- — Fair
- — Poor
| Metric | Rating |
|---|---|
| Performance | |
| Versatility | |
| Build Quality | |
| Ease of Setup/Programming/Integration | |
| Features | |
| Performance | |
| Value |