
DVIGear Custom AV Wall Plates Review
DVIGear HDMI wall plate
- Product Name: Custom AV Wall Plates
- Manufacturer: DVIGear
- Performance Rating:


- Value Rating:
- Review Date: August 06, 2006 19:00
- MSRP: $ varies
- 60 available connector types
- 15 different plate colors (Leviton and Lutron color pallets)
- Brass and stainless steel covers available
- $20 handling charge available to reduce delivery time by up to 2 weeks
- $20 rush charge for 48-hour shipping if ordered before 3PM EST (subject to part availability)
Pros
- Compatible with Decora-style covers
- Common configurations in stock
- Custom configurations to order
- 2-5 day delivery on custom plates if ordering 4 or more units
- 48-hour delivery possible with Rush option
- Custom installers dream come true
Cons
- 2-3 week lead time for custom orders
- Not inexpensive for direct-to-consumer applications
- More robust online ordering system or “build application” would be welcome for custom plate orders
DVIGear Custom Wall Plates Introduction
You’ve been there. Move into a new home and any respectable audioholic will quickly find himself looking around and planning cable runs for whatever room is to be commandeered for home theater. Let’s see, kitchen is too small… master bedroom would be obnoxious… kids gotta sleep somewhere… Aha! The oversized formal dining area is perfect! Once you plan the location it’s not long until you begin to mentally position the gear and begin planning for the home-run wiring. Well I’ve been there several times now in the last few years. The difference this time was that I utilized a new resource for cutting back the time and hassle involved in wiring up the new room.
DVIGear is an Atlanta-based company and provides custom configured wall plates for nearly any possible use. While DVIGear specializes in digital and analogue video cables, their wall plates are NOT limited to video only. I tried to trip them up, but they managed to pull through and deliver custom Decora-style wall plates that reduced wall clutter and optimized my cable runs.
DVIGear AV Wall Plates Options & Configurations
 What’s Possible: Options and Configurations

When I say “custom” wall plates, I mean just that. In addition to a myriad of “standard” plates which can be ordered online, DVIGear will custom configure wall plates to meet nearly any potential need. Before getting into custom configuration, check out this partial list of wall plate options:
- HDMI, DVI, or DVI + HDMI
- HDMI/DVI + component (rear ‘F’ style or RCA) or s-video
- HDMI (x1 or x2) + toslink (optical) or coax digital (x1 or x2)
- HDMI + component + s-video
- HDMI (x1 or x2) + component
- DVI or VGA + USB (input or output)
- DVI or VGA + stereo audio (rear ‘F’ style or RCA)
- DVI or VGA + 3.5mm stereo
- DVI or VGA + coax digital
- Component video (rear ‘F’ style or RCA)
- Component video + stereo audio
- Component video + toslink (optical)
Optional configurations can expand on the above and include XLR, telephone jacks, RJ45, D-sub connections, RS-232, volume controls & switches, fiber optic jacks, or even switches lights or indicators. The configuration options are endless – and if you’re like me, you’ll miss some excellent opportunities solely because you didn’t have the imagination (or perhaps budget) to take it one step further.
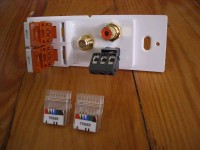
In the picture above, one of my more complex custom orders included a single-gang Decora-style wall plate the contained two RJ45 punch connections, an F connector (for cableTV), a coax digital RCA jack and a 3.5mm TRS input for connecting an RF remote receiver.
Ordering and Delivery
 Grabbing
some standard plates can be accomplished online with no hassles using
DVIGear’s secure Yahoo storefront. Ordering custom wall plates is also
made easy but is best done via phone so you can speak directly with DVIGear and communicate your needs thoroughly. Since you need to describe both the front and back
of the plate connectors, it’s a good idea to sketch a drawing of the
room first and make plenty of notes. I took my time and laid out a plan
for connecting not only my room, but also providing for some convenient
patching as well as outputs to a secondary room.
Grabbing
some standard plates can be accomplished online with no hassles using
DVIGear’s secure Yahoo storefront. Ordering custom wall plates is also
made easy but is best done via phone so you can speak directly with DVIGear and communicate your needs thoroughly. Since you need to describe both the front and back
of the plate connectors, it’s a good idea to sketch a drawing of the
room first and make plenty of notes. I took my time and laid out a plan
for connecting not only my room, but also providing for some convenient
patching as well as outputs to a secondary room.
You don’t have to use a graphics program as I did here, but you’ll want to make triple sure that you’ve covered all of your bases when setting up your wiring layout. This is even more important if you are planning on putting your gear into a remote closet, as I am with this Reference System. Once you’ve got everything well-defined, and you feel as though you can do a good job of intoning the difference between needing rear ‘F’-style connectors on your component video connections as opposed to RCA-style, then you should be ready to pick up the phone. I would have loved a more robust online ordering system for building custom wall plates, but this doesn’t seem to be anything that anyone has at the moment. As it stands now, you may have to spend some time clarifying and double checking your order over the phone to make sure everything is exactly the way you need it for your jobsite or theater room.
It took approximately two and a half weeks for me to receive my custom wall plates from DVIGear. I didn’t pay for rush delivery and this fell within the normal expected delivery time for this type of order. When the packages arrived, each wall plate was individually wrapped in bubble wrap and contained all of the screws and plate covers I needed to fully complete the job (you’ll need to get your own low voltage boxes of course). I had quite the order, with two 3-gang assemblies, two 2-gang assemblies, and a host of single-gang plates. The folks at DVIGear helped take my drawing and parts list and arrange the connections onto the plates in a way that saved space and made sense.
DVIGear AV Wall Plates Installation and Conclusion
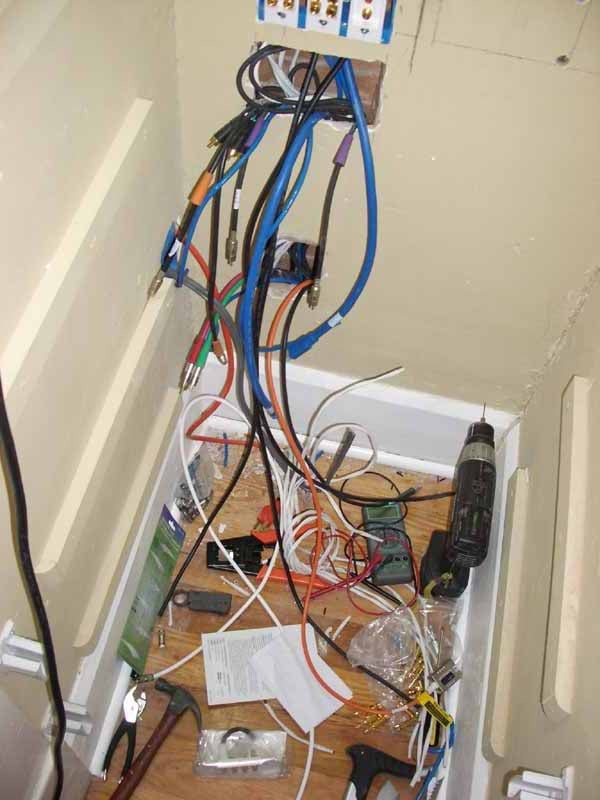 You
would think installation of the plates would be the difficult part. In
my case it was a welcome relief as it meant the end was near for the
clutter that had become the inside of my equipment closet. It was one
big mess, but its days were numbered!
You
would think installation of the plates would be the difficult part. In
my case it was a welcome relief as it meant the end was near for the
clutter that had become the inside of my equipment closet. It was one
big mess, but its days were numbered!
Though I was prepared for difficulties, I was actually quite surprised at the number of innovations and shortcuts the custom wall plates afforded me. For example, I had no idea how I was going to wire up a stereo 3.5mm jack to remotely locate the RF receiver for my Universal Remote Control MX-950. As it turns out, DVIGear soldered on a TRS screw down terminal on the back of the wall plate. All I had to do was use a few pairs from a CAT5e cable, screw them down, and I was all set. Not sure the best way to run component video from plate to plate? Well, you can either do a robust RCA to RCA connection, or simply crimp on some ‘F’-style connections and use well-shielded RG6. Use the flexibility and choices you have to make your life easier.
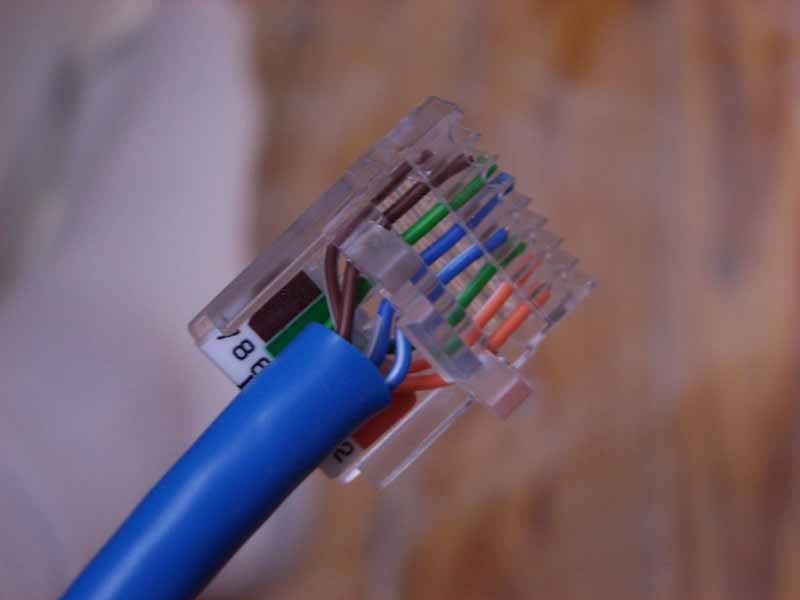
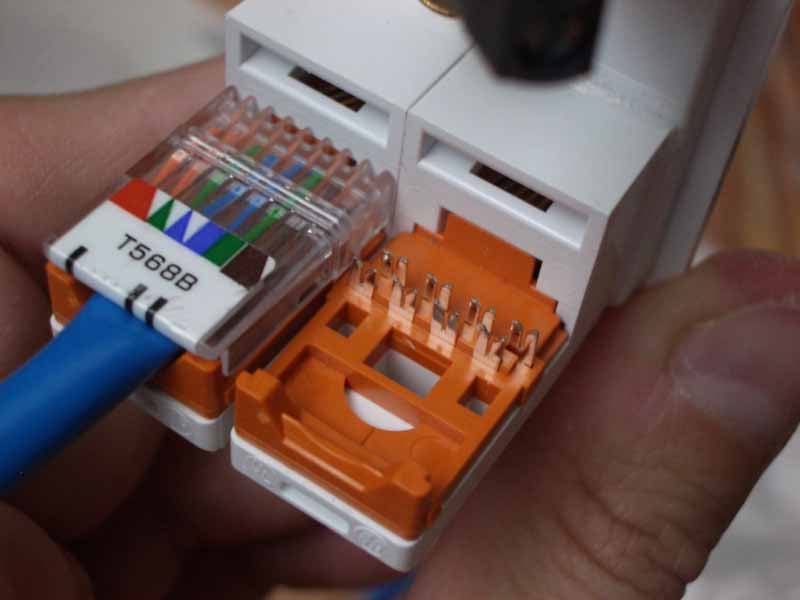
One thing in particular really caught my attention. I have done my share of punch-down RJ45 connectors, but DVIGear has the easiest method I have seen to date. Instead of lining up the individual cables and using a plastic (or other) punch tool to seat each cable in its slot, the DVIGear connector has you thread the cables through the top piece and then push it down onto the assembly. This forces each cable to make contact through its individual shield and you aren’t stuck bending individual wires to fit across each section. In addition, it is far easier to cut the correct length and provide a little strain relief on the Cat5e cable.
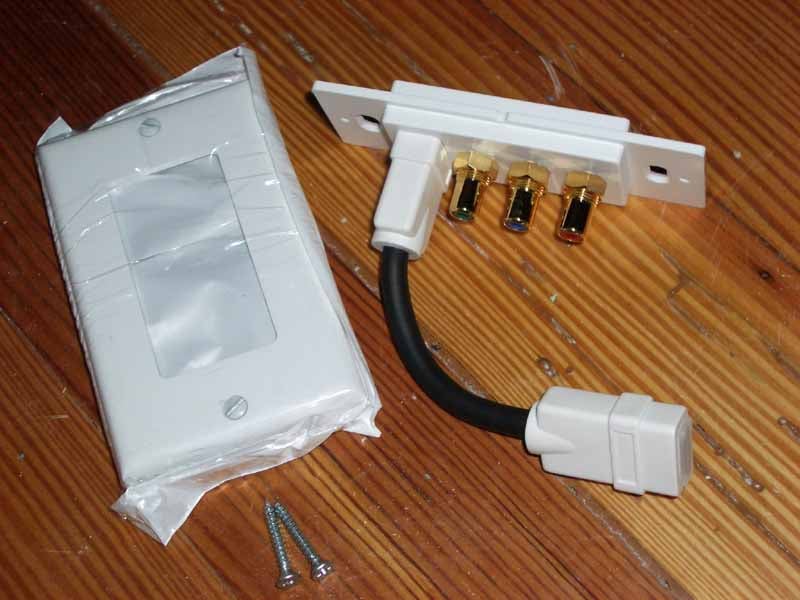
 The
next nifty thing that happened was that I received the standard HDMI +
component wall plates. These feature a short HDMI “pigtail” which can
be oriented in any direction and is just long enough to poke through a
standard J-box. The first wall plate I received had a female end for
facilitating connection with standard male cables. Because of this I’d
need to use the (included) small HDMI jumper cable to facilitate a
connection to the female end of the DVIGear HDMI fiber optic cable.
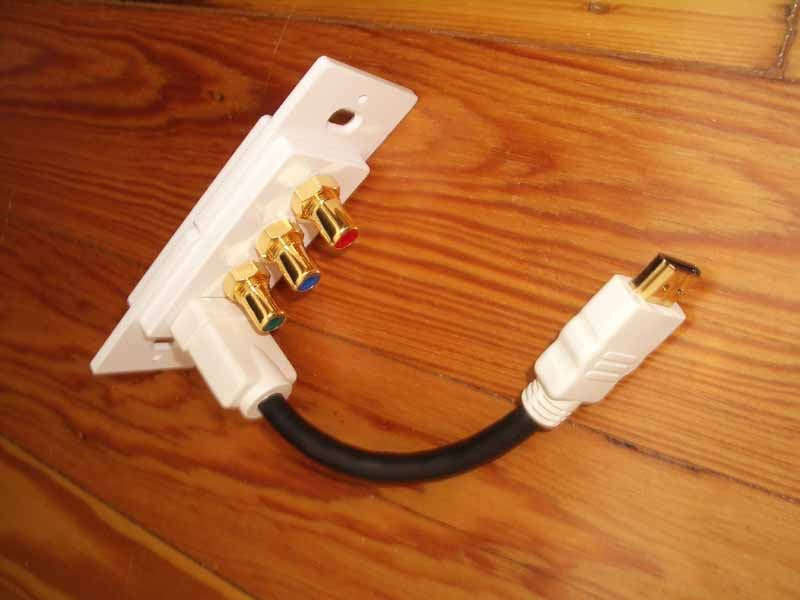
DVIGear’s Steven Barlow
quickly realized that with such a hot product as a fiber optic cable
with integrated electronics, he’d better make an HDMI wall plate that
had a male “pigtail” coming from it. One week later I had the new wall
plate in my hand and I was able to eliminate the small male-to-male
HDMI jumper cable.
The
next nifty thing that happened was that I received the standard HDMI +
component wall plates. These feature a short HDMI “pigtail” which can
be oriented in any direction and is just long enough to poke through a
standard J-box. The first wall plate I received had a female end for
facilitating connection with standard male cables. Because of this I’d
need to use the (included) small HDMI jumper cable to facilitate a
connection to the female end of the DVIGear HDMI fiber optic cable.
DVIGear’s Steven Barlow
quickly realized that with such a hot product as a fiber optic cable
with integrated electronics, he’d better make an HDMI wall plate that
had a male “pigtail” coming from it. One week later I had the new wall
plate in my hand and I was able to eliminate the small male-to-male
HDMI jumper cable.
When putting on the final plate covers I noticed that each had a small retaining nut that kept the screw (metal, none of that plastic or nylon junk) from coming out of the fixture. These small details are what all add up to making an installation job smooth and hassle-free. All the screws lined up correctly and I was able to produce some very nice finished results.
Conclusion
If you are doing an installation – either personally or as a custom installer, you owe it to yourself to simplify your life by ordering custom HDMI wall plates. They will make a tough job much more manageable and the configuration options will likely save you some room and hassle when planning your layout and cable runs. DVIGear is one of the only companies I know of who offers this type of service and it should be something they shout from the rooftops. Get organized. Get connected. Get some DVIGear custom AV wall plates.
The Score Card
The scoring below is based on each piece of equipment doing the duty it is designed for. The numbers are weighed heavily with respect to the individual cost of each unit, thus giving a rating roughly equal to:
Performance × Price Factor/Value = Rating
Audioholics.com note: The ratings indicated below are based on subjective listening and objective testing of the product in question. The rating scale is based on performance/value ratio. If you notice better performing products in future reviews that have lower numbers in certain areas, be aware that the value factor is most likely the culprit. Other Audioholics reviewers may rate products solely based on performance, and each reviewer has his/her own system for ratings.
Audioholics Rating Scale
 — Excellent
- — Very Good
- — Good
- — Fair
- — Poor
| Metric | Rating |
|---|---|
| Build Quality | |
| Ergonomics & Usability | |
| Ease of Setup/Programming/Integration | |
| Features | |
| Performance | |
| Value |
Clint Deboer was terminated from Audioholics for misconduct on April 4th, 2014. He no longer represents Audioholics in any fashion.
View full profile