
Emotiva Ultra Theater Series LMC-1 & LPA-1 Review
- Product Name: LMC-1 Preamplifier/Processor; LPA-1 7-Channel Power Amplifier
- Manufacturer: Emotiva
- Performance Rating:


- Value Rating:
- Review Date: February 28, 2007 18:00
- MSRP: $ 899 (both)
|
LMC-1 Preamplifier/Processor |
LPA-1 Power Amplifier Six 125 watt channels (one channel config. for 2 channel operation) Low noise 1.2 KVA torrid power transformer Status indicators for standby, operate and fault Configurable power output options: 125 watts/8 ohms x 6 channels or 125 watts/8 ohms x 5 channels plus 2 x 50 watts/8 ohms x 2 channels Completely stable into 4 ohm loads Signal to Noise Ratio is greater than 100dB THD .03% at rated power, 20Hz-20kHz Fully protected from all fault conditions Soft start circuitry External trigger on Soft touch power switch 4RU chassis w/solid milled aluminum faceplate IEC power inlet, 120/230 VAC configurable |
Pros
- Incredible value
- Awesome power
- Audiophile-grade build quality
- Free HDMI switcher upgrade
Cons
- Remote lacks backlighting
- HDMI only available through outboard switcher
Emotiva LMC-1 & LPA-1 Introduction
A couple of years ago, I had an epiphany of sorts. After years of lusting after and owning several Japanese a/v receivers with tons of features and DSP modes, I was ready for something different. I suddenly knew exactly what I wanted, or maybe more precisely, what I didn't want. I wanted clean power, excellent build quality, and maybe most of all, simplicity.
The truth was, even though it seemed cool to know that I could listen to music in a "cathedral" mode, or a movie in "70mm Cinema" mode, I always ended up listening to the pure Dolby Digital or DTS modes. And when listening to music, I wanted to hear it in 2 channel stereo, with my subwoofer turned off. While my receivers were capable of this, it occurred to me that they were not focused on these things, not to mention that they were impossible for my wife to figure out how to use.
So the idea of separates has always been appealing, with one major exception - price. Most any Audioholic has drooled over a matched pre/pro and amp, only to be scared away by a price tag. Emotiva has broken the price barrier with an impressive home theater combo. But at $899, can this combo really move you into the leagues of big-boy gear performance?
Emotiva LMC-1 Build Quality and Features
Talk about an impressive intro - Emotiva's Ultra Theater Series combo arrived at my door in two large boxes weighing a combined 97lbs! The combo consists of the LMC-1 7.1 Channel AV Preamplifier/Processor, and the beastly LPA-1 7-Channel Power Amplifier. Both were double-boxed and well packaged.
The look of this combo can only be described as clean, powerful - and yes, simple. Both pieces feature a black solid milled aluminum faceplate with brushed silver trim panels. The LMC-1 has two large brushed silver knobs, a blue vacuum fluorescent display, and a single round on/off soft touch power switch centered under the display.
 The LPA-1 has a front panel array of LED's that indicate the
condition of the amp, and also a single round on/off soft touch power switch
centered under the display. This simple array of displays and lighting is
wicked-cool. The power buttons on both units glow a soft orange when turned off
(standby), then turn blue (matching the display) when turned on. There are seven
LED's in the array that represent each amplifier. When you power on, each lamp
lights up red in sequence until all seven have blinked, then all seven shift to
a solid blue. While this is undeniably cool, it also serves a practical
purpose, letting you know that everything is working as it should. If any of
the lights should flash red, you have a fault condition. (This happened to me
the first time I powered up, but a restart fixed the problem, and it has not
happened since.)
The LPA-1 has a front panel array of LED's that indicate the
condition of the amp, and also a single round on/off soft touch power switch
centered under the display. This simple array of displays and lighting is
wicked-cool. The power buttons on both units glow a soft orange when turned off
(standby), then turn blue (matching the display) when turned on. There are seven
LED's in the array that represent each amplifier. When you power on, each lamp
lights up red in sequence until all seven have blinked, then all seven shift to
a solid blue. While this is undeniably cool, it also serves a practical
purpose, letting you know that everything is working as it should. If any of
the lights should flash red, you have a fault condition. (This happened to me
the first time I powered up, but a restart fixed the problem, and it has not
happened since.)
Not to be outdone, the LMC-1 has a neat little exploding title animation at start-up, followed by the numerical readout of the volume ramping up to your pre-set default level. So before you even play the first note of music, this system already has your attention.
 My favorite thing about the front panel of the LMC-1
preamp/processor is what it doesn't have - there are no buttons or
switches (other than the power button), only the two large knobs. The function
knob on the left is quite an amazing control. When I first operated this knob,
I was concerned at what seemed to be a loose and wobbly connection. I called
Emotiva and spoke with Dan Laufman (President, Emotiva Audio Corp.), who
described in great detail the workings and engineering of the control. He
explained that although it feels a bit loose, it is not, and is actually
designed that way. Emotiva tried several options for this part before choosing
this one to make sure that it would stand up to repeated use. The function knob
has 3 separate functions - push in, scroll up, and scroll down. For most
functions, you first push the knob in and navigate the sub-menu section that
appears and then use the select up or down function to choose from the available
selections. The front panel display shows the menu steps, but the OSD (on
screen display) shows more information and is the preferred place to program and
set up the LMC-1. The function knob is also used for tuning in AM and FM
stations.
My favorite thing about the front panel of the LMC-1
preamp/processor is what it doesn't have - there are no buttons or
switches (other than the power button), only the two large knobs. The function
knob on the left is quite an amazing control. When I first operated this knob,
I was concerned at what seemed to be a loose and wobbly connection. I called
Emotiva and spoke with Dan Laufman (President, Emotiva Audio Corp.), who
described in great detail the workings and engineering of the control. He
explained that although it feels a bit loose, it is not, and is actually
designed that way. Emotiva tried several options for this part before choosing
this one to make sure that it would stand up to repeated use. The function knob
has 3 separate functions - push in, scroll up, and scroll down. For most
functions, you first push the knob in and navigate the sub-menu section that
appears and then use the select up or down function to choose from the available
selections. The front panel display shows the menu steps, but the OSD (on
screen display) shows more information and is the preferred place to program and
set up the LMC-1. The function knob is also used for tuning in AM and FM
stations. The LMC-1 has many audiophile-grade features, including four
(Toshiba) output devices per channel (two up and two down), a Toroid mains
transformer rated for 800VA, 0.5dB resolution on volume and all channel level
adjustments, multiple frequency bass management (60-150Hz selectable) for all
full range channels, 24-bit/192kHz digital processing, gold plated input and
output connectors, automatic video format transcoder that up-converts composite
and s-video source to 480i component, and an 8 channel analog input for
DVD-Audio and SACD formats.
The LMC-1 has many audiophile-grade features, including four
(Toshiba) output devices per channel (two up and two down), a Toroid mains
transformer rated for 800VA, 0.5dB resolution on volume and all channel level
adjustments, multiple frequency bass management (60-150Hz selectable) for all
full range channels, 24-bit/192kHz digital processing, gold plated input and
output connectors, automatic video format transcoder that up-converts composite
and s-video source to 480i component, and an 8 channel analog input for
DVD-Audio and SACD formats.
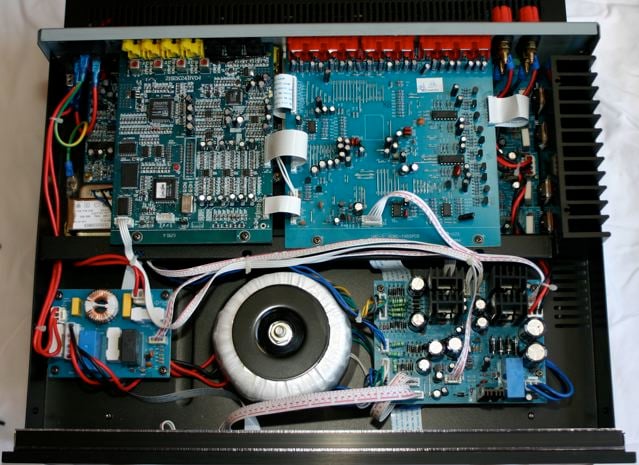
The LPA-1 has discrete, dual differential class AB topology with active current sources. The power supply's capacitors have a total rating of 73,600uf. There are six 125 watt channels - one of the channels can be configured for two channel operation. The power output can be configured as 125 watts/8 ohms x 6 channels, or 125 watts/8 ohms x 5 channels plus 2 x 50 watts/8 ohms x 2 channels. (These ratings are all channels driven @ 1Khz, 120VAC/60HZ supply.)
Emotiva Ultra Series LMC-1 & LPA-1 Setup and Remote
The manuals that come with the Ultra Theater Series combo are among the best I have encountered. Clear, concise and very well-written, they are very easy to understand with clear diagrams. They easily walked me through all aspects of setup and system adjustments. The rear panels of both units are clearly marked and designed in a very easy to use and logical manner.
The LPA-1's rear panel has 7 RCA audio inputs. Channels 6 and 7 can be used as a bridged output. There are also 7 pairs of very high quality 5 way binding posts for speaker connections. There is a standard IEC 3 prong power receptacle, and a 3.5mm remote turn on jack for use with the LMC-1's triggered output. There is also a large rocker-style main power switch.
 The LMC-1's rear panel boasts 3 optical and 4 coaxial digital
source inputs, 3 component video inputs, 5 S-Video and composite video inputs,
and 7 analog audio source inputs. There is also a 7.1 channel analog input for
SACD or DVD-A sources, as well as the 7.1 channel analog outputs for your
external amplifiers and subwoofer. There are 2 composite video out jacks for
recording to VCR or other device. Like the LPA-1, there is a standard IEC 3
prong power receptacle and rocker-style master power switch. A remote amplifier
(3.5mm) trigger out jack and remote keypad control connection round out the
array of standard jacks.
The LMC-1's rear panel boasts 3 optical and 4 coaxial digital
source inputs, 3 component video inputs, 5 S-Video and composite video inputs,
and 7 analog audio source inputs. There is also a 7.1 channel analog input for
SACD or DVD-A sources, as well as the 7.1 channel analog outputs for your
external amplifiers and subwoofer. There are 2 composite video out jacks for
recording to VCR or other device. Like the LPA-1, there is a standard IEC 3
prong power receptacle and rocker-style master power switch. A remote amplifier
(3.5mm) trigger out jack and remote keypad control connection round out the
array of standard jacks.
One thing you will not find on the rear panel of the LMC-1 are any HDMI inputs or outputs. But Emotiva will supply at no charge, a proprietary connector, the HSM-1 External HDMI Switcher. This was not included with my test unit, but is described by Emotiva as follows:
Editorial Note On The HSM-1
The HSM-1 allows the Emotiva LMC-1 preamplifier/processor to add HDMI capabilities. The switcher features two HDMI inputs and one HDMI output. It connects through a proprietary connector (the Zone 2 connector) on the back of the Emotiva LMC-1 processor. This proprietary connection allows the LMC-1 to control the switcher and still allows uninterrupted use of the RRC-1 wall plate accessory for Zone 2 operation. Input #1 on the switcher is aligned to the SAT input and Input #2 is aligned to the DVD input. This operation allows the HSM-1 to operate as if it was built into the chassis of the LMC-1. This eases control of your system by alleviating the need to switch the video input on your TV as well as the audio input on your processor. Pressing a single button changes all of the inputs simultaneously. Manual switch operation is also supported with controls on the switcher itself.
The HSM-1 switcher maintains 480i, 480p, 720p, 720i, and 1080i, 1080p resolutions. Cable runs of up to 50 feet are supported so that the preamplifier/processor location will not limit where HDMI screen placement will be. The HSM-1 can only be used with LMC-1.
A unique inclusion on the LMC-1 is the Zone 2 powered output. There is actually an onboard 25 watt x 2 amp to power a set of speakers for a second zone. I found this to be a great option for powering my outdoor speakers on my back porch adjacent to my theater, without having to purchase a small amp or sacrifice any power from the LPA-1.
Setup was straightforward - the biggest challenge was lifting the 63 pound beast of an amplifier out of its box into place on my rack - or should I say, under my rack! I chose to keep it on the floor to give it plenty of breathing room (not to mention making things easier on my back). Once I powered up the processor, I found the onscreen menu easy to navigate via the remote. Emotiva is to be congratulated for making what can often be a confusing process (setting up a sophisticated pre/pro) quite simple. Pressing the menu button on the remote brings up a simple Main Menu screen, with the following options: Input Select, Mode Select, Sound Adjust, Zone Control, Function, and Exit. From there it is very easy to drill into each section to make adjustments.
Initial setup of inputs was as easy as choosing your input, then selecting which audio and video inputs you wanted assigned to it. I was quickly able to assign all inputs for my gear, and then it was time to move on to mode and sound adjustments. Within minutes I had gone through a quick and simple setup of speaker balance, level, distance and delay adjustments and was ready to start listening.
One thing that is important to point out about the Emotiva is that simplicity does not equate to a lack of depth. The LMC-1 has plenty of tools for configuring the system, including test noise for level calibration of your speakers and on screen display options for other functions. Overall, I found setup of the LMC-1 to be very intuitive and satisfying.
The LMC-1 has three Dolby modes: Dolby Digital (AC-3), Dolby Digital EX, 3 CH, and Dolby Pro Logic IIx. For DTS, the available modes are DTS, DTS-ES, and DTS Neo:6. And in case I ever miss my DSP modes, there are 8 available: LIVE, STADIUM, CHURCH, HALL, THEATER, ROCK, POPS and CLASSIC.
I have to admit, that I have not used the AM/FM section of receivers I have owned for years. The main reason was because they usually did not have very good reception, even with the included wire and loop antennas. I decided to hook up the antennas that came with the LMC-1 and try out some radio (how old-fashioned of me!). I listened to the local classic rock station and was amazed at how easy it was to lock in the station, and found the sound to be rich and full. I also listened to ESPN radio on both AM and FM, and was equally pleased with the results. The LMC-1 has 40 presets for the tuner - 30 for FM, and 10 for AM.
Remote Control
 Let me start out by saying that I am a big fan of
universal remote controls. I strongly suggest to anyone who is asking me for
help choosing and purchasing a system that they budget for a solid universal
remote to control their entire system. With that being said, I don't expect
much from supplied remotes, because I end up not using them anyway. (But when
reviewing a product I actually use ONLY the supplied remote so I can tell you
what to expect.)
Let me start out by saying that I am a big fan of
universal remote controls. I strongly suggest to anyone who is asking me for
help choosing and purchasing a system that they budget for a solid universal
remote to control their entire system. With that being said, I don't expect
much from supplied remotes, because I end up not using them anyway. (But when
reviewing a product I actually use ONLY the supplied remote so I can tell you
what to expect.)
The supplied remote for the LMC-1 is a decent remote, and much like the system itself, it has no frills. It is not a learning remote, and can only control the LMC-1. There is nothing sexy or fancy here, only a clean, simple layout that includes everything you need. I love the dedicated buttons for "on the fly" trim adjustments to the sub and center channel levels. The left/right/up/down/center array of buttons was a bit frustrating to me at first - the center button is for "menu," and I kept hitting it when I wanted to "select." The right button is the "okay" button which was usually what I was looking for. The left button is "exit." Once I paid attention to this, it was not that big of a deal. My main complaint with the remote is the lack of backlighting, which is always a problem for me in my theater, which is very dark. But to be fair, with such aggressive low pricing on this combo, I can do without the added expense that backlighting the remote - or even a learning remote - would add.
Music
Part of what I loved about the
LMC-1 is that it does what I want it to do with minimal (if any) effort. For
example, when I put a CD into my CD/DVD player, the LMC-1 automatically switches
to bypass (stereo) mode. When in "bypass mode," the processor bypasses all
signal processing and/or decoding functions and reverts to a "pass through" type
2-channel mode. This is what I want when listening to CDs. I want to turn off
my sub and just listen to my main left and right speakers, and the Emotiva does
this for me when it senses a 2-channel PCM signal.
Lyle Lovett - Joshua Judges
Ruth
Lyle Lovett records are some of the best sounding
recordings I have found. I always find myself popping this disc in when
evaluating a new piece of gear or speakers. The arrangements are amazing, with
plenty of space for things to spread out. The song Church is a great
gospel tune filled with all kinds of tasty things to fill up a room. The
handclaps and acapella vocals in the beginning were rendered with such realism
that if I closed my eyes I could just imagine myself in a small country church
in front of the gospel choir members. As the piano, bass and drums join in, I
found myself wanting to stand up and sway. The song is full of powerful dynamic
shifts, and the LPA-1 never blinked.
Jet -
Shine On
Jet is a great mash-up of AC/DC, Pink Floyd, and
the Beatles. The songs move from trashy garage rock to melodic ballads and back
to something in-between over the course the record. When I cranked this disc
up, the Ultra Theater Series combo pushed my speakers to place I had not yet
experienced - volume levels that hurt my ears! In other words, my speakers gave
out before the combo did. (Suddenly this affordable gear became considerably
more expensive - I need new speakers!) The amp stayed clean and precise, but
was incredibly loud.
Movies
I watched several sci-fi and action flicks on the Emotiva combo, and all were impressive. I also find the sound design of most PIXAR movies to be fantastic for demos. But I am a sucker for great multichannel music on DVD. There are several concert DVD's that sound great, not to mention some musicals I love.
Cars
The opening scene of Cars is a
fantastic test of any system. The throaty roar of the stock cars intercut with
the solitude of Owen Wilson's nervous pre-race voiceover, followed by the theme
song performed by Sheryl Crow - it all happens in the first five minutes. The
Emotiva combo handled every bit of it with brawn. I listened to this scene at
reference levels and never heard a hint of clipping. The balance across the
front soundstage was perfect.
Moulin Rouge
One of the things I listen for in a great amp is not
only the ability to deliver the powerful stuff, but how it performs with
delicate sound design as well. Chapter 32 begins with Nicole Kidman beginning
to sing in what is almost a whisper. As her vocal builds, so does the music and
sound effects. Eventually Ewan McGregor joins her in the duet, and when you see
and hear a pistol get cocked, the scene explodes with sound and music. The amp
tracked the transition with grace, taking my room from whisper level to chaotic
dance hall level with ease.
Sarah McLachlan - Afterglow
Live
This DVD is more or less my musical reference disc to hear
what a new amp or set of speakers sounds like. Track 14, Fear, will
take you to an amazing musical place. The song starts at the piano and the bass
line will warm up your entire house. As she moves
into the chorus, the entire band comes crashing in, and the Emotiva filled my
room with concert-quality (and dB level) sound. I had never experienced this
song with such richness and power. The dynamic headroom simply blew me
away.
Conclusion
I have already talked a friend of mine into ordering this combo to replace his current $1000 a/v receiver. As far as build quality and amplifier power, I am confident you cannot find a better setup than the Ultra Theater Series combo. I would say this even if were priced at $1299! (In fact, I am replacing the $1299 British receiver in my reference room with this combo.) The Emotiva setup excels in simplicity, not to mention raw power.
At $899 shipped, it is very hard to find anything to complain about with this combo. Although there is no HDMI built into the unit, the supplied HSM-1 external HDMI switcher should work seamlessly with the LMC-1. The remote control is not backlit, which made it hard for me to use in my darkened reference room. That's about all I can really find to complain about - this is a fantastic product. The Emotiva combo is the best value I have seen in the marketplace. The company is dedicated to building great gear at affordable prices, without skimping on quality. For all of you out there who have mid-range a/v receivers, this is a much better option in my opinion. The Emotiva Ultra Theater Series combo does indeed fall into the league of big-boy gear. Now, isn't it time you grew up?
The Score Card
The scoring below is based on each piece of equipment doing the duty it is designed for. The numbers are weighed heavily with respect to the individual cost of each unit, thus giving a rating roughly equal to:
Performance × Price Factor/Value = Rating
Audioholics.com note: The ratings indicated below are based on subjective listening and objective testing of the product in question. The rating scale is based on performance/value ratio. If you notice better performing products in future reviews that have lower numbers in certain areas, be aware that the value factor is most likely the culprit. Other Audioholics reviewers may rate products solely based on performance, and each reviewer has his/her own system for ratings.
Audioholics Rating Scale
 — Excellent
- — Very Good
- — Good
- — Fair
- — Poor
| Metric | Rating |
|---|---|
| Multi-channel Audio Performance | |
| Two-channel Audio Performance | |
| Build Quality | |
| Fit and Finish | |
| Ergonomics & Usability | |
| Features | |
| Performance | |
| Value |
Over the years J. has constantly found himself to be an "early-adopter," spending way too much money on "new" technologies such as Compact Disc, LaserDisc, and DVD. He is one of the few people who actually purchased (and still owns) a CORE programmable remote control (bonus points if you remember this product).
View full profile