
Emotiva Audio RPA-1 Stereo Amplifier Review
Emotiva Audio RPA-1 Stereo Amplifier
- Product Name: RPA-1
- Manufacturer: Emotiva Audio
- Performance Rating:


- Value Rating:
- Review Date: June 30, 2007 19:00
- MSRP: $ 699
- Dual mono block design
- Extremely low residual noise floor
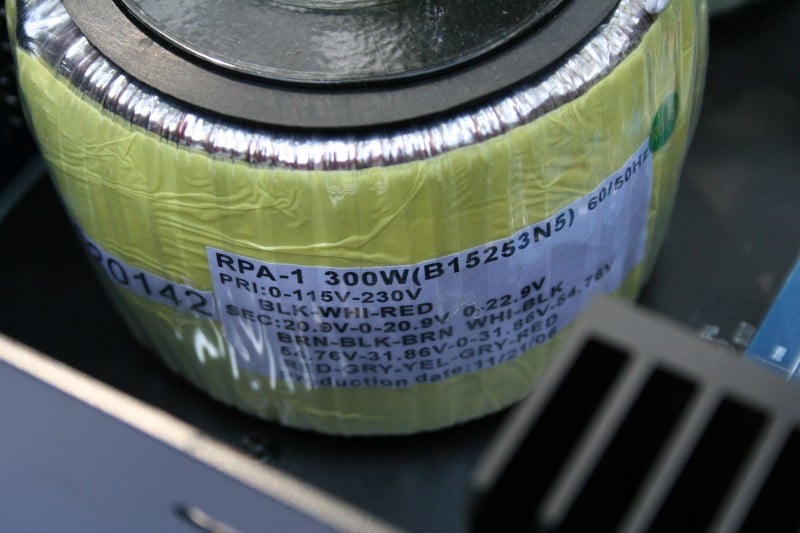
- Dual high current toroidal power transformers
- Enhanced Emotiva EPM power module topology
- 200 watts RMS per channel into eight ohms
- 350 watts RMS per channel into four ohms
- 1Hz – 80kHz bandwidth
- THD+N - .015%
- Convection cooling
- Analog VU meters
- 12VDC trigger input
- Balanced XLR and unbalanced inputs
- Tiffany style RCA inputs
- High-quality, high current binding posts
- Panel dimmer
- Milled multi-element floating wing faceplate with indirect cobalt blue illumination.
- Dims: (HxWxD) 6” x 18 7/16” x 16 7/16"
- Weight - 60 lbs.
Pros
- Price
- Performance
- Looks
Cons
- None
Emotiva Audio RPA-1 Introduction
As a reviewer, I "need" things. Test equipment, a modicum of writing ability, and an opinionated mind. A lack of consideration for other's feelings with my opinion helps as does a stockpile of products upon which to heap my love or loathing (depending). Occasionally, I "need" new equipment. I need it like a crack addict needs a fix. Like a Krispy Kreme "needs" to be next door to a Jenny Craig. Like a politician needs a cause no matter how little they believe in it. Well, I had a couple of speakers coming in for review and I noticed that they were a little inefficient and perhaps could have benefited from external amplification. Being the dutiful reviewer I am, I gave Emotiva Audio a call to see if they could help me out with my looming problem. Dan Laufman decided that what I needed was a good two channel amp to put these speakers through their paces. He was right, I did need that. I needed it bad.
Emotiva Audio has been making a name for themselves as the answer to the question "can I afford separates"? Well, yes you can, if you buy them from Emotiva. To my mind there are three levels of receiver purchases, <$300, $300-$1200, and $1200+. If you are new to home theater you're looking at a sub-$300 purchase. Most people can't fathom spending any more than that. Once you break that barrier, you're looking at a mid-level receiver for someone that recognizes the benefits of sinking a little more into their receiver including increased functionality, configuration options, connection types, and more. After about $1200, you get into the realm of separates and flagship receivers. This is for your serious user that either has a lot of money or looking for quality amplification and processing for a very high end system. For many, many years you couldn't find a set of separates under $2000. Emotiva Audio killed that notion when they introduced their $899 Ultra Theater Series. Now they are taking on the high-end two-channel crowd with their Reference Audio Series.
Build Quality
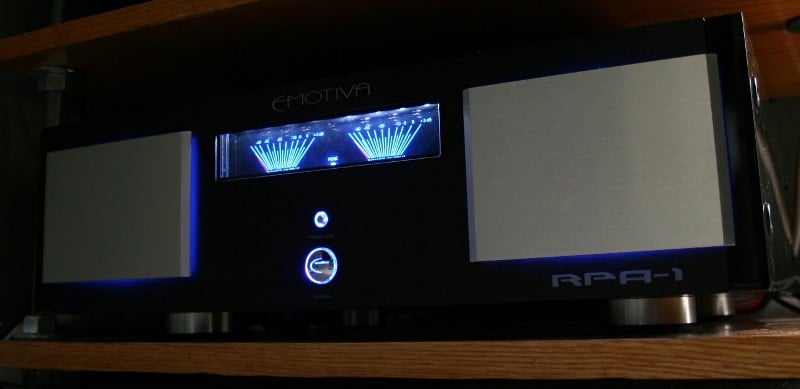
![]() Topping 50 pounds, the RPA-1 is no lightweight in the amplifier world.
Emotiva suggests (and I concur) that you set the amp on the lowest shelf of
your rack. My homemade flexy
rack needed a little stability and the RPA-1 was the perfect fit. The piano
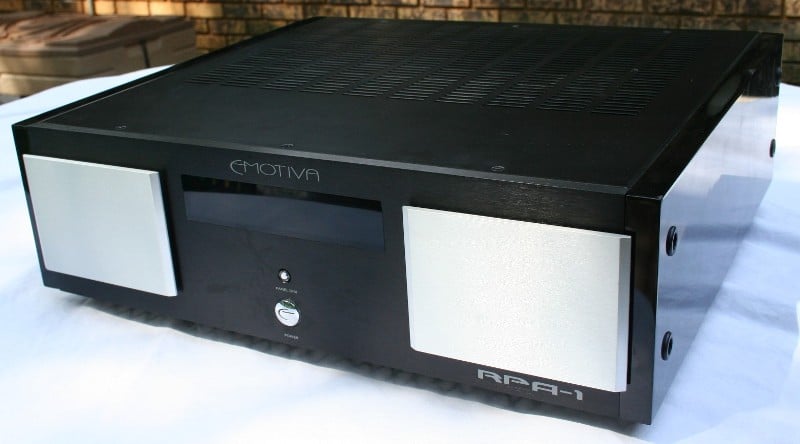
finished lacquered wood panel sides of the amp are simply gorgeous and contrast
nicely with the industrial front panel. Those of you in love with blue lights
and analogue voltage meters will have a lot to like about the front of the
RPA-1. Little blue needles jump as the amp pumps power to your speakers. They
are a little small to see from a distance but just the fact that they are there
is enough for some of us. If simplicity in design is a hallmark of an
audiophile product, the faceplate is a model for others to follow. Two buttons,
power and dimmer, run the centerline flanked on either side by two raised
milled aluminum plates with blue light seeping from underneath when powered up.
The light will turn red under a fault of clipping condition. Industrial
looking? Yes. But it looks mean. And I like that in an amp.
Topping 50 pounds, the RPA-1 is no lightweight in the amplifier world.
Emotiva suggests (and I concur) that you set the amp on the lowest shelf of
your rack. My homemade flexy
rack needed a little stability and the RPA-1 was the perfect fit. The piano
finished lacquered wood panel sides of the amp are simply gorgeous and contrast
nicely with the industrial front panel. Those of you in love with blue lights
and analogue voltage meters will have a lot to like about the front of the
RPA-1. Little blue needles jump as the amp pumps power to your speakers. They
are a little small to see from a distance but just the fact that they are there
is enough for some of us. If simplicity in design is a hallmark of an
audiophile product, the faceplate is a model for others to follow. Two buttons,
power and dimmer, run the centerline flanked on either side by two raised
milled aluminum plates with blue light seeping from underneath when powered up.
The light will turn red under a fault of clipping condition. Industrial
looking? Yes. But it looks mean. And I like that in an amp.
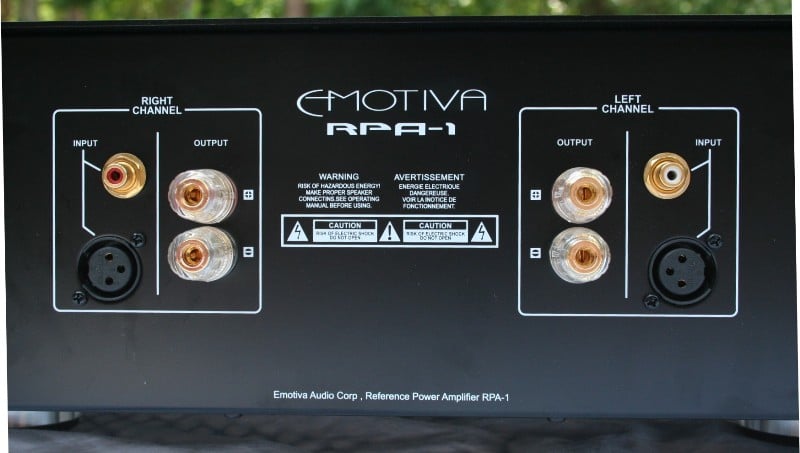 While the RPA-1 is attractive enough to be displayed out in the open
(under a little spot light as far as I'm concerned), it is rack mountable with
the supplied hardware. The back of the unit sports an RCA in, a XLR in, and
high quality five way binding posts for output to speakers. There is a 12 volt
trigger input, a master power switch, access to the fuse, and a voltage
selection switch. The unit can be configured ala the Turn On Selector switch
for manual power on/off, 12 volt trigger on/off, and signal on/off. When in the
signal configuration, the unit shuts itself down after 30 minutes and will
power back on when it senses an incoming signal. It usually takes a second to
sense the signal so you may lose the first beat or two of music. While the 30
minute shut down time should eliminate any inadvertent shutdowns doing
playback, it is still possible during "talkie" movies that the amp
could go into sleep mode. Personally, I used the supplied 12 volt trigger.
While the RPA-1 is attractive enough to be displayed out in the open
(under a little spot light as far as I'm concerned), it is rack mountable with
the supplied hardware. The back of the unit sports an RCA in, a XLR in, and
high quality five way binding posts for output to speakers. There is a 12 volt
trigger input, a master power switch, access to the fuse, and a voltage
selection switch. The unit can be configured ala the Turn On Selector switch
for manual power on/off, 12 volt trigger on/off, and signal on/off. When in the
signal configuration, the unit shuts itself down after 30 minutes and will
power back on when it senses an incoming signal. It usually takes a second to
sense the signal so you may lose the first beat or two of music. While the 30
minute shut down time should eliminate any inadvertent shutdowns doing
playback, it is still possible during "talkie" movies that the amp
could go into sleep mode. Personally, I used the supplied 12 volt trigger.
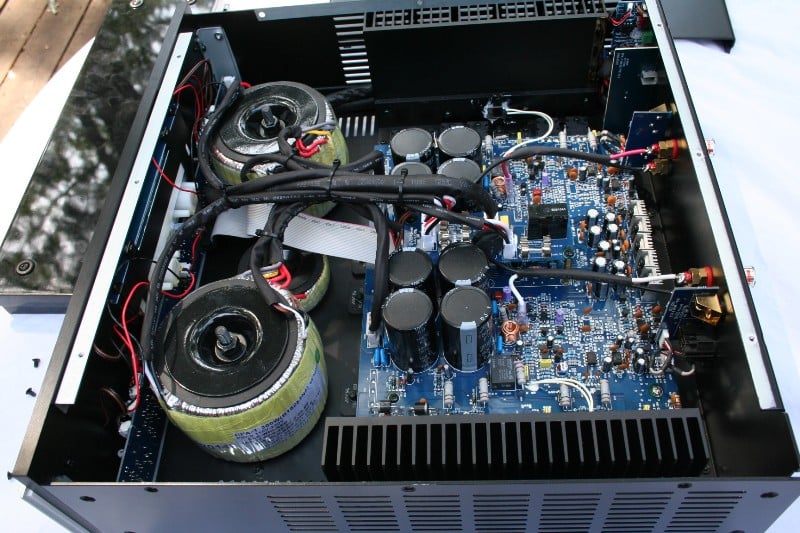
With a dual-mono design, each channel has its own massive toroidal power supply and electronics. In fact, if you could slice the amp down the center, you'd basically have to mono amplifiers. This design has its advantages in that each channel is fully isolated from each other yielding the absolute best channel to channel isolation for stereo separation. Stereo separation is an important aspect often overlooked in amplifier design. An amplifier with poor stereo separation will lend itself audibly as one that just doesn’t seem to make your speakers disappear into the room while instead sounding more like a wall of sound.
Just like all of the previous Emotiva amplifiers, the RPA-1 utilizes a Class H design which is similar to Class G and modulates the power supply rail voltage a bit higher than the output signal. It keeps the voltage across the transistors small and the output transistors cool. Overall, this provides for a cool running amp which explains how Emotiva Audio could cover up the side vents with the lacquered wood panels. The Class H is a fairly efficient design in comparison to an A/B design. The main difference of this amplifier compared to their flagship 7CH MPS-1 amplifier, is the former has about double the power supply for each channel of the latter. The transformer is much juicier allowing the amp to really belt out power into low impedance loads as you will see from our measurements later in this review.
Setup
Setting up an amp isn't exactly brain surgery so I'll be brief. Running RCA's from the receiver to the amp's inputs and speaker wire to the speakers should take all of seconds for most Audioholics. Since the 12 volt trigger doesn't have a 1/8th" jack, you'll need to connect the wires manually. All you need to do is loosen the screws on the green connector (I would think I don't have to say this but remove the connector from the back of the unit first) and insert the wires as indicated in the user manual. I found that the amp turned on and off instantly without any annoying pops or clicks with the 12 volt trigger and there was only a few millisecond delay on the "signal" setting. Basically, you'd miss the first note or two of a song waiting for the amp to turn on.
Emotiva RPA-1 Listening Tests
 Finally, we get to the most controversial of sections in an amp review.
On another website, users would skip to this section and digest hungrily every
chocolaty midrange and authoritative bass comment. But this is Audioholics,
folks, amps sound the same. Right? Well, not exactly. All things being equal,
I'd agree with that statement, but this amp's duty is to push harder to drive
speakers. When you hook up a low impedance/low sensitivity speaker to a
midlevel receiver or a mediocre amplifier, you're going to risk clipping which
could damage your speakers and/or create drastic frequency response variations
both of which don’t lend to quality audio reproduction. Not to mention that
many of these "hard to drive" speakers just plain require more power
than your typical receiver can provided. With speakers like these, you need to
have a dedicated amplifier with plenty of power and tons of headroom. When I
was first utilizing the RPA-1 for the RBH TK-5CT review (forthcoming) I
immediately noticed a difference between the RPA-1 and the amps in the Denon
2307CI (which was in for review around the same time). Taking into account the
considerably greater power of the RPA-1, this isn't surprising. The Emotiva amp
is obviously going to stay stable at higher volumes with harder loads than any
the mid-level receiver.
Finally, we get to the most controversial of sections in an amp review.
On another website, users would skip to this section and digest hungrily every
chocolaty midrange and authoritative bass comment. But this is Audioholics,
folks, amps sound the same. Right? Well, not exactly. All things being equal,
I'd agree with that statement, but this amp's duty is to push harder to drive
speakers. When you hook up a low impedance/low sensitivity speaker to a
midlevel receiver or a mediocre amplifier, you're going to risk clipping which
could damage your speakers and/or create drastic frequency response variations
both of which don’t lend to quality audio reproduction. Not to mention that
many of these "hard to drive" speakers just plain require more power
than your typical receiver can provided. With speakers like these, you need to
have a dedicated amplifier with plenty of power and tons of headroom. When I
was first utilizing the RPA-1 for the RBH TK-5CT review (forthcoming) I
immediately noticed a difference between the RPA-1 and the amps in the Denon
2307CI (which was in for review around the same time). Taking into account the
considerably greater power of the RPA-1, this isn't surprising. The Emotiva amp
is obviously going to stay stable at higher volumes with harder loads than any
the mid-level receiver.
CD: Bang
& Olufsen Vol. XIII – The Sound of Perfection
What is quickly becoming one of my standards for review, the B&O
test disc was the first one I turned to when listening to this amp. While I can
only really stomach the first five or so songs (seriously, who thought a cover
of "Come Together" by a scat/techno band was a good idea?) it
universally has good fidelity. The first thing I noticed during the listening
test was how every note seemed tighter. Of course the RPA-1 played louder (I
could rarely get the little needles past the 1/3rd point on the dial) and
cleaner, but even at moderate volumes I perceived a tightening of the overall
presentation of the music. Part of me thinks that the soundstage expanded
though it is really hard to be sure of this without a more controlled A/B test.
As I am generally doing these tests alone (the wife hates loud music - even if
it is music she likes) everything was sighted with more than the preferable
time between comparisons.
Still, you don't need to do a blind test to know the differences between a horse and a cow. The Emotiva Audio RPA-1 kept pushing the TK-5CT's and the Usher Audio s-520's to their limits rather than holding them back as the Denon did. I suppose "holding them back" is too harsh a term. The Denon faired well with these harder to drive speakers, much better than I would have thought. I was impressed overall with how loud and clean the Denon played but it really wasn't much of a contest with a dedicated two-channel amp that weighs more than almost two of these receivers put together!
DVD-A: Lowen & Navarro
- Carry On Together Yes, yes
I know this is a DVD-A but I couldn't get the CD side to play in the Denon
DVD-3910. I know from experience that the vast majority of the information
is in the left and right channels so I wasn't all that worried about it. Each
instrument was lifelike but I was especially impressed with the kick drum which
just sounded tight and deep with all the proper harmonics that you associate
with one of the more difficult sounds for speakers to produce. The vocals were
well separated and distinct, each placed securely in the soundstage. Again I
felt the soundstage was a bit larger than I was used to. Sound separation -
between the different notes, instruments, and vocals - was excellent with a
nice depth to the music.
Yes, yes
I know this is a DVD-A but I couldn't get the CD side to play in the Denon
DVD-3910. I know from experience that the vast majority of the information
is in the left and right channels so I wasn't all that worried about it. Each
instrument was lifelike but I was especially impressed with the kick drum which
just sounded tight and deep with all the proper harmonics that you associate
with one of the more difficult sounds for speakers to produce. The vocals were
well separated and distinct, each placed securely in the soundstage. Again I
felt the soundstage was a bit larger than I was used to. Sound separation -
between the different notes, instruments, and vocals - was excellent with a
nice depth to the music.
Good music (and by good I mean well recorded and mixed) has a depth to it. If you desire, rather than listening to the main vocals and instruments, you can focus on something less prominent. These background instruments are usually the first to be affected by a compression codec so you'll want to listen to see if they sound realistic. What is especially telling is when an instrument is suddenly overshadowed by another like a piano vamping after a solo as a guitar comes to the forefront. If that instrument suddenly loses all the harmonics, depth, and presence when it recedes into the background you know that you've been the victim of compression. The RPA-1 ensured that each instrument was presented as it was mixed. It can't bring a compressed instrument back to life but it can make sure that each sound has more than enough power to be presented true to the recording and mix.
CD: Yello
- the eye You can't
read an amp review and not hear about bass. It just seems to be the first thing
that trips off a reviewer's tongue. But why? Can amps really
"tighten" up bass that much? Well, the thing to remember is that a
bass note requires a lot more power than other frequencies so it is possible
that a lower powered amp or the internal amps on a receiver are clipping those
notes ever so slightly while having plenty of power for everything else. So,
while it might seem like an amp or a receiver is doing a great job overall, it
may be that it is having a hard time with bass without you knowing it.
You can't
read an amp review and not hear about bass. It just seems to be the first thing
that trips off a reviewer's tongue. But why? Can amps really
"tighten" up bass that much? Well, the thing to remember is that a
bass note requires a lot more power than other frequencies so it is possible
that a lower powered amp or the internal amps on a receiver are clipping those
notes ever so slightly while having plenty of power for everything else. So,
while it might seem like an amp or a receiver is doing a great job overall, it
may be that it is having a hard time with bass without you knowing it.
Since I did most of this review with the full-range RBH TK-5CT towers, I was pushing the RPA-1 with a full range sound (not crossed over into a subwoofer). Part of my earlier assertion that their was an overall "tightening" of the sound I believe was mostly do to the increased power available for bass notes. The eye is a fairly bass (and treble for that matter) heavy techno CD. It is murder on bad speakers and none to kind on amps. The RPA-1 generally presented cleaner bass notes with reduced hang-over and an overall tighter presentation even at very loud volumes. Was this a night and day difference? No. But neither the RBH TK-5CT's nor the Usher Audio s-520's present extremely hard loads. Difficult loads, sure, and maybe a bit more than you should force on your average receiver. With a harder to drive set of speakers, these differences are only going to become more apparent.
Emotiva RPA-1 Measurements and Analysis and Conclusion
By Gene DellaSala
I did some quick spot-checking on the RPA-1 amplifier gain structure to
ensure it could be properly driven with a wide assortment of preamps or
receivers. My personal criteria for amplifier gain structure is that it should
be able to hit full power when driven with 2Vrms. The RPA-1 fell well within
this criteria.
Amplifier Power & Efficiency
Due to the inherent multi rail switching scheme of the RPA-1, my efficiency measurements are much lower than actual for this amplifier design since I use continuous sine wave testing. My measurements indicated how efficient the amp is when driven continuously at full power (0.1% THD + N), hence when the amplifier is operating in linear A/B mode. During normal music listening, expect to see around 65-67% efficiency which is about the best you can get from a linear amplifier design.
|
# of CH |
Power Consumption |
Power Delivered |
Load |
Efficiency |
|
1 |
314 watts |
210 watts |
8 ohms |
67 % |
|
1 |
539 watts |
320 watts |
4 ohms |
59 % |
As you can see, I measured the RPA-1 to deliver about 210wpc into 8-ohms and 320 watts into 4-ohms at 0.1% THD + N using my APC S-15 and SBATT to ensure the line stayed at 120V +- 2V. Keep in mind most review publications test at clipping and don’t do continuous power measurements so our power numbers are usually a lot more conservative than what you typically find from other reviewers. This amp hit its power rating of 200wpc into 8 ohms. Their 350wpc rating isn’t specified at any particular distortion level, but rest assured it can do it at 1& THD + N.
For more info, see: The All Channels Driven (ACD) Test
I asked Emotiva to furnish their power measurements vs. distortion to see if their ratings jived with my findings and they did.
Emotiva Power Measurements
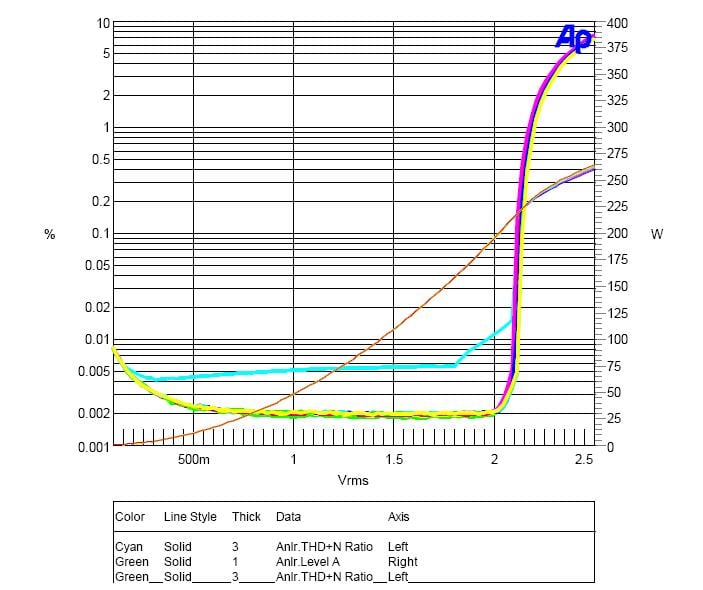
Figure 1. RPA Power vs. Distortion
As you can see, the true continuous power rating of this amplifier (Audioholics style at least) is in excess of 200 wpc into 8-ohms.
Frequency Response
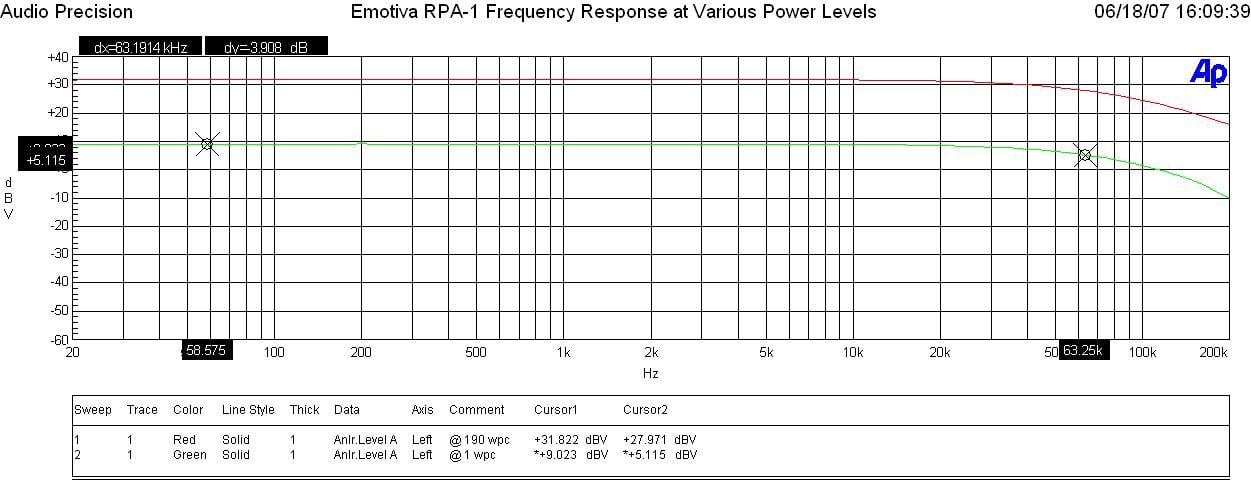
Figure 2. RPA-1 Frequency Response
The frequency response was smooth and extended to a -3dB point of 65KHz which is more than enough bandwidth, but a bit puzzling since all of the other Emotiva amps we reviewed had about double the bandwidth. In any event, bandwidth uniformity was excellent at low or high power indicating that this roll off was intentional to ensure the best SNR performance.
FFT Distortion Analysis
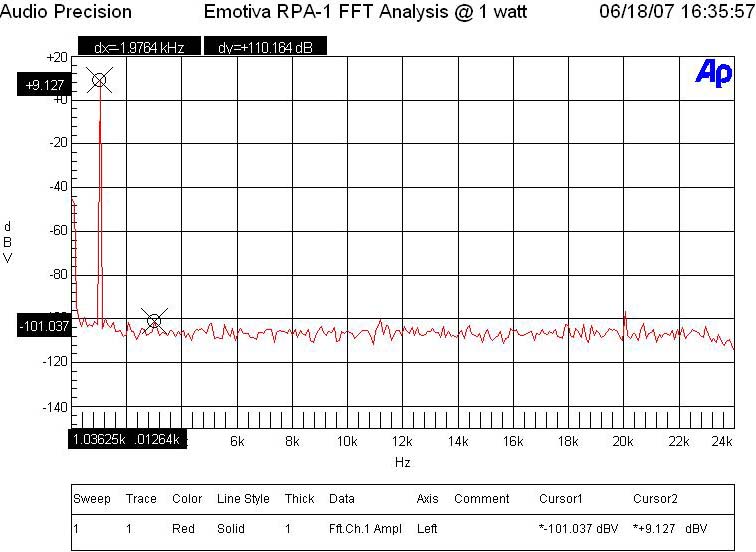
Figure 3. FFT Distortion Analysis
at One Watt
At 1 watt, the RPA-1 FFT distortion test resulted in nearly immeasurable harmonics, a scenario I rarely run into. This amp is super clean at low power which in my book is one of the most important virtues of quality amplification for a controlled listening space concerned with high fidelity playback.
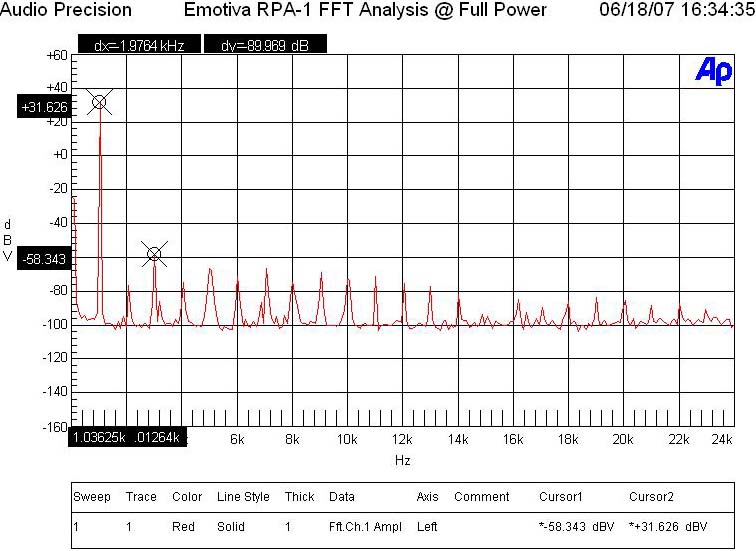
Figure 4. FFT Distortion Analysis at Full Power
At near full rated power (200wpc) into 8-ohms, the RPA-1 exhibited impressively low distortion (31.6+58.3)dBv = 89.9dBv or 100*alog^-1(-89.9/20) = 0.003%. This figure is even lower than what I measured on the MPS-1 (.008%) under similar load conditions. I suspect the removal of the soft clipping circuit has paid dividends in this regard (lower noise floor, lower distortion).
As many amps approach their full power rating, their power supplies tend to run out of gas and show large harmonic nasties of the fundamental test tone. The RPA-1 maintained its composure commendably demonstrating perhaps why it also sounded so good.
Output Impedance and Damping Factor
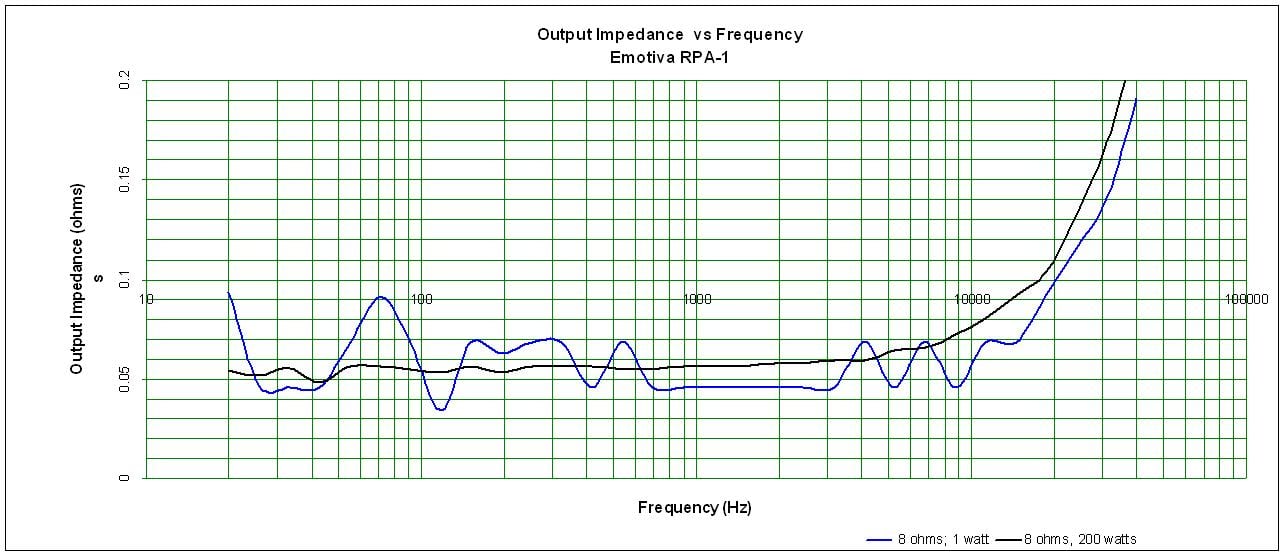
Figure 5. Amplifier Output Impedance
vs Frequency
Amplifier output impedance when the RPA-1 was driving an 8-ohm load at 1 watt and full rated power 200wpc was well below 100 mohm for the entire audio bandwidth with a gradual rise above 20kHz. We like to see amplifier maintain 150 mohm output impedance or less so that it will sound consistently good for a larger variety of speaker and cable loads with rather complex impedance profiles. This is a very good measurement and one of the primary design attributes that will ensure this amplifier will sound consistently good on a wide variety of speakers.
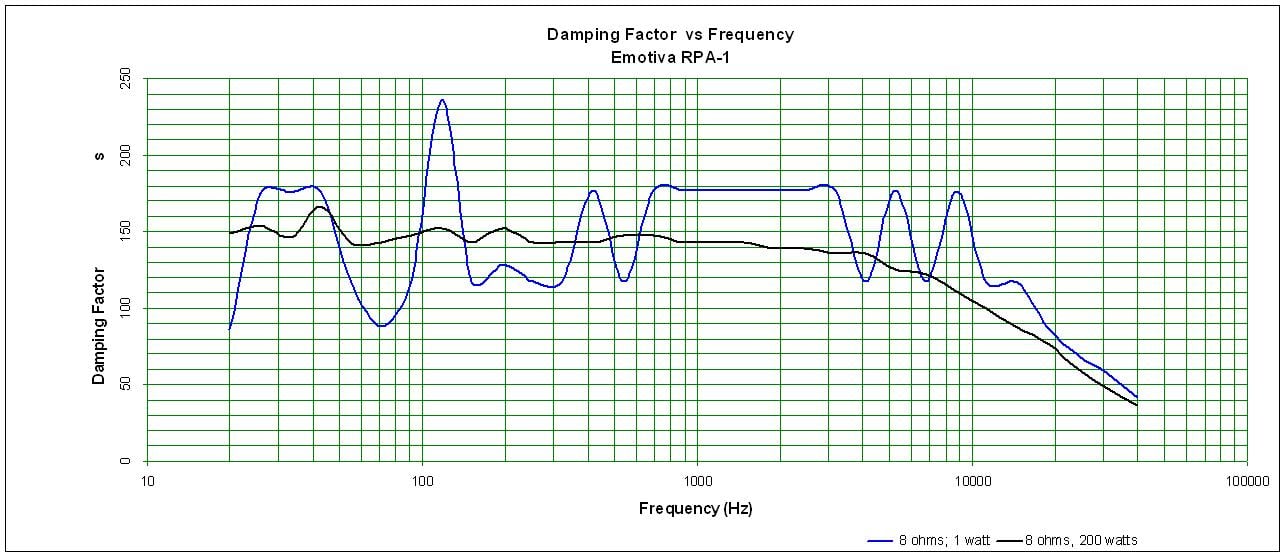
Figure 6. Amplifier Damping Factor vs Frequency
Again the RPA-1 did NOT disappoint. An amplifier with a low output impedance will also maintain excellent damping characteristics since these are related metrics. The RPA-1 maintained a damping factor of around > 150 for 8 ohm loads. This exceeded our benchmark criteria with flying colors.
Signal to Noise Ratio
Using balanced inputs, I measured 79dB (unweighted) with 145mVrms driving an 8 ohm load. With unbalanced inputs the SNR dropped about 2.6dB as expected. Both measurements were very good, confirming that this amplifier was dead quite at very low power levels where it matters most.
Av (BAL) =
25.9dB
Av (unBal)
= 27dB (THX standard is 29dB)
Editorial Note on Amplifier Voltage Gain
With most amps, the voltage gain difference between balanced vs unbalanced is 6dB with the unbalanced connection being the hotter of the two. This is a standard practice in most consumer and pro audio. The preamp therefore usually has a +6dB boost via the balanced outputs to compensate. Emotiva didn’t seem to be following this convention but considering the unbalanced input was a mere 2dB shy of THX standard, it shouldn’t be an issue at all as long as your preamp can deliver at least 1.5Vrms of clean output to hit the rated power of this amplifier.
Recommendations
Are you kidding? It is hard to NOT sound like a fanboy when you are dealing with a company that sells quality components at rock bottom prices. Our bench tests also support our listening evaluation. This amp is a golden nugget at twice its price.
Conclusion
 I'll repeat myself for people that skip to the end of the review - It is
hard to NOT sound like a fanboy when you are dealing with a company that sells
quality components at rock bottom prices. The RPA-1 offers one of the best
values in reference quality amplifiers out there. Beautiful, powerful, and
bulletproof, if this amp isn't on your father's day/mother's
day/birthday/Christmas wish list, it should be. You may not need an amp this powerful, but don't lie
to yourself, you want it. You know you do.
I'll repeat myself for people that skip to the end of the review - It is
hard to NOT sound like a fanboy when you are dealing with a company that sells
quality components at rock bottom prices. The RPA-1 offers one of the best
values in reference quality amplifiers out there. Beautiful, powerful, and
bulletproof, if this amp isn't on your father's day/mother's
day/birthday/Christmas wish list, it should be. You may not need an amp this powerful, but don't lie
to yourself, you want it. You know you do.
Emotiva Audio
Corporation
106 Mission Court
Suite 101
Franklin, TN 37067
877-EMO-TECH
Fax: 615-771-1128
RPA-1 Review
MSRP:
$699
About Emotiva Audio
Emotiva engineers believe that the
experience of enjoying home audio and home theater components begins with
thoughtful design, robust engineering, superior quality materials and a deep
understanding of what the audio/video enthusiast wants and needs. It occurs all
too often; designers and manufacturers consider technology and ease of use to
be mutually exclusive qualities in a product. Emotiva engineers think
differently. Technologically superior and user friendly products are paramount
to the Emotiva design philosophy and are qualities that allow Emotiva users to
appreciate their purchase in the future as much as they do today. We utilize
only premium components with proven, critically evaluated circuitry in the
audio and video paths to preserve the original quality of the sound and vision
experience. Emotiva products compliment the entertainment experience and bring
it up to a level rarely experienced with other mass produced products.
The Score Card
The scoring below is based on each piece of equipment doing the duty it is designed for. The numbers are weighed heavily with respect to the individual cost of each unit, thus giving a rating roughly equal to:
Performance × Price Factor/Value = Rating
Audioholics.com note: The ratings indicated below are based on subjective listening and objective testing of the product in question. The rating scale is based on performance/value ratio. If you notice better performing products in future reviews that have lower numbers in certain areas, be aware that the value factor is most likely the culprit. Other Audioholics reviewers may rate products solely based on performance, and each reviewer has his/her own system for ratings.
Audioholics Rating Scale
 — Excellent
- — Very Good
- — Good
- — Fair
- — Poor
| Metric | Rating |
|---|---|
| Frequency Response Linearity | |
| SNR | |
| Output Impedance | |
| Measured Power (8-ohms) | |
| Measured Power (4-ohms) | |
| Two-channel Audio Performance | |
| Build Quality | |
| Fit and Finish | |
| Ergonomics & Usability | |
| Features | |
| Performance | |
| Value |
As Associate Editor at Audioholics, Tom promises to the best of his ability to give each review the same amount of attention, consideration, and thoughtfulness as possible and keep his writings free from undue bias and preconceptions. Any indication, either internally or from another, that bias has entered into his review will be immediately investigated. Substantiation of mistakes or bias will be immediately corrected regardless of personal stake, feelings, or ego.
View full profile