
Denon POA-A1HDCI 10 Channel Power Amplifier Review
- Product Name: POA-A1HDCI 10-Channel Power Amplifier
- Manufacturer: Denon Electronics
- Performance Rating:

- Value Rating:
- Review Date: May 22, 2008 16:50
- MSRP: $ 7,500
- Power Output: 150 wpc x 10; 8-ohms @ 0.05% THD + N / 300wpc x 10, 4-ohms @ 0.08% THD + N
- Monoblock amplifier construction with shortened audio signal paths and direct mechanism grounding scheme
- 4 large E-core power transformers and 200,000uF total power supply capacitance
- 3 Analog VU power meters assignable per channel
- Amp Configuration options: fully configurable channel assignments
- Amplifier Operational Modes: bridgeable, bi-wireable and bi-ampable
- Speaker Terminals: high grade 5 way binding post banana plug
- Completely Configurable Amplifiers
- THX Ultra2 Certified
- UL Rated down to 4-ohms
- Link Control for matching AVP-A1HDCI pre/pro
- Dimensions (H x W x D): 11.1” x 17.1” x 20.9”
- Weight: 132 lbs
Pros
- Endless array of configuration options
- Phenomenal build & sound quality
- Has no problems driving low impedance speakers to reference levels
Cons
- Uber expensive
- Bulky and heavy
 Denon POA-A1HDCI Introduction

Somebody forgot to tell the engineers at Denon that just because you can build a thing, doesn’t necessarily follow that you must build that thing. The more familiar I become with Denon flagship products, the more I realize two things: Denon is always the first to implement new technologies without consideration if the end result is a box that weighs and costs more than most mere mortals can swing. Enter the new POA-A1HDCI 10 channel amplifier whose name may be forgettable but its momentous stature isn’t. When I first saw the prototype at CES two years ago, I remember thinking I can’t believe they actually produced a multi-channel amplifier that makes their AVR-5805 flagship receiver feel envious. Standing in at a hefty 132 lbs, it’s the largest and heaviest amplifier I’ve ever tested. When Denon shipped it to me with their matching AVPA1-HDCI pre/pro on a large palette, my wife was concerned where the shipper was going to place it while I was trying to figure out how I would hoist these monsters up my flight of steps. The Denon separates actually took priority in my garage over my Acura TL, at least until I managed to get them installed into my theater room. I was more than a little excited to test out the new Denon gear which I pegged as being the hottest items to review in 2008. Now that they had finally arrived, I wanted to be sure they would live up to all the hype and deliver true high end performance one would expect from the very best “separates” components.
Denon PAO-A1HDCI Set-Up & Design Overview
 “It’s got
handles,” Jeff Talmadge, Product
Manager of Denon told me. “It should be a breeze to carry…” what he didn’t tell me was that the handles
were on the back panel of the unit and that I’d have to upright row it up my
flight of steps into my theater room. I
instead opted to carry it up the old fashion way – bribing my neighbor with a
cold beer to help me carry it and install into my Audiav Crystal A/V rack. The handles did come in handy when pulling it
into my rack while my friend pushed from the front. Make no mistake this amplifier is a two man
install job unless of course you’re a competitor on the Strong Man show.
“It’s got
handles,” Jeff Talmadge, Product
Manager of Denon told me. “It should be a breeze to carry…” what he didn’t tell me was that the handles
were on the back panel of the unit and that I’d have to upright row it up my
flight of steps into my theater room. I
instead opted to carry it up the old fashion way – bribing my neighbor with a
cold beer to help me carry it and install into my Audiav Crystal A/V rack. The handles did come in handy when pulling it
into my rack while my friend pushed from the front. Make no mistake this amplifier is a two man
install job unless of course you’re a competitor on the Strong Man show.
With an almost endless array of configuration options, I had to really think which options best suited my needs. Thus I listed some of the most common configuration choices highlighting the one I used for my application.
Common Connection options:
- 5.1 Main Zone all channels bi-amplified
- 5.1 Main Zone all channels bridged for up to 4x power to each channel
- 5.1 Main Zone, Zone 2 and Zone 3 stereo, with Zone 4 mono
- 7.1 Main Zone, Zone 2 stereo and Zone 3 mono
- 7.1 Main Zone with Front left, right and center speakers bi-amplified
- 7.1 Main Zone with Front speakers bridged and Zone 2 mono
- 9.1 Main Zone and Zone 2 Mono
Editorial Note on Amplifier Connection Type Definitions
Bi-Wire: When using speakers that have independent input terminals for the woofer and tweeter drivers, this type of connection allows you to connect both terminals to the same channel of the amplifier via the Spk A and Spk B WBT connections. The main advantage to bi-wiring is lowering the effective wire gauge. There are minimal benefits to this connection scheme and we usually recommend going with lower gauge single wired solutions instead.
Bi-Amp: When using speakers that have independent input terminals for the woofer and tweeter drivers, this connection outputs one input signal from two amplifiers to each woofer and tweeter connection. During this mode, the ten channel amplifier becomes a 5-channel amplifier. This allows for a greater degree of isolation between the drivers and better amplifier control. Ultimate bi-amplified installations involved active crossover solutions but we’ve seen and heard benefits of passive bi-amplifying assuming the amplifiers power supply is capable of such an installation.
Bridge Mode: This connection allows you to use two amplifier channels to output opposite phase signals generated from one input signal. When you bridge an amplifier, you effectively double the output voltage with can yield up to 4 times the rated output power assuming the power supply can deliver that much current. This is a good idea for applications that require lots of power to reach high SPL’s but its important to note that each amplifier effectively sees ½ the rated impedance of the loudspeaker so if your speaker system is rated nominally at 4-ohms, be sure the amplifier is stable for two ohm loads before bridging it. Never bridge an amplifier that isn’t designed to do so!
Though I didn’t make use of the 10th channel for Zone 2 mono, I did get a chance to really punish this amp by bridging it for my reference speakers which dip dangerously low into the 2-ohm region while at the same time had it powering the rest of my surround speakers for a full 7.1, or in my case 7.4, spectacle. Unless otherwise noted, all of my listening tests were conducted via this loading scheme on the amplifier.
All of the connections I made between the POA-A1HDCI and the AVP-A1HDCI were via balanced cables furnished by Blue Jeans Cable. My reference gear consisted of all RBH Signature Special Edition speakers, two Velodyne DD-15 subwoofers, a Denon DVD-5910CI Universal DVD player and Toshiba HD-A2 HD DVD player and an XBOX 360.
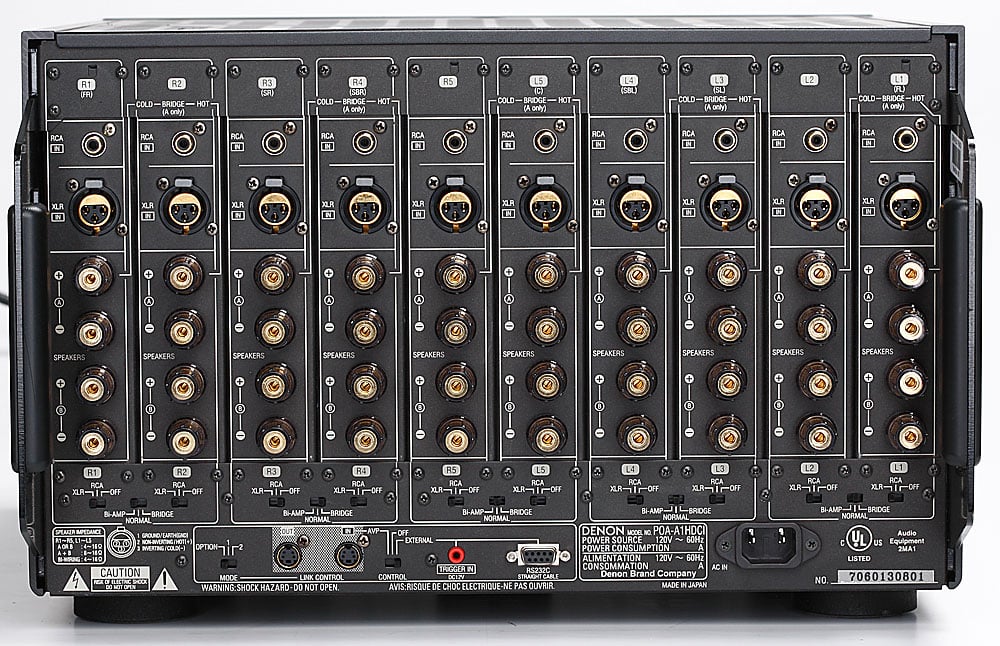
POA-A1HDCI back panel view
If there was an award to be given for the most complex amplifier back panel, Denon would surely win it with the POA-A1HDCI. At first glance, it appeared to have as many connections as a flagship A/V receiver and was initially about as intimidating, but it’s important to break it down into sections and realize that it’s mostly just one amp module repeated 9 extra times. The POA-A1HDCI accommodates both balanced and unbalanced input connections. Each channel may be configured as “normal”, “bi-amp” or bridged as well be completely defeated. Each channel is labeled for a particular speaker but the channel assignment is ultimately dictated by the AVP-A1HDCI processor. The amp can be configured via switches for each channel on the back panel, or if you have the matching AVP-A1HDCI processor via the Link control which bypasses all back panel switches once you make the link connection and flip the control switch to AVP. It took me a few minutes to understand how to properly bridge two-channels.
- L1 & L2 > L1 (hot)
- L3 & L4 > L3 (hot)
- R1 & R2 > R2 (hot)
- R3 & R4 > R4 (hot)
Where for example L1 is the hot for the L1/L2 bridged amps and the Red (+) A speaker terminal for L1 is positive while the Red (+) A speaker terminal for L2 is negative. You cannot use speaker terminals B for bridging. Speaker polarity for bridged mode was poorly documented in the manual and is shown via a crude black and white connection diagram of a speaker being connected to the amp. In my opinion, they should have circled the + side for the bridged channels on the back panel for greater clarity but if you remember that “hot” implies amplifier input connection and + speaker polarity, you will get the connections right. Also note that the switch to select “normal, bi-amp, bridged” always points to “bridged” on the “hot” amp of the pair grouping. Once you have a channel pair configured into “bridged” mode, you can confirm it by selecting the amp pair on the front power meter which will illuminate the two associated amplifiers. Bi-amp connections and channel grouping work similarly to bridging except you connect the high portion of one speaker to the +/- terminals of one amp while connecting the low portion of the speaker to the +/- terminals of the adjacent grouped amplifier.
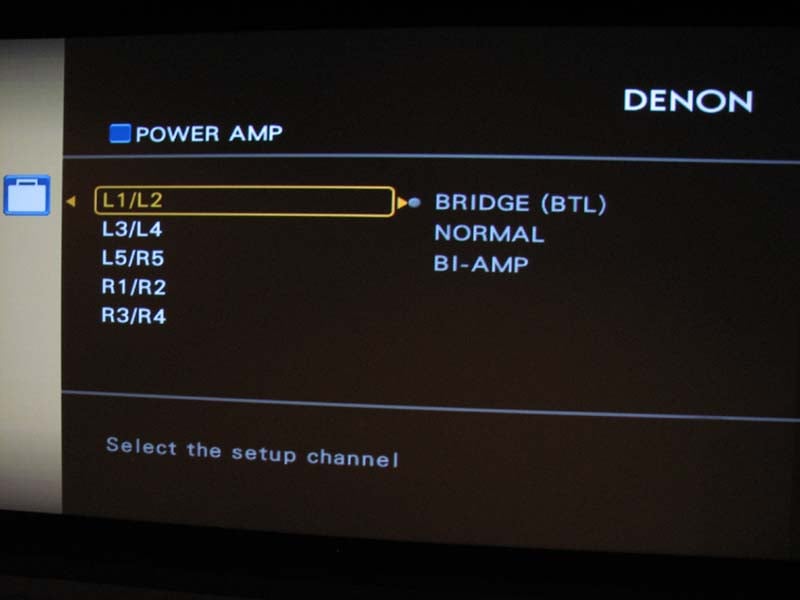

Screenshots from the AVP-A1HDCI Power Amp Configuration Screen
The Link control connects directly to the AVP-A1HDCI and can also be connected in series with another POA-A1HDCI for a 20 channel application. Not even I could ever envision this, but I am sure someone with a deep enough wallet and passion for the hobby could make it a reality. This is accomplished via the mode switch which has three settings “option” for future use, “1” and “2” for master and slave operation, respectively. It’s pretty neat to have the ability to fully configure the amplifier from the processor and I am hopeful they can take better advantage of this feature perhaps by offering power monitoring via future firmware upgrades to the AVP-A1HDCI processor. There is also a 12V trigger for those not using the Link control feature found on the matching pre/pro. An RS-232C connection (first time I’ve ever seen this on a power amp) is available for external control as well.
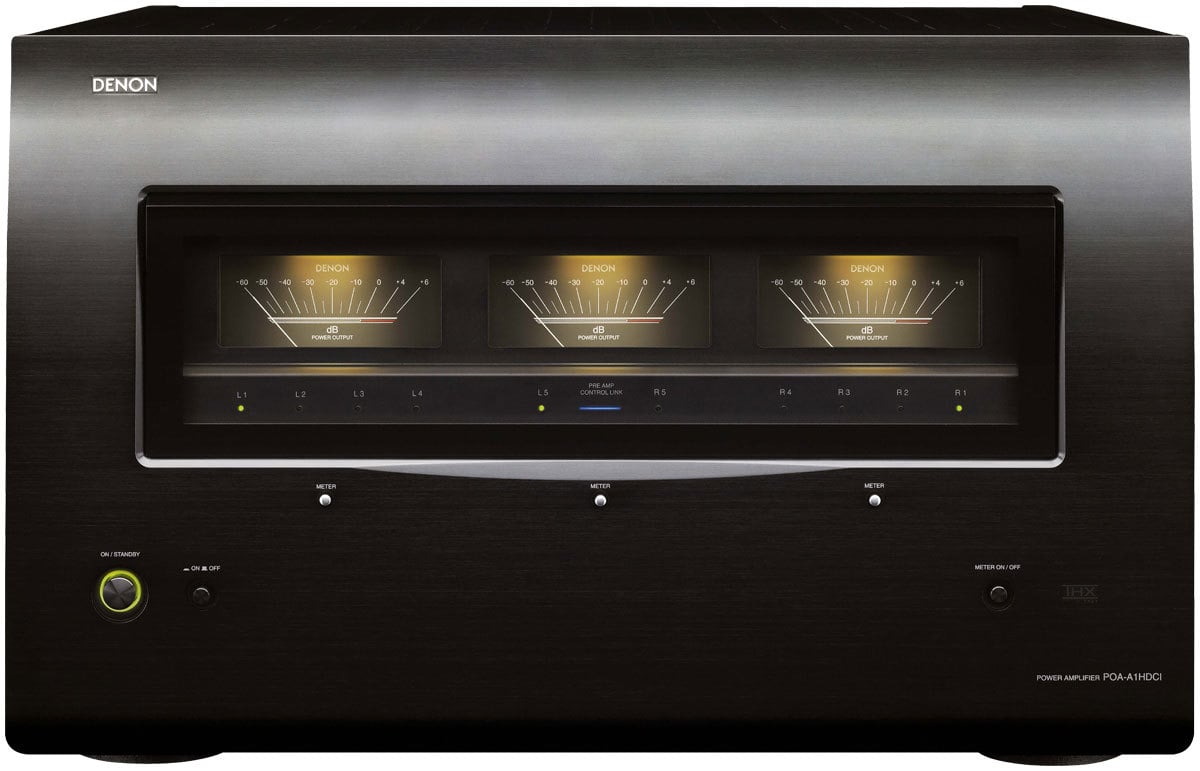
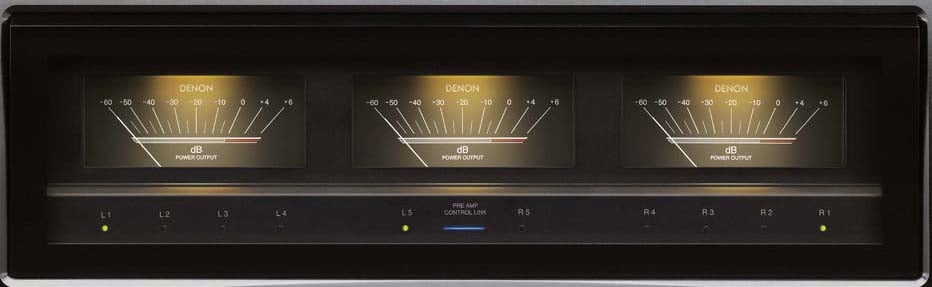 The Denon multi-channel power amplifier features
three channel level meters across its front-panel. I like the idea here but don’t
particularly care too much for the white backlighting. Personally I’d rather they run across the
street to McIntosh labs and replace them with blue ones and make the panels
larger so they can be more easily seen from a distance. Regardless, I like the idea of monitoring
power with old fashion VU meters and it gives the amplifier a nice high end
appeal to it.
The Denon multi-channel power amplifier features
three channel level meters across its front-panel. I like the idea here but don’t
particularly care too much for the white backlighting. Personally I’d rather they run across the
street to McIntosh labs and replace them with blue ones and make the panels
larger so they can be more easily seen from a distance. Regardless, I like the idea of monitoring
power with old fashion VU meters and it gives the amplifier a nice high end
appeal to it.
You can select the output level (dB indicator) of each power amp channel by using one of the channel level meters. The channel level meter to the left of the unit's front-panel displays the output level of Left 1, Left 2, Left 3, or Left 4 channel of the amplifier. The channel level meter to the right of the unit's front-panel displays the output level of the Right 1, Right 2, Right 3, or Right 4 channel of the amplifier. The channel level meter located in the center of the front-panel of the amplifier display the output level of the Left 5 or Right 5 channel of the amplifier. I monitored the front 3 channels, especially since my mains were configured in bridged mode to see if I ever drove the needles into red.
According to the manual, the front panel level indicators represent the following power levels which are more ideal than a reality for bridged amplifiers. Rarely have I come across an amplifier that can truly deliver 4x the power when bridged, especially into a 4-ohm load as you will see in the measurements portion of this review. I believe however that these power figures are more representative of dynamic rather than sustained at least for bridged modes of operation.
| Output Indicator | 4-ohm | 8-ohm | 4-ohm – bridged | 8-ohm - bridged |
| 0 dB | 300 watts | 150 watts | 1200 watts | 600 watts |
| - 10dB | 30 watts | 15 watts | 120 watts | 60 watts |
| - 20 dB | 3 watts | 1.5 watts | 12 watts | 6 watts |
| - 30 dB | 300 mwatts | 150 mwatts | 1.2 watts | 600 mwatts |
| - 40 dB | 30 mwatts | 15 mwatts | 120 mwatts | 60 mwatts |
| - 50 dB | 3 mwatt | 1.5 mwatts | 12 mwatts | 6 mwatts |
Design Overview & Build Quality
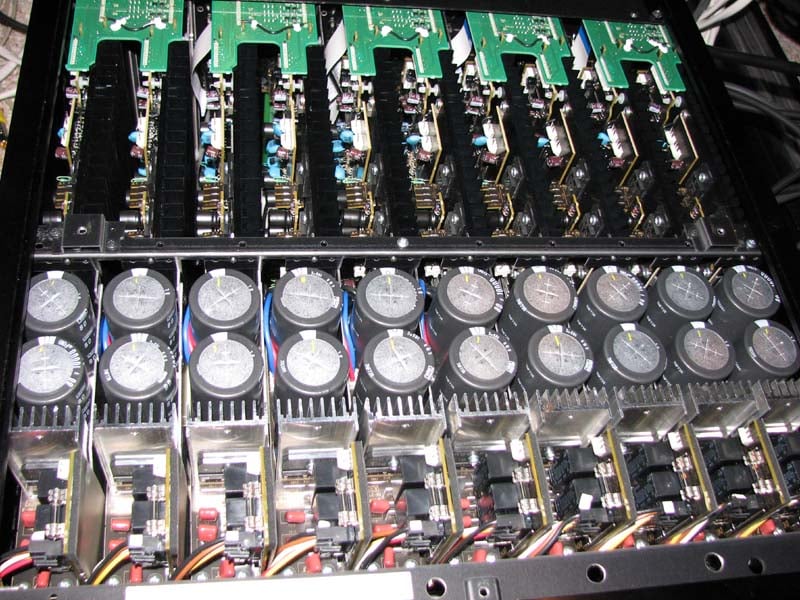 The Denon
POA-A1HDCI is a no holds barred, no compromise multi-channel THX Ultra2
certified amplifier design that represents some of the best engineering I’ve
seen to date in a traditional linear Class A/B amplifier. Each of the unit's ten amplifier channels feature a discrete
power amplifier assembly and DC power supply to eliminate interference between
channels. The POA-A1HDCI is equipped
with eight individual transformers to supply power to each discrete circuit and
uses 4 main power transformers to drive the ten channel power amplifiers with
separated coil winding for pure audio playback. High current DC rectifiers and
companion high current filter/storage capacitors (20 x 10,000uF 80V 105 deg C
rated to yield a whopping 200,000uF total storage capacity) ensure stable
performance with low impedance (4-ohms) speaker loads, even in bridged
mode. In fact this is the industry's first
4-ohm UL rated amplifier I’ve come across.
This is quite an engineering feat for a multi-channel amp which requires
a helluva lot of heat sink area and high current devices to double down its
power with halving load impedance while meeting the stringent heat dissipation
requirements of UL. To do 150wpc into 8-ohms
like this amp is rated, you need at least 55V rails so the 80V caps have more
than enough design margin to ensure this amp can deliver more than rated power
and not get wigged out during high line voltage conditions when plugged into a
power conditioner that does voltage regulation.
The POA-A1HDCI appears to be a very conservatively rated 150wpc x 10
amplifier with good headroom to help prevent clipping during high power
demands.
The Denon
POA-A1HDCI is a no holds barred, no compromise multi-channel THX Ultra2
certified amplifier design that represents some of the best engineering I’ve
seen to date in a traditional linear Class A/B amplifier. Each of the unit's ten amplifier channels feature a discrete
power amplifier assembly and DC power supply to eliminate interference between
channels. The POA-A1HDCI is equipped
with eight individual transformers to supply power to each discrete circuit and
uses 4 main power transformers to drive the ten channel power amplifiers with
separated coil winding for pure audio playback. High current DC rectifiers and
companion high current filter/storage capacitors (20 x 10,000uF 80V 105 deg C
rated to yield a whopping 200,000uF total storage capacity) ensure stable
performance with low impedance (4-ohms) speaker loads, even in bridged
mode. In fact this is the industry's first
4-ohm UL rated amplifier I’ve come across.
This is quite an engineering feat for a multi-channel amp which requires
a helluva lot of heat sink area and high current devices to double down its
power with halving load impedance while meeting the stringent heat dissipation
requirements of UL. To do 150wpc into 8-ohms
like this amp is rated, you need at least 55V rails so the 80V caps have more
than enough design margin to ensure this amp can deliver more than rated power
and not get wigged out during high line voltage conditions when plugged into a
power conditioner that does voltage regulation.
The POA-A1HDCI appears to be a very conservatively rated 150wpc x 10
amplifier with good headroom to help prevent clipping during high power
demands.
Editorial Note on Amplifier Clipping
Once an amp runs out of headroom it enters a mode commonly referred to as “clipping”. When an amplifier clips it essentially sends a square wave response or DC voltage to the speaker which after only a few short cycles can fry a tweeter's voice coil or burn out series inductors in the crossover sections.
Denon PAO-A1HDCI Listening Evaluation
CD: Dianne Reeves Never Too Far
 This is the first CD I turn to when initially calibrating a
system as many of the tracks in this CD are an awesome test for a system's bass
response and accuracy. The bass track in
Track #2 “Never Too Far” will sound muddy or weak on an improperly set up or
inadequate system. I initially ran just
my front main speakers bridged to the POA-A1HDCI to determine how cleanly they
would play once I started pumping the volume up. The presentation was free from audible strain
or graininess and the system's bass response was tight and articulate - just as
it should be when driven by quality electronics. The tonal balance seemed slightly more
forward than what I recalled when the amps in my Denon AVR-5805 were powering my
speakers but it also seemed more grandiose. I found the POA-A1HDCI displayed
excellent stereo separation portraying Dianne’s powerful vocals dead center. The drums had a nice pop to them while the
saxophones exhibited a nice bite giving you that “live” feeling. The soundstage was very expansive making me
feel the “never too far…" chants
from the backing vocals where emanating from my side channels despite the fact
that I was only listening in stereo. The
POA-A1HDCI maintained a very clean composure even when driven to LOUDER than
comfortable listening levels in my nearly 6,000 ft^3 Auralex acoustically treated
listening room sitting 16ft away from my speakers. Switching over to PLIIx Music mode was like
being thrown right into a high power nightclub.
Now I had all the speakers powered off the POA-A1HDCI and instead of
rnning out of gas, it seemed to want to play louder so I continued increasing
the volume hypnotically watching the needles on the power meters pump away flirting
into the red +4dB levels during bass transients in track #3 “Come In”. The floor in my theater room shook as if it
were alive and the transients in the sax sent chills down my spine. Although this was insanely loud, it didn’t at
all seem strained and I had to remind myself as my SPL meter hit 110dB
transients that I was listening at unsafe levels.
This is the first CD I turn to when initially calibrating a
system as many of the tracks in this CD are an awesome test for a system's bass
response and accuracy. The bass track in
Track #2 “Never Too Far” will sound muddy or weak on an improperly set up or
inadequate system. I initially ran just
my front main speakers bridged to the POA-A1HDCI to determine how cleanly they
would play once I started pumping the volume up. The presentation was free from audible strain
or graininess and the system's bass response was tight and articulate - just as
it should be when driven by quality electronics. The tonal balance seemed slightly more
forward than what I recalled when the amps in my Denon AVR-5805 were powering my
speakers but it also seemed more grandiose. I found the POA-A1HDCI displayed
excellent stereo separation portraying Dianne’s powerful vocals dead center. The drums had a nice pop to them while the
saxophones exhibited a nice bite giving you that “live” feeling. The soundstage was very expansive making me
feel the “never too far…" chants
from the backing vocals where emanating from my side channels despite the fact
that I was only listening in stereo. The
POA-A1HDCI maintained a very clean composure even when driven to LOUDER than
comfortable listening levels in my nearly 6,000 ft^3 Auralex acoustically treated
listening room sitting 16ft away from my speakers. Switching over to PLIIx Music mode was like
being thrown right into a high power nightclub.
Now I had all the speakers powered off the POA-A1HDCI and instead of
rnning out of gas, it seemed to want to play louder so I continued increasing
the volume hypnotically watching the needles on the power meters pump away flirting
into the red +4dB levels during bass transients in track #3 “Come In”. The floor in my theater room shook as if it
were alive and the transients in the sax sent chills down my spine. Although this was insanely loud, it didn’t at
all seem strained and I had to remind myself as my SPL meter hit 110dB
transients that I was listening at unsafe levels.
SACD: Patricia Barber – Night Moves
 Track #1
“Bye Bye Blackbird” revealed that the POA-A1HDCI can handle delicate musical
passages with authenticity. Piano music
is very hard to accurately reproduce as the harmonic overtones are quite
complex. The POA-A1HDCI’s low noise
floor revealed all of the nuances with plenty of depth at airiness. I heard all of the presence in the cymbals of
Track #2 “Invitation” with plenty of body in the music. Bass was abundant and well extended in track
#3 “Yesterdays”. I switched the
processor to pure direct and just sat back listening to pristine two-channel
audio that would make even the most critical of audiophiles
drool over. The Denon gear was driving
my speaker system with ease and adding no sonic nasties that would distract my
enjoyment of the listening session no matter what power level I was running at.
Track #1
“Bye Bye Blackbird” revealed that the POA-A1HDCI can handle delicate musical
passages with authenticity. Piano music
is very hard to accurately reproduce as the harmonic overtones are quite
complex. The POA-A1HDCI’s low noise
floor revealed all of the nuances with plenty of depth at airiness. I heard all of the presence in the cymbals of
Track #2 “Invitation” with plenty of body in the music. Bass was abundant and well extended in track
#3 “Yesterdays”. I switched the
processor to pure direct and just sat back listening to pristine two-channel
audio that would make even the most critical of audiophiles
drool over. The Denon gear was driving
my speaker system with ease and adding no sonic nasties that would distract my
enjoyment of the listening session no matter what power level I was running at.
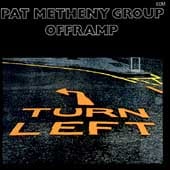 No serious
reviewer forgets to throw in a little Pat Metheny in their product reviews,
especially when testing out top echelon gear like this. I pulled out an oldie but goodie and took it
for a spin using PLIIx Music Mode. I was
drawn into the immense sound field that Track #1 “Barcarole” was portraying and
Pat’s synth guitar was simply surreal.
This got my endorphins pumping as I couldn’t wait to really crank out my
favorite track of the disc which quickly followed. Track #2 “Are You Going with Me?” starts out
calm and collected until Pat’s synth guitar erupts into a solo so few
guitarists can convey this level of emotion in their playing. I found myself continually cranking it up
because it was so clean and non-fatiguing.
A sign of a good system is when it’s blasting and it doesn’t seem all
that loud. The Denon POA-A1HDCI was
certainly reaffirming this point with me.
No serious
reviewer forgets to throw in a little Pat Metheny in their product reviews,
especially when testing out top echelon gear like this. I pulled out an oldie but goodie and took it
for a spin using PLIIx Music Mode. I was
drawn into the immense sound field that Track #1 “Barcarole” was portraying and
Pat’s synth guitar was simply surreal.
This got my endorphins pumping as I couldn’t wait to really crank out my
favorite track of the disc which quickly followed. Track #2 “Are You Going with Me?” starts out
calm and collected until Pat’s synth guitar erupts into a solo so few
guitarists can convey this level of emotion in their playing. I found myself continually cranking it up
because it was so clean and non-fatiguing.
A sign of a good system is when it’s blasting and it doesn’t seem all
that loud. The Denon POA-A1HDCI was
certainly reaffirming this point with me.
DTS CD: Diana Krall - Love Scenes
 Track #2
“Peel Me a Grape” had Diana’s vocals centered straight ahead while the bass
rattled my floor joists. I was in awe
that despite my room was shaking with so much tactile energy, I still heard all
of the great reverb from the surround channels in the recording and the twang
sound of the bass. There was excellent
separation of musical instruments and no sigh of strain or smearing like I’ve
heard on lesser designed amplifiers. In
track #3 “I Don’t Know Enough About You” I actually did hear distortion but quickly realized it was part of the
recording likely caused by preamp clipping during the recording process.
My system was revealing enough to showcase this recording flaw.
Track #2
“Peel Me a Grape” had Diana’s vocals centered straight ahead while the bass
rattled my floor joists. I was in awe
that despite my room was shaking with so much tactile energy, I still heard all
of the great reverb from the surround channels in the recording and the twang
sound of the bass. There was excellent
separation of musical instruments and no sigh of strain or smearing like I’ve
heard on lesser designed amplifiers. In
track #3 “I Don’t Know Enough About You” I actually did hear distortion but quickly realized it was part of the
recording likely caused by preamp clipping during the recording process.
My system was revealing enough to showcase this recording flaw.
Denon PAO-A1HDCI Measurements and Analysis
The gain structure for this amp is right in line with every THX Ultra2 certified product I’ve measured:
Av = 23dB
balanced
Av = 29dB
unbalanced
Power Bandwidth & Distortion
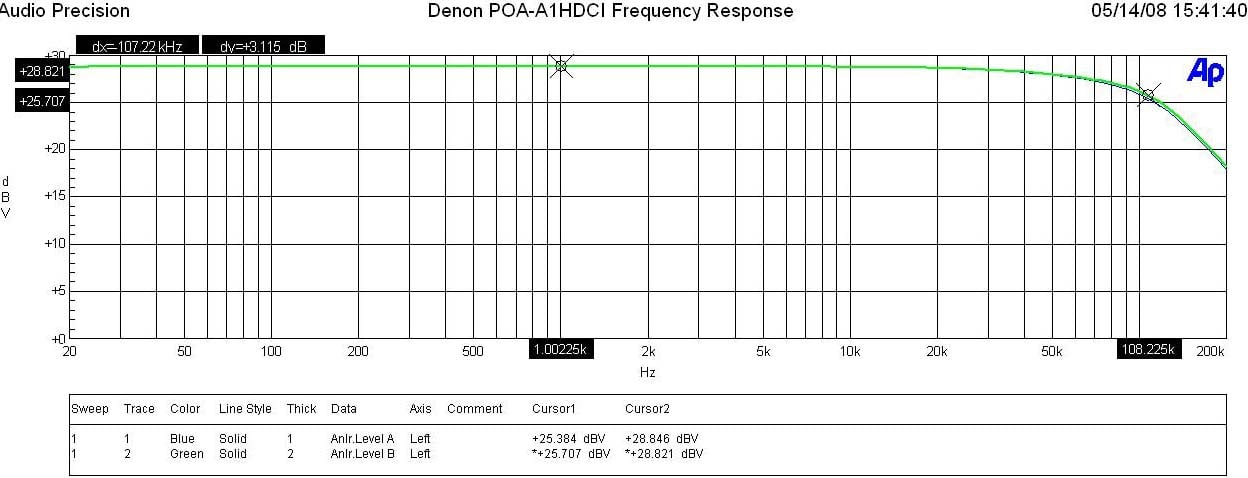
Denon POA-A1HDCI Frequency Response at 1 watt & Full Power
The POA-A1HDCI displayed excellent frequency response uniformity with a ruler flat response in the audio passband and an unwavering -3dB point of 108kHz at every power level whether in normal or bridged modes of operation.
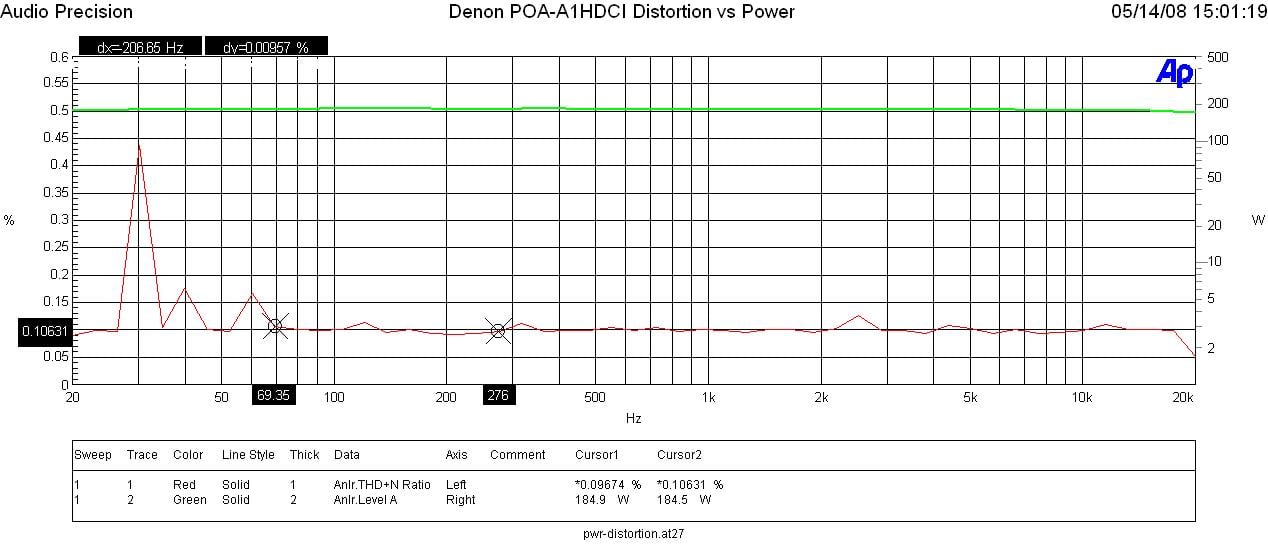
Denon POA-A1HDCI Power vs Distortion
I measured full bandwidth continuous power vs distortion by setting up a regulated sweep in my Audio Precision to automatically adjust input level until the maximum power output was achieved at < 0.1% THD + N. The POA-A1HDCI was plugged directly into an APC S-20 Power Conditioner with regulation to ensure the line never dropped below 116Vrms.
Power output: <0.1% THD + N
- 1CH, 8-ohms: 184wpc
- 2CH, 8-ohms: 180wpc
- 1CH, 4-ohms: 300wpc
- 2CH, 4-ohms: 285wpc
- 1CH, 8-ohms bridged: 340wpc
- 1CH, 4-ohms bridged: *425wpc; 500wpc @ < 1%
- 2CH 8-ohms bridged 330wpc
- 2CH, 4-ohms bridged: *405wpc; 470wpc @ < 1%
It is clear that the POA-A1HDCI easily hit the 150wpc power rating, delivering MUCH more than specified into 8-ohm loads in normal and bridged modes and about dead on specified power delivery for 4-ohm loads for normal and bridged modes of operation.
While the POA-A1HDCI was driving 4-ohm loads in bridged mode, I was able to achieve the 1% power numbers at <.1% THD + N in the above table at 1kHz but distortion went up significantly at the frequency extremes (20Hz and 20kHz). This is why I scaled the measurements back to ensure the amp delivered the measured power at <0.1% THD + N full bandwidth continuously.
Editorial Note on Bridged Power Measurements
What I believe was happening here was the power draw at low frequencies didn’t allow enough time for the capacitor bank to charge and at high frequencies the power density is much higher requiring a bigger transformer to achieve these sustained power levels. I couldn’t help to wonder just how much more power the POA-A1HDCI could have delivered if Denon chose to employ one massive power supply instead of multiple smaller ones for better channel to channel isolation. There are pros and cons to these different methodologies but I believe Denon struck a good balance here, yielding the best of both worlds with their hybrid mono block multi power supply approach while also keeping the box size reasonable for a high power ten channel amplifier. Keep in mind that this amp in bridged mode will yield a HUGE +6dB of dynamic headroom when driving a real speaker load with music, even though sustained power measurements aren’t all that much higher into resistive loads driven by continuous test tones.
When testing 2 channels bridged mode into a 4-ohm load, my APC S20 ran into an overload condition but did manage to keep the line regulated above 116Vrms. This goes to show you that continuous power testing consumes far more power than real world usage as I was never able to get my APC S20 to state I was using greater than 30% capacity even when I was blasting my system at sustained 110dB listening levels in 7.1 surround modes at my listening area.
Upon peering at the spec sheet for this amp, it was obvious that the manufacturer was specific about how they rated power. They specified full bandwidth power at < .05%THD + N for (150wpc, 300wpc bridged) for 8-ohm loads, but only 1kHz .7% THD+N (300wpc, 500wpc bridged) when driving 4-ohm loads. Under these circumstances, the POA-A1HDCI delivered as promised and then some, but as an Audioholic, I would de-rate the 4-ohm bridged continuous power specification by 15% or so and bolster the fact that you’ve got roughly +6dB of dynamic headroom.
Editorial Note on Audioholics Power Ratings
Keep in mind most review publications don’t do continuous power measurements and they usually publish power measurements into clipping at 1% THD + N at 1kHz. Our measurements are very conservative and are continuous full bandwidth.
For more info on amplifier measurements, see: The All Channels Driven (ACD) Test
Efficiency
With two-channels
driven at full load, I measured about 47-49% efficiency which is good but not
as great as I’ve seen in for other linear Class A/B amplifier designs. When the unit was idling with all amplifiers
turned on, it consumed about 275 watts. It’s
the idle power consumption of 10 channels that kills the efficiency of this
amplifier. Too bad there isn’t a way to
cut power on unused channels.
SNR Measurement
When the
POA-A1HDCI was driven to full power into an 8-ohm load, I measured: -117.15 dB
below 31.77 dBV Reference Level (at 0.09% THD+N) < 10Hz – 22kHz unfiltered
and unweighted. This translates down to
94.3dB SNR @ 1 watt which is excellent and explains why this amp sounds so
crystal clean and quite at low power levels.
FFT Distortion Analysis
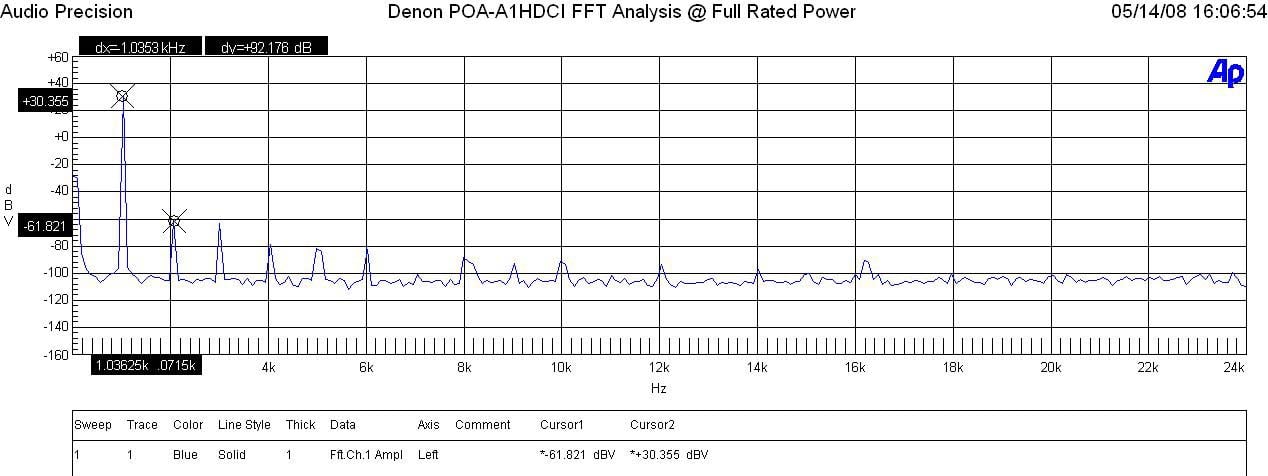
Denon POA-A1HDCI FFT Analysis @ Full Rated Power
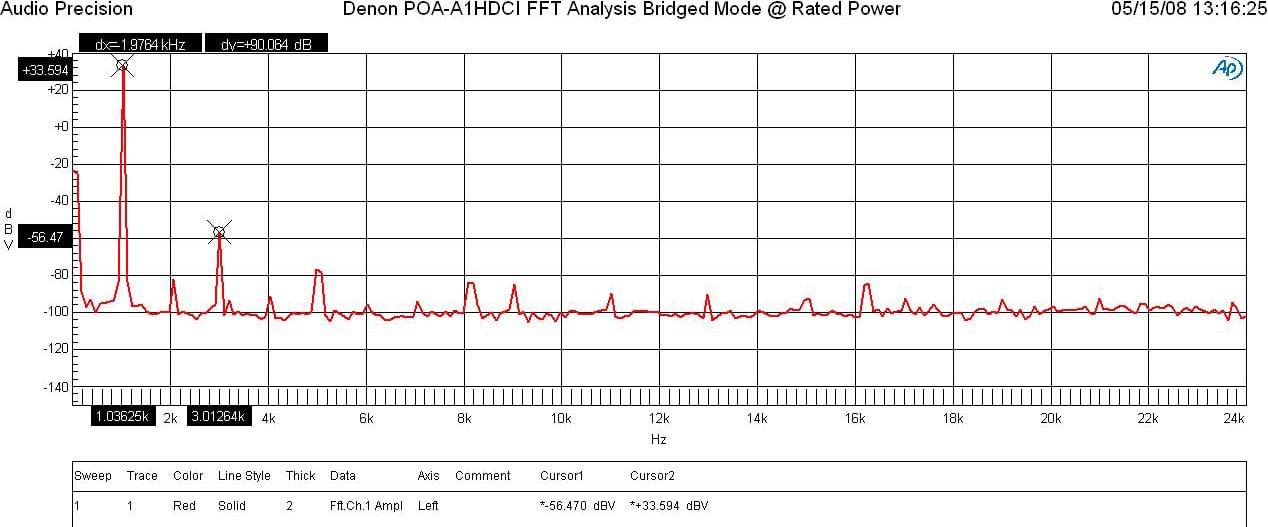
Denon POA-A1HDCI FFT Analysis @ Full Rated Power – Bridged Mode
At 1 watt into 8-ohms, the POA-A1HDCI displayed excellent results (+8.649 + 84.653)dBv = 93.3dBv or 100*alog^-1(-93.3/20) = .0.0022%. At full rated power the POA-A1HDCI again exhibited excellent distortion measurements (+30.355 + 61.821)dBv =92.2dBv or 100*alog^-1(-92.2 /20) = 0.0025%. With the POA-A1HDCI in bridged mode, it still achieved excellent distortion measurements (+33.594 +56.47)dBv = 90dBv or 100*alog^-1(-90 /20) = 0.0032%. This was among the cleanest amplifiers I’ve measured to date besting even the venerable Integra Research RDA-7.1.
While the overall amplitude of the primary distortion products remained similarly good for normal vs bridged modes of operation, it was interesting to note that the POA-A1HDCI even order harmonics seem to dominate in normal mode while the odd order harmonics seem to dominate in bridged mode of operation.
Amplifier Output Impedance & Damping Factor
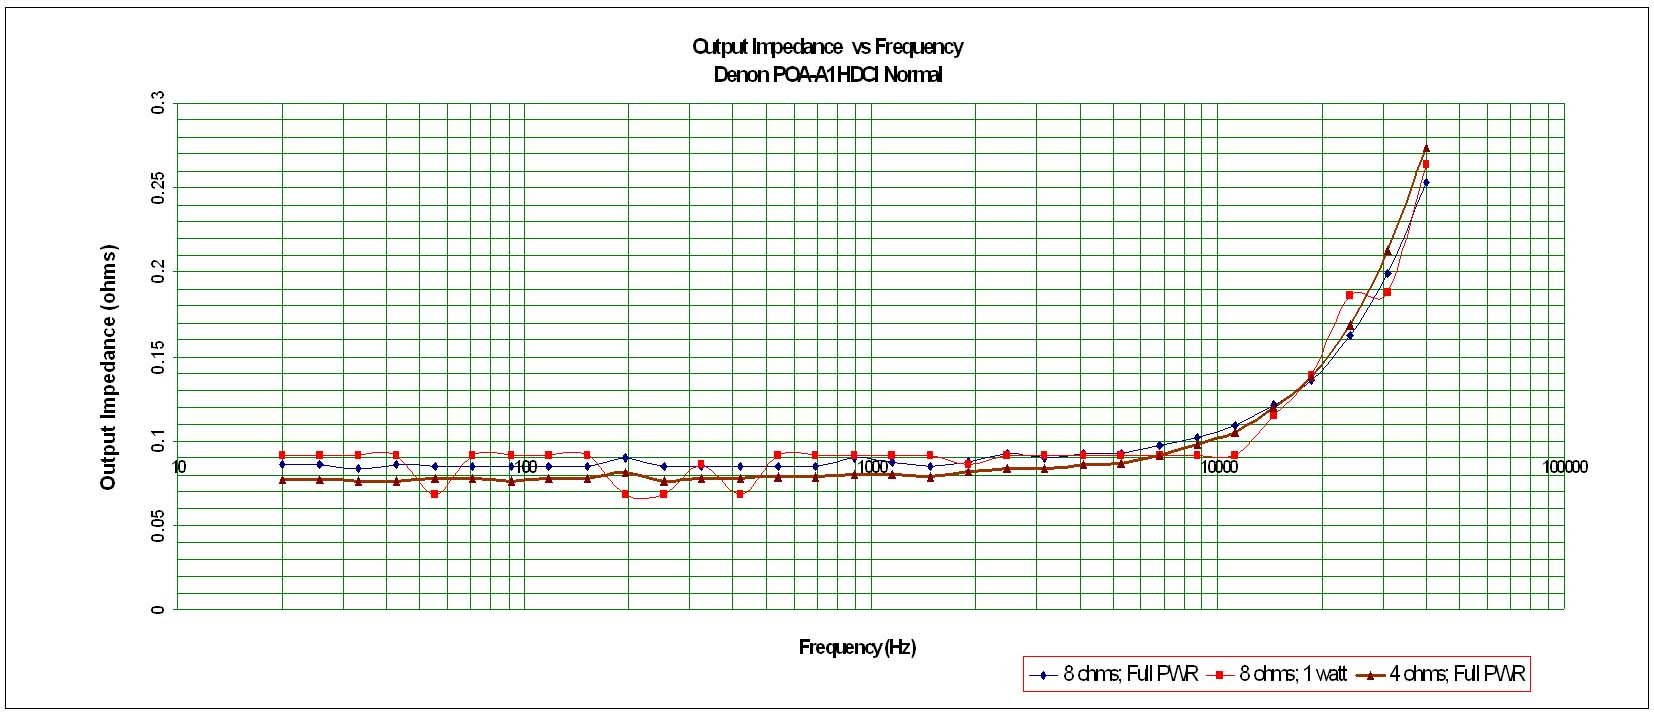
Denon POA-A1HDCI Amplifier Output Impedance – Normal Mode
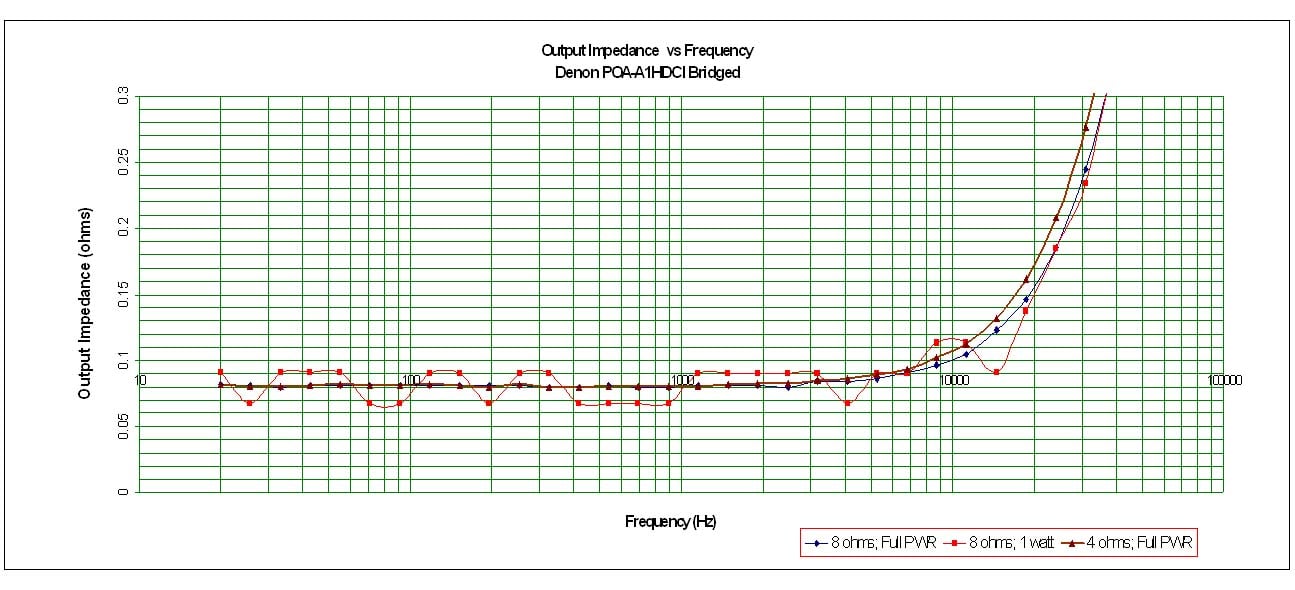
Denon POA-A1HDCI Amplifier Output Impedance – Bridged Mode
The POA-A1HDCI exhibited vanishingly low output impedance in normal and bridged configurations. This indicates good usage of negative feedback but also high quality output devices and a large enough power supply to be stable when driving low impedance loads at full power. It fell well below our desired 100 mohm or less mark for the entire audible bandwidth up to 20kHz and maintained itself even when driving at max sustained power levels into 8-ohm and 4-ohm loads. This proves that the POA-A1HDCI will sound consistently good no matter what loudspeaker load it is driving.

Denon POA-A1HDCI Amplifier Damping Factor – Normal Mode
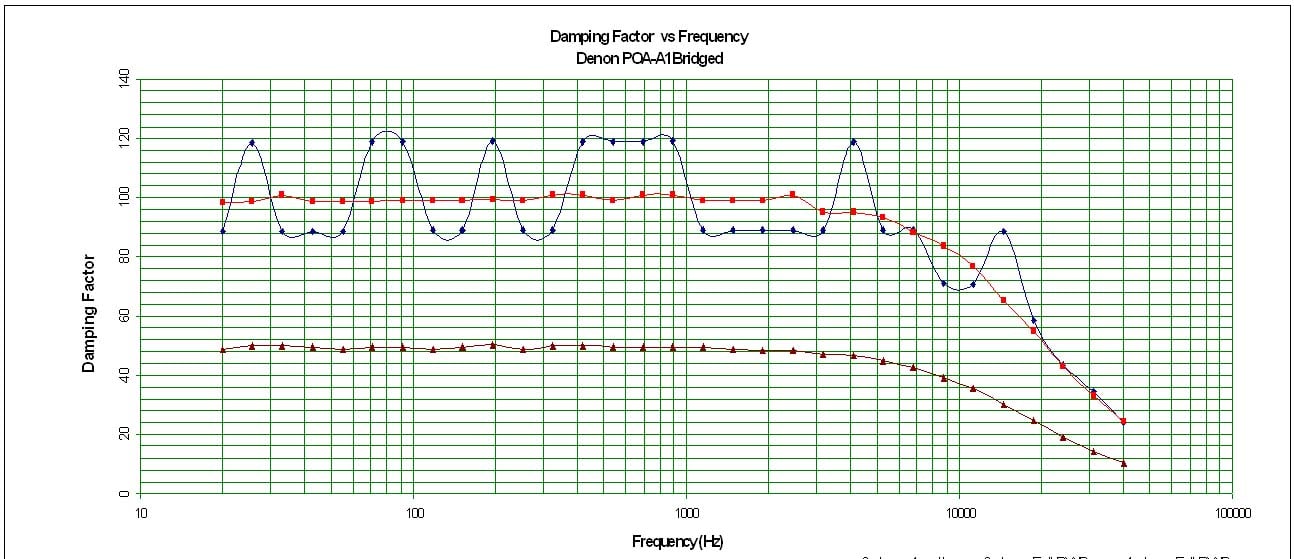
Denon POA-A1HDCI Amplifier Damping Factor – Bridged Mode
The POA-A1HDCI amplifier damping factor is about what I expected based on the measured output impedance. It is uniformly good across the entire audio frequency range at around the 100 mark (50 is a minimum we like to see in all amplifiers of uncompromising design) when driving an 8-ohm loads. Into 4-ohm loads the Damping factor is exactly as expected, ½ the 8-ohm value and buttressing the argument that the POA-A1HDCI is happy to drive low impedance loads at full power.
Crosstalk
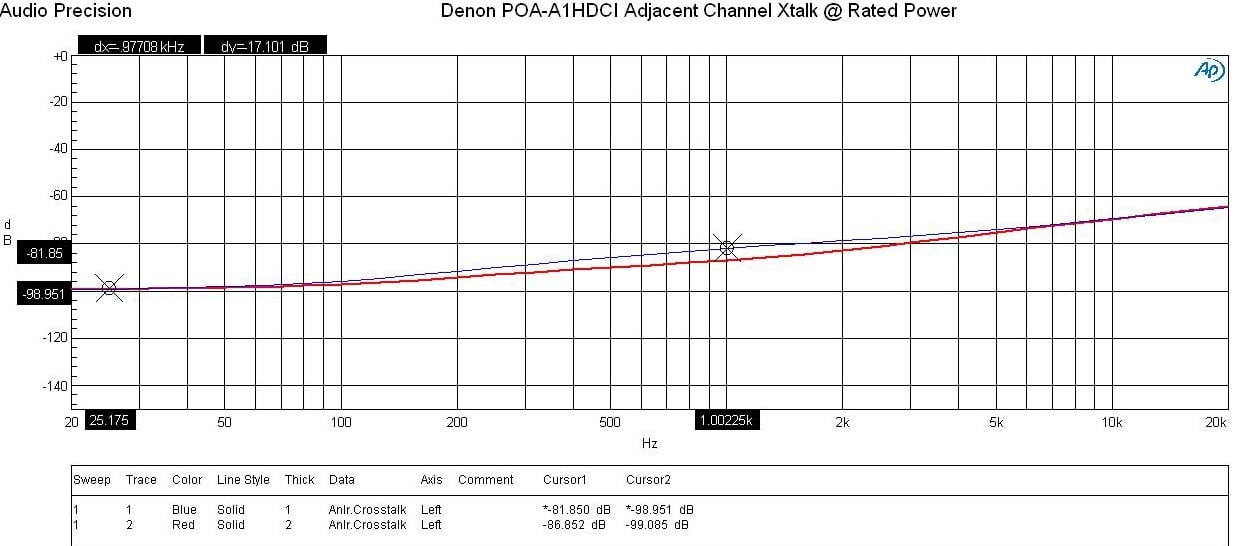
Denon POA-A1HDCI Crosstalk Measurement Adjacent Channels
Running a full range frequency sweep through the POA-A1HDCI amplifier at full rated power (150wpc @ 8-ohms), I measured channel to channel crosstalk on two adjacent channels where one channel was the disturber and the other was the Device Under Test (DUT). The Audio Precision plotted crosstalk of both channels over frequency by varying the Distruber/DUT channels. You can see the POA-A1HDCI produced very good crosstalk measurements (>81dB at 1kHz) with only a gradual rise with increasing frequency because of capacitive coupling. Anything greater than 60dB is deemed acceptable so this is quite good for a multi-channel amp that isn’t a true mono block design.
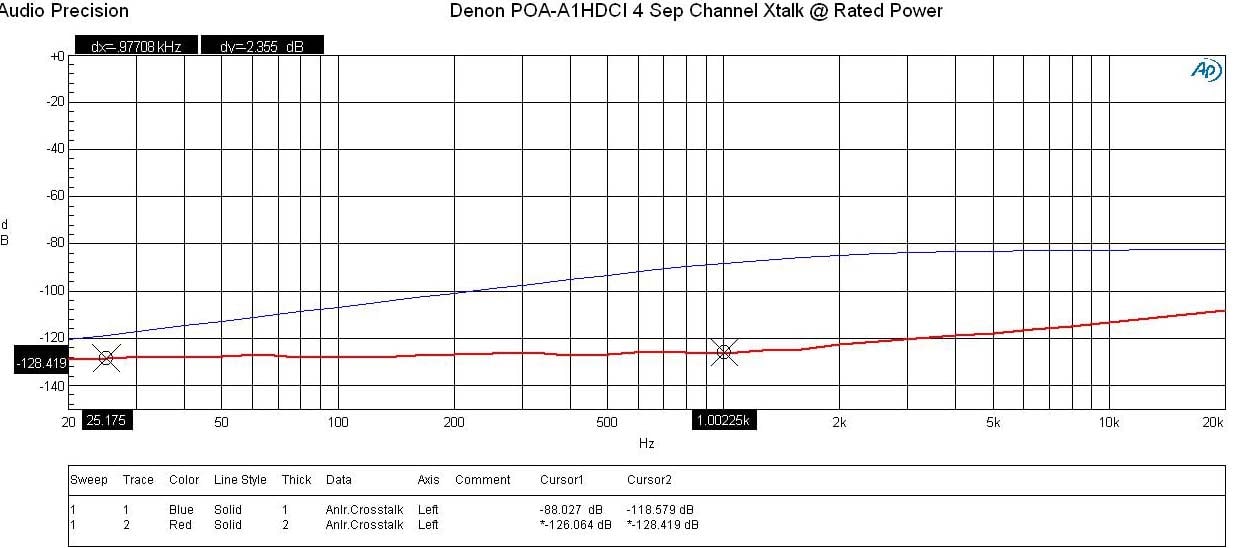
Denon POA-A1HDCI Crosstalk Measurement 4 Channels Apart
As expected, channel separation got better as you moved the Disturber/DUT channels further apart. It is interesting to note that varying the Distruber/DUT of the two-channels I tested produced a crosstalk measurement difference of over 20dB. While both measurements were very good, I couldn’t help to wonder how much better it would have be if a bit more careful layout was done to optimize trace routing and minimize their coupling paths on the circuit boards.
Denon POA-A1HDCI Crosstalk Measurement Bridged
For two-channel audiophiles wanting the absolute best performance this amplifier has to offer, I’d suggest bridging the two amplifier pairs on the opposite ends of the amp labeled “FL” and “FR”, respectively. This provides the maximum amount of separation between them which is critical especially during high power applications to minimize magnetic coupling. As you can see in this measurement, the POA-A1HDCI produced excellently low crosstalk measurements (>94dB @ 1kHz) with a slight rise at the frequency extremes due to magnetic coupling at low frequencies and capacitive coupling at high frequencies. Considering I was pumping over 300wpc during this test, I’d say magnetic coupling isn’t an issue of concern with this amplifier. Audiophiles rejoice as this is as close as you’re likely gonna get to mono block channel separation performance in a non mono block multi-channel amplifier design.
Denon PAO-A1HDCI Conclusion
The Denon POA-A1HDCI is a monster (or maybe I should say “beast” to avoid a Monster Cable lawsuit). It’s as powerful as it is heavy but most importantly it exhibits ultra low noise and distortion to handle the subtle nuances of music with great finesses and clarity. The POA-A1HDCI revitalizes Denon’s high end stigma that it earned over the years but also puts itself into an elitist price category that only the very wealthiest audiophiles would dare tread. There are certainly cheaper alternatives that will perform similarly good but will also require more rack space to achieve 10 channels of amplification and won't have the cool connection link with the mating Denon pre/pro for easier channel configurability.
While I wasn’t initially in total awe at the cosmetics of this product, it does have a tendency to grow on you over time. It will most certainly serve as a conversational piece when people visit and see the sheer mass of this mega multi-channel amplifier. You can rest assured that its size is backed by legendary performance one would expect from Denon flagship pieces. The POA-A1HDCI delivers respectable high and most importantly clean dynamic power and provides enough channels to handle even the largest scale home theater installations with a few to spare for specialized needs and installations. Coupled with the matching AVP-A1HDCI processor, you’ve got a state of the art A/V separates solution that can run toe to toe with any of its peers in this price class.
Recommendations
 If you plan on purchasing the AVP-A1HDCI pre/pro, then you should also take a hard look at mating it with this amplifier. Not only will they both match cosmetically but the LINK control between the units really opens up a lot of user and installer flexibility and they exhibit great working synergy together.
If you’re in a situation where you listen to highly dynamic two-channel music at loud listening levels you may wish to consider bridging the front two channels. On the flip side, this amp does commendably well configured for normal operation and the unused channels may be better served in a home theater installation for bi-amping your front speakers if your using their bass portions as active subwoofers or feed them to other speakers in multi zone audio duties. Make sure you have plenty of shelf space to house this unit so it gets enough ventilation as there are no internal cooling fans. The amp ran warm but not hot to the touch when positioned in free space and only really heated up during continuous power testing which is a non real world lab condition.
POA-A1HDCI
MSRP: $7,000
Denon Electronics
http://www.usa.denon.com
100 Corporate Drive
Mahwah, N.J. 07430-2041
The Score Card
The scoring below is based on each piece of equipment doing the duty it is designed for. The numbers are weighed heavily with respect to the individual cost of each unit, thus giving a rating roughly equal to:
Performance × Price Factor/Value = Rating
Audioholics.com note: The ratings indicated below are based on subjective listening and objective testing of the product in question. The rating scale is based on performance/value ratio. If you notice better performing products in future reviews that have lower numbers in certain areas, be aware that the value factor is most likely the culprit. Other Audioholics reviewers may rate products solely based on performance, and each reviewer has his/her own system for ratings.
Audioholics Rating Scale
 — Excellent
- — Very Good
- — Good
- — Fair
- — Poor
| Metric | Rating |
|---|---|
| Frequency Response Linearity | |
| SNR | |
| Output Impedance | |
| Measured Power (8-ohms) | |
| Measured Power (4-ohms) | |
| Multi-channel Audio Performance | |
| Build Quality | |
| Fit and Finish | |
| Ergonomics & Usability | |
| Features | |
| Performance | |
| Value |
Gene manages this organization, establishes relations with manufacturers and keeps Audioholics a well oiled machine. His goal is to educate about home theater and develop more standards in the industry to eliminate consumer confusion clouded by industry snake oil.
View full profile