
Onix Rocket Digital Equalization System (R-DES) Review
Onix Rocket Digital Equalization System
- Product Name: Rocket Digital Equalization System (R-DES)
- Manufacturer: Onix
- Distributor: AV123
- Performance Rating:

- Value Rating:
- Review Date: July 25, 2006 19:00
- MSRP: $ 399
- Supported OSes: Windows XP (all variants). Tested with Windows 98se; not supported but should work fine. Mac and Linux not currently available.
- Can store up to five separate curves and can be recalled instantly with the touch of a button
- Five bands of parametric equalization per curve with low pass crossover adjustment (frequency and slope)
- Two line-level (RCA) inputs and outputs
- USB Input
- Input impedance: 100K ohms
- 5 1/8" D x 4 1/4" W x 2 3/16" H
- 3 Year Warranty
Pros
- Price
- Intuitive Interface
- It WORKS!
Cons
- Only Windows OS supported
- Learning curve
- Manual measurement process is tedious
- No auto-save feature for graph paper or “Save” button on R-DES EQ
Onix Rocket Digital Equalization System (R-DES) Introduction
I'd seen pictures of the R-DES on the AV123 website but I still wasn't prepared for it when it arrived. It was so - small. And light. I almost shook it to see if there was anything in there. The case has an industrial look that I find very attractive. There are two buttons in the front and six lights. The button to the far left switches the unit between on and standby (when it is in standby mode, the sub is disengaged). The far right button switches between the four presets and the bypass mode. In between the two buttons are the lights to indicate which mode you are currently using (in order from left to right - Bypass, Preset 1, 2, 3, and 4). The aluminum body has inset lines running the depth of the unit on the sides but not the top and bottom. The black rings around the unit near the front and back plates are made of a hard plastic.
Using the System: The Basics
There is some software to install on a computer (preferably a laptop, though I see no reason why you couldn't use a desktop and just move the unit to install the new update) and specific instructions. We've all installed quite a bit of software over the course of our lives and have run into our fair share of strange error messages than can make even the stoutest among us break out in cold sweats. The directions for installing the software take into account just about every possible error message you can get. I found it extremely easy to follow them. Unless you try to install the software on an unsupported OS, I don't see how you could run into too much of a problem. The back of the unit has a left and right input and a left and right output. You can use this to connect two subwoofers (in mono, since there is no provision in the software for independent EQing.) There is a USB 2.0 connection and one for power. The system came with the power adaptor, a USB cable, and the installation disc.
Breakdown of Features
There are two main programs associated with the R-DES - The Onix Graph Paper and the Onix R-DES. The Graph paper is just that - it graphs out the frequency response of your system. The R-DES is the actual EQ program that makes the changes in your frequency response. With the R-DES you can set 5 separate bands of parametric equalization and a crossover into 4 different curves and 5 different presets. What does that mean? Hold on, we're getting to that. With the Onix Graph Paper program you can select either a long or short sweep (19 or 37 data points between 16 and 120hz respectively) or generate a blank sheet that will graph whichever data points you select. Now, what does that mean? Hold on, I'm getting to it.
Onix Rocket R-DES Using the System: Step by Step
Let's just take this slow so that you a) know what you are getting yourself into and b) know what to do once you get this box. These directions assume that you are using an SPL meter (like the Radio Shack version).
Setting up the R-DES and utilizing the Onix Graph Paper program:
- Install software following the supplied directions.
- Connect Onix R-DES box between the receiver and the sub (I used the right in and out). You'll need an extra subwoofer cable - preferably a short one. For now, hook it up near the sub where you can get to it. Later, you can move it to a more discrete place if you like. Press the right button until the Bypass light is lit
- Disconnect your front speakers (simply unplug them from the back of the receiver or turn them off from the speaker selection menu on your receiver). See our Editor's Note below on why we think you may want to actually leave your main speakers on.
- Disable any matrixing DSP on your receiver (set to Stereo with sub).
- Turn the volume on your receiver DOWN! The first track is test tones and they are recorded pretty loud. You don't want to hurt your ears or, God forbid, your speakers by blasting pink noise.
- Set up your SPL meter at your prime listening position - preferably on a tripod.
- Open the Onix Graph Paper program.
- Hit the "New" button.
- Select "Long Sweep."
- Insert the CD (yes the one with the installation program) into your CD/DVD player in your system.
- Hit play.
- Increase the volume on your receiver until the SPL meter reads between 70-75Hz (make sure you set it to "C" weighting). Record that number in the Noise SPL box.
- Hit pause.
- Under "Correction" select "RS Meter" if you are using the Radio Shack SPL meter. If not, leave it on "None." If you select RS Meter, you'll notice a dotted line within your graph. This dotted line shows your actual measurement. The graph is different because the RS Meter is known to be inaccurate at those frequencies. The graph is modified accordingly.
- Turn the directions for installing the software over. Notice the play list. This lists the track numbers and the corresponding frequency being played. Each track is a different frequency. They are listed in order on the left side of the Graph Paper program. If you take a reading and enter them in order, you may never need this. Chances are, though, you'll lose your place at least once. Every once in a while be sure to check where you are just in case.
- Turn your SPL meter down to its lowest setting (60dB for the Radio Shack version) and press play.
- Don't be surprised when you don't hear anything until about Track 6 (20Hz). Those frequencies are inaudible (though you may hear something in your house vibrate). Keep an eye on your SPL meter to see if they are registering.
- Each test tone will play for ~10 seconds. You will quickly become adept at adjusting your meter, taking a reading, and inserting it in the program in that time. Still, have your remote handy.
- When you are done HIT SAVE . If you don't and close it, you'll lose your graph forever (it will not ask if you want to save). If you wish to save an image of your graph to share with others, drag and drop it on your desktop.
Ok, now you've got this pretty graph - what do you do with it?
Editor's Note: Tip on SPL meter usage and the integration of your main speakers
There are few things more important in this process than taking an accurate measurement. It is an absolute necessity to get your body away from the meter when taking a reading. Don't believe me? Set the meter up on a tripod. Play a test tone at a specific frequency. As the tone is playing move toward the meter and reach your hand out to grab it. Watch the pretty needle jump around. The most common mistake when using the RS Meter is to hold it in your hand. You'll think the thing is broken as the readings will change each time you take it.
Also, though the R-DES directions instruct you to turn off your main speakers, we actually recommend keeping them on as most users do not have "brick-wall" crossover points. The bass extension of your main speakers will almost certainly affect overall low frequency and room response.
Using the Onix R-DES program.
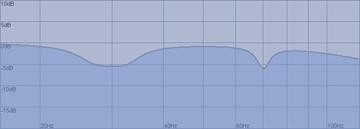
When you open the program, you'll notice one preset and four possible curves listed under it listed as "Default" down the left side of the screen (you can right click on these to change their titles). At the bottom, there is a button labeled "New" that will allow you to create a whole new preset with four more curves underneath it (up to five of these). For now, ignore that button. At the top, there is a big arrow pointing up that is grayed out and can't be clicked (yet). There are six columns, five labeled " EQ" and one labeled "Crossover". In each of the EQ columns there are three dials. The top one is for decibel (or degree of change). Move the dial to the right (clockwise) and you'll boost the frequency selected, move it to the left and you'll decrease it. In this process, we will only be decreasing. The middle dial is for the frequency. When you find a frequency you want to adjust, you simply move the dial until the readout indicates the correct frequency. The last dial adjusts the Q or the width of the peak. This will make more sense once we get into it. Lets take a hypothetical situation and go with that - Lets say you have sloping rise at 30Hz and a dramatic spike at 70Hz (see the graphic). You want to reduce these two problem areas by lowering these frequencies.
- In your first curve, set the first column frequency (the second dial in the first column) to 30Hz.
- The apex of the bump is about 5 decibels (look at the number on the left of the graph) higher than the rest of the graph. Set your dB dial (the top one) to -5 or so.
- You'll notice that the shape of that curve is going in the opposite direction as the one in the graph above. That is good -舑 it is what you want. It is also more dramatic than the one on the graph. You want to as closely approximate that as possible.
- Adjust the Q (bottom dial) down or counter clockwise. This will make that slope a bit more gentle. Keep working with it until it approximates the mirror image of the original graph. You may have to use more than one of the EQ columns working together to get the proper results (for example one set at 28Hz and the other set at 32Hz rather than one set at 30Hz).
- Do the same with the 70Hz bump but instead of moving the Q down (counterclockwise) move it up (clockwise). This will increase the angle so that it is sharp.
-
You should end up with something that looks like:
- Now EXIT THE PROGRAM . It will ask you if you want to save. Hit "yes." Now reopen the program. Get used to doing this. Much better than losing your work.

Setting the Crossover
Honestly, with today's receivers, you may have little use for this function. You have two buttons and two dials. The buttons select how steep a crossover you want to set (the left is a gentle roll-off and the right is more steep). The first dial sets the frequency you want the crossover to be set. This is what you need to do:
- Disable the crossover on your sub by turning it as high as it will go or selecting "Bypass" or some similar setting (you've probably already done this).
- On your receiver, disable your crossover. If you can't disable your crossover (I couldn't on my Denon 3805 ) then stop here and use your receiver's crossover. You can disable the crossover on the R-DES by turning it all the way up to 120Hz (your receiver crossover should be set lower than that).
- Select the frequency and slope you want on the crossover.
- You're done.
Yeah but what about that other dial? The decibels dial? What's that all about? The use for that is if you had a need for more bass in particular applications. Say you EQed everything fairly flat and music sounded great. But now your movies don't have that punch you are used to. Well, redo your entire EQ set up in a different curve and move the decibel dial up a few points under the crossover. This increases the volume of the sub overall. Personally, I'm not using it.
So you're done right? Not quite. Now you need to get the new settings to your R-DES. This is probably the easiest part of the process:
- Open the Onix R-DES program.
- Connect the R-DES to your computer via the supplied USB cable.
- The arrow at the top of the screen with light up, click on it.
- Watch the pretty lights on the R-DES for the next second or so.
- You're done!
Or not. If you are infallible and/or an expert in using a parametric EQ, you can be sure your EQ attempt was successful and go on to enjoy the sonic bliss you've created. If you are somewhat less than an expert, you want to go back and take new measurements and perhaps readjust. Then take more measurements and readjust. You get the idea.
Now for some helpful hints:
- Whichever curve you were viewing on the screen is the one that the R-DES will default to when you upload the EQ settings. If you were viewing Curve 1 and you want the unit to be set on Curve 4, you'll need to change that manually.
- Save your work. Constantly save. When you are absolutely, positively sure you've saved, save again.
- Do yourself a favor; line up the EQ columns from low to high frequency, left to right. If you start skipping around, you're going to get confused and mess up something you had perfect.
- You don't have to keep taking the same measurements over and over once you've got something dialed in. If your problem area is between 20 and 50Hz, and you haven't changed anything, just take those measurements. This significantly reduces your workload. You can also use the short sweep version if that is more appropriate.
- If you have another program that takes measurements, you can use the blank form to graph your response. It will only graph the frequencies displayed (up to 120Hz). The graph will not expand if you include higher data points.
- Your EQing will change the overall level of your sub in relation to the rest of your speakers. You need to check that after you finish this process with your receivers test tones. You'll probably find you can turn your sub up.
- Avoid EQing up (boosting a signal) like the plague.
- You have multiple settings in the R-DES system - use them. While you may get a great response for your primary listening position, it may make sense to take several measurements from different seating areas. When you have guests over you may opt for a setting that gives you more overall good bass response, though the "golden seat" may not fare as well.
Editor's Note: But Why ..........?
Most dips in your frequency response are created by "nulls" or "room nodes" or "room effects." They are all the same thing. Think of it this way - sounds are waves. They bounce off of walls, floors, and ceilings. When they bounce they hit themselves again. If the reflection is at the high point of the wave and it hits another high point, it makes the wave stronger (louder). If it is at the low-point and it hits a highpoint, it cancels itself out. If you cut the artificially increased signal, it will be boosted less. If you boost the cancellation frequency, it will still bounce and still cancel itself out. The only way to fix that is through room treatments. They absorb the sound so it doesn't bounce. No bounce, no cancellation. No cancellation, no null. A simplistic explanation but this isn't meant to be a course in acoustics. Properly placed multiple subs can also help smooth bass response.
Onix Rocket R-DES The System in Action
Ok, enough with the theory - let's see this thing in action. When I got the Onix R-DES, it was at a bad time. My in-laws were in town and we were preparing for my son's third birthday party. So I hooked it up and set it to "Bypass" so that it would be ready to test once the commotion settled down. The absolutely first thing I noticed was a significant increase in the amount of bass. I checked a rechecked the box to ensure that it was set to bypass (it was). When I finally got time to measure it, it seemed that the R-DES on bypass still increased the bass about six decibels.
Once everyone left, the first thing I did was take some measurements at different locations within my room. Because of a challenging layout (who doesn't have this?) there are limited locations to place the sub. I was also unwilling to re-wire the whole setup just to check locations that I knew either I wouldn't like or my wife would veto. This limited me to one wall from about the midpoint to the front corner. I didn't place the sub all the way in the corner as I've already done that and I know I don't like it there:
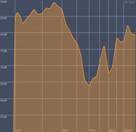
Original Location Near the corner
Moved Forward Facing Forward
The first three placements had the sub facing the center of the room. The fourth had the sub facing the back of the room. The original location was just less than half way down the side wall facing into the room. The third had it facing inward but moved much closer to the center of the room. The last had it facing the back of the room so that the woofer was at the midpoint of the side wall. The corner placement was obviously the worst as the reinforcement made all the problems worse. For those of you out there that think speaker placement doesn't make that much of a difference, I beg to differ. The differences in the measured curves were substantial and some of the placements were mere inches apart. Regardless of placement, I have a 60Hz and, to a lesser extent, an 80Hz null and a bump at 30Hz. As there is nothing I can do for the nulls with the EQ, I can do something about the bumps. I chose the Facing Forward location and quickly got to work.
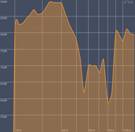
I took measurements, adjusted the EQ, took more measurements, adjusted the EQ some more. Over and over until I was about sure the next iteration would have it perfect. I even dutifully kept track of all the different curves, saving and labeling them for inclusion into the review. And then Mrs. Andry walked through the room and said, "Oh, you 'e not going to leave the sub there are you?" For those of you with a significant other that has a say in your listening room, don't get so caught up in the quest for perfect placement that you forget to solicit opinions. So, I took a break for dinner before we started haggling about the placement of the sub. As the forward-facing orientation seemed to be working the best, I stuck with that but was asked to move it farther toward the front of the room. I countered by suggesting that we move it away from the wall a bit. Surprisingly, she acquiesced. I took some new measurements. This is what I got:
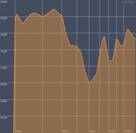
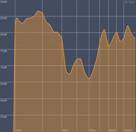
Not as good as my previous placement but not so bad either considering how bad it could be. Pulling it away from the wall helped. There was a huge bump between 20 and 40Hz, the expected null at 60Hz, and a bit of a bump at 70 and 90Hz. The first thing I figured out was that experience using the EQ makes a huge difference in your success. After only a few tries I ended up with this:
Now that is what I call an improvement! Now, am I done? No, not in the least. I'm sure I can get that line a little straighter and I'm going to keep tweaking until I do. But I had to start the review sometime, so this is where I was when I completed the review. Also, it is obvious that I need to build some sort of 60Hz bass trap. That has suddenly become 1st on my "to do" list. That, too, is the power of this process - once you know where your problem areas are, you can devise a plan of attack. It is one thing to recognize you have room issues; it is another to have a plan of attack against them. Now I have a plan.
Remember, these results are only valid at the one position that I took the measurements. I'm fortunate enough to have had the foresight to purchase theater seating with a double seat in the center. This allows the wife and I to sit close or for me to sit in the center when conducting reviews. I EQed my sub from the center of this double seat. If I wanted to get as smooth response as possible for all the seats in my theater, I'd have to take measurements at each seat and try to create a curve that gave the best response over all seats. Very likely that "sweet spot" wouldn't be as good and frankly, since it is mostly me and the wife, I don't have any interest in going through all that hassle at this time.
Onix Rocket R-DES Listening Tests and Conclusion
It was time to do some listening tests
War of the Worlds
By this time I had been at this for the better part of six hours and it was getting late. So what did I do? I popped in a few movies. My first thought was to watch something with a lot of bass (heck, that was nearly always my first thought). War of the Worlds immediately came to mind. The first time I watched this flick it was fairly late at night and my wife kept waking up because of all the bass. I kept turning it down until I could barely hear the dialogue and still she was complaining. Looking at my original frequency response, I can see why. The low bass had a huge bump while the rest was significantly lower. When I calibrated my system, this created an inordinate amount of low bass. With the EQ in place, I could listen to it at a fairly loud volume without invoking the wrath of "She Who Shall Not Be Awakened." Definitely an improvement.
Star Wars Episode II: Attack of the Clones
But was it better? Because of my bass problems, I've watched War of the Worlds sparingly so I'm not that familiar with it. One of my favorite movies to use to check bass is Star Wars Episode II:Attack of the Clones . The first scene with the two flyovers, the landing, and the explosion really test the mettle of a sub. I saw a small Infinity one time go into what can only be described as anaphylactic shock trying to reproduce that scene. Kind of sad really. Now my Axiom EP500 is no slouch but I've never really been pleased with the rendition of the bass in this scene. You could hear the bass cut in and out to the point that sometimes you could barely hear the sound at all, all the way to painful levels. My DIY room treatments helped a great deal with this as did adjusting the placement of the sub (it was corner loaded at the time which was BAD ). With the Onix R-DES engaged it was like I was finally hearing the bass the way it was meant to be heard. The sound of the ship flying by was much more uniform, the boominess was greatly reduced and frankly, I was amazed.
 Yello: The Eye
Lastly I stuck in my new favorite album for testing speakers, Yello: The Eye. Yello is the band that gave us the "Oh, Yeah" track from Ferris Bueller's Day Off . I know you know the song. The album is all electronica but there are some great tracks for testing imaging and crossover points. Track 5: "Junior B" has a nice bass run that cycles down into near subsonics. Ever since acquiring this album, I've been bothered by the unevenness of this run. Much like the flyovers in Star Wars , this was much improved. What was once uneven, was now much more consistent and pleasant to listen too.
Suggestions and Recommendations
No product is perfect and I do have a couple of recommendations for improving the Onix R-DES:
- Graphical overlay - it would be fantastic if the Onix Graph Paper and the Onix R-DES interface could interact so that you could see the predicted outcome of your EQ choices. Sure, it wouldn't be perfect, but it would cut down on the learning curve.
- Save button - The R-DES EQ interface has GOT to have a save button. It is far too easy to close out without saving. The Onix Graph Paper also closes out without asking if you want to save your work. That clearly needs to be remedied.
- Clear button - It would be nice in the Onix R-DES EQ interface had a "clear" button to reset the current curve to the default values.
Comparison to the Velodyne SMS-1
Since I've only seen the Velodyne SMS-1 in demo and can't make a direct comparison. The Onix product is quite a bit less expensive, though more labor intensive. The Velodyne SMS-1 gives you an on-screen display and the ability to watch your EQ attempts make changes in the frequency response in real time. The thing to remember is that regardless of which product you go with, once you get it dialed in, you are done - at least until you change something in your room. It isn't like buying a DVD player or a receiver where you can play with and interact with it all the time. It just sits there. The two products are very different and the level of understanding/interaction the Onix requires may encourage some to pay the extra dough for the more expensive Velodyne. But for those of us that don't mind (or even like ) tweaking stuff manually, this is an easy way to save a few hundred bucks.
Conclusions and Overall Perceptions
The big question: Is the Onix R-DES for everyone? No, not really, but it should be. Honestly, with only the most rudimentary understanding of how a parametric EQ works, you can do WONDERS for your bass response. For those out there unwilling to take the time and energy to learn to use the R-DES - go ahead, live with bad bass or pony up for a much more expensive product. For me, I'm going to sit back and enjoy my system that has never sounded better.
The Score Card
The scoring below is based on each piece of equipment doing the duty it is designed for. The numbers are weighed heavily with respect to the individual cost of each unit, thus giving a rating roughly equal to:
Performance × Price Factor/Value = Rating
Audioholics.com note: The ratings indicated below are based on subjective listening and objective testing of the product in question. The rating scale is based on performance/value ratio. If you notice better performing products in future reviews that have lower numbers in certain areas, be aware that the value factor is most likely the culprit. Other Audioholics reviewers may rate products solely based on performance, and each reviewer has his/her own system for ratings.
Audioholics Rating Scale
 — Excellent
- — Very Good
- — Good
- — Fair
- — Poor
| Metric | Rating |
|---|---|
| Build Quality | |
| Ease of Setup | |
| Ergonomics & Usability | |
| Features | |
| Performance | |
| Value |
As Associate Editor at Audioholics, Tom promises to the best of his ability to give each review the same amount of attention, consideration, and thoughtfulness as possible and keep his writings free from undue bias and preconceptions. Any indication, either internally or from another, that bias has entered into his review will be immediately investigated. Substantiation of mistakes or bias will be immediately corrected regardless of personal stake, feelings, or ego.
View full profile