
Auralex Sonosuede Room Acoustics System Review
SonoSuede HT Acoustics Kit
- Product Name: Sonosuede Pro and HT System
- Manufacturer: Auralex
- Performance Rating:

- Value Rating:
- Review Date: June 26, 2007 10:15
- MSRP: $1199
- Overall NRC flush: 0.14-0.89 for 1" and 0.59-0.91 for 2"
- Overall NRC spaced: 0.40-1.06 for 1" and 0.67-1.09 for 2"
- Thickness: (8) 1" S3TZ (L&R) and (4) 2" S3CT
- Edge: Square-edged S3TZ (L&R) & back-beveled S3CT
- Fire Rating: Class A
Pros
- Free CUSTOM acoustical room analysis
- Multi-purpose acoustics in one package
- Improved soundstage and dialogue clarity
- Auralex offers additional acoustical products for particular needs
Cons
- Additional color choices add cost
- Will likely need more than one kit to do a room
Auralex Sonosuede Room Acoustics System Introduction
Many people think that the secret to a great home theater is great gear. And when you ask them what that gear consists of, it will usually be a display, speakers, components, and cables. But the ingredient that can often make or break a home theater is the room itself. My room is an excellent case in point, which is why I chose to bring in the good folks at Auralex.
 When I moved into my current home almost five years ago, I
had some tough decisions to make. My old
house back in Nashville had a dedicated room for my theater. Moving to the coast of SC, I lost almost 1000
square feet, and indeed my dedicated room.
For almost a year we kept our projector under a side table, and at night
would bring it out and set it up on a coffee table and use the wall of our
great room as a screen. It actually
took me that long before I realized that the sitting room (we call it a
"Carolina room" in these parts) off of the great room might be a
great place for our theater. The room
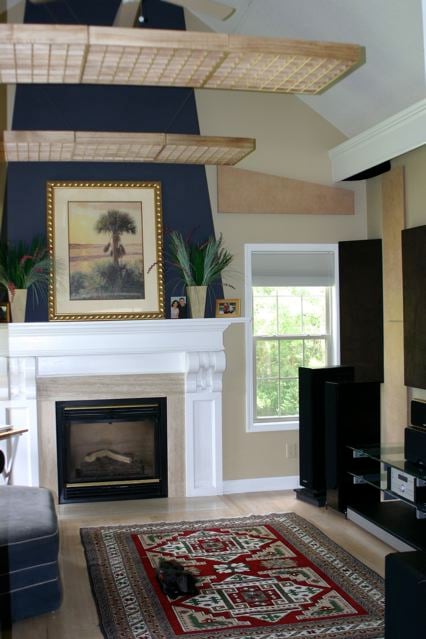
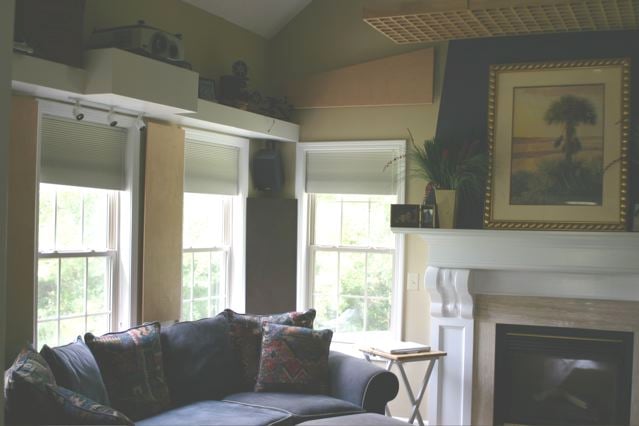
did not have much going for it - a fireplace, a cathedral ceiling, hardwood
flooring, and two walls of windows. But
after weeks of deep thought and measurements, we came up with a plan.
When I moved into my current home almost five years ago, I
had some tough decisions to make. My old
house back in Nashville had a dedicated room for my theater. Moving to the coast of SC, I lost almost 1000
square feet, and indeed my dedicated room.
For almost a year we kept our projector under a side table, and at night
would bring it out and set it up on a coffee table and use the wall of our
great room as a screen. It actually
took me that long before I realized that the sitting room (we call it a
"Carolina room" in these parts) off of the great room might be a
great place for our theater. The room
did not have much going for it - a fireplace, a cathedral ceiling, hardwood
flooring, and two walls of windows. But
after weeks of deep thought and measurements, we came up with a plan.
 I called on my buddy Gary to drive up for the weekend and we
set out to create the ultimate multipurpose room. We built a shelf over the windows in the
rear of the room for the projector, then created a nicely trimmed out box in
the front of the room for the retractable screen I sprung for. Before long, we
had a room that was shaping up quite nicely.
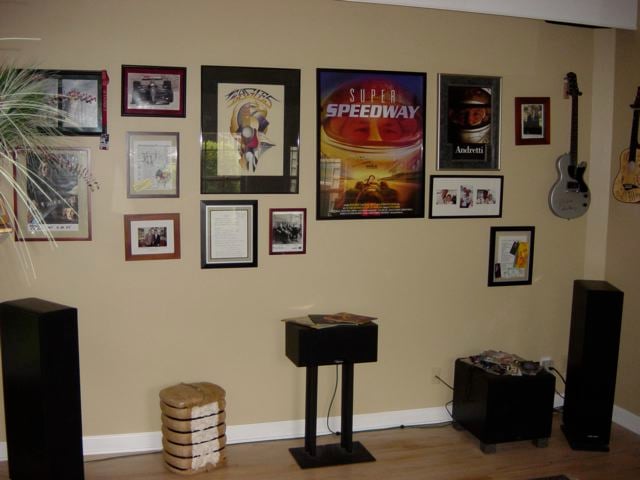
I covered the walls with music and movie memorabilia, added a fantastic
couch and ottoman, purchased room-darkening honeycomb shades, threw down a nice
Turkish rug, and we were in business.
The room is filled with great gear and a fantastic image on screen, but
has always been missing something. I
have always had bass problems with the room, and I knew that the only way to
fix it was to correct the room itself.
I called on my buddy Gary to drive up for the weekend and we
set out to create the ultimate multipurpose room. We built a shelf over the windows in the
rear of the room for the projector, then created a nicely trimmed out box in
the front of the room for the retractable screen I sprung for. Before long, we
had a room that was shaping up quite nicely.
I covered the walls with music and movie memorabilia, added a fantastic
couch and ottoman, purchased room-darkening honeycomb shades, threw down a nice
Turkish rug, and we were in business.
The room is filled with great gear and a fantastic image on screen, but
has always been missing something. I
have always had bass problems with the room, and I knew that the only way to
fix it was to correct the room itself.
Room Treatment Overview and Ordering Process
Auralex Acoustics offers room treatments for everything from home theaters to recording studios, and recently introduced their SonoSuede Systems. These room treatment systems are cost-effective, and provide a do-it-yourself option that delivers excellent acoustical performance in a visually-pleasing package for most any circumstance.
I knew my room would provide not only a challenging opportunity, but also an example of the type of situation many homeowners face when installing a home theater system in a less-than-ideal room. The process began with Sean Bowman from Auralex contacting me to request photos and detailed measurements of the room. He explained that Auralex offers any of their customers a free acoustical analysis of their room so they can suggest the proper product and placement in the room.
The form asks you to choose a budget level, describe the type of room, and list any preferred products. It also asks for a description of the walls, ceiling, floor and any existing acoustical treatments. Finally, there is a section on observed or measured acoustical problems, broken down into two categories: Room Acoustics (things like slap-back, boomy bass or excessive reverb) and Sound Isolation (disturbing neighbors, HVAC noise, or unwanted external noises). Next there is a sheet of graph paper for you sketch out the room and its measurements, windows, doors, etc.
If you are worried that you might not be "technical" enough to fill out the form properly - don't be. That is what the team at Auralex is there for. I was very brief in my descriptions. Other than making sure I measured the dimensions of the room and windows properly, I pretty much just checked the box by "Bass Build-up (boomy lows) and/or Cancellation" (bass drop-outs), as my room is definitely plagued by excess bass. I faxed the form back to Auralex and emailed the digital photos of the room.
Later that day, Sean had emailed me back with an email that said, and I quote, "Wow, that's quite a room!" He said he would work up some recommendations and get back to me in about a week.
As promised, a week later I found an email one day from Sean describing in detail the "number of acoustical problems" that my room presented, which were somewhat "atypical of what a dedicated home theater might encounter." Some of these problems included the sloped ceiling and large amount of glass windows (not to mention the picture and poster frames) that would make reducing harsh reflections and taming frequency response irregularities a bit of a challenge. He explained that in order to improve sound quality, we would need to strategically place absorbent and diffusive materials throughout the room to break up parallel wall/ceiling reflection and smooth frequency response across the listening positions on the couch.

The SonoSuede series panels are a great fit for the room due to their broadband absorption. Certain panels will help to address the low frequency inconsistencies throughout the room while others will minimize flutter and reverb in the mid-high frequency bands.
 The cathedral ceiling was creating a small, focused sweet
spot that we wanted to expand, so Sean suggested using SpaceCoupler diffusers
suspended from the ceiling, hung parallel to the floor. This will break up reflection and decrease
the focusing from the angled ceiling while keeping the energy in the room,
which ultimately should result in a more open and natural sweet spot for
listening.
The cathedral ceiling was creating a small, focused sweet
spot that we wanted to expand, so Sean suggested using SpaceCoupler diffusers
suspended from the ceiling, hung parallel to the floor. This will break up reflection and decrease
the focusing from the angled ceiling while keeping the energy in the room,
which ultimately should result in a more open and natural sweet spot for
listening.
All of this sounded great - but would it work? I called Sean back to discuss color options and clarify some of the suggestions. Auralex offers the SonoSuede Pro and SonoSuede HT systems in several colors that can be custom ordered, and keeps four standard colors in stock. Red, Tan, Brown and Black are the stock colors, and for my room I chose to go with Tan and Brown.
Within a day or two of emailing Sean my color choices, I received tracking information from FedEx, and a few days later I was helping the delivery guy unload four sizeable boxes into the garage.
Auralex SonoSuede Overview & Build Quality
The suggested treatment that Auralex came up with for my room included an assortment of products, including the following:
- 1 SonoSuede Pro System ($1199)
- 1 SonoSuede HT System ($1199)
- 1 SCREEN 6 System ($1199)
- 4 SubDudes ($49.95/each)
 Each SonoSuede System contains 8 SonoSuede Panels, 4
SonoSuede Corner Traps, and mounting blocks and impaler clips. The only difference in the Pro model and the
HT model is the shape of the SonoSuede Panels.
While both are the same length (48") and depth (1"), the HT
version has a slightly triangular shape, whereas the Pro version is
rectangular.
Each SonoSuede System contains 8 SonoSuede Panels, 4
SonoSuede Corner Traps, and mounting blocks and impaler clips. The only difference in the Pro model and the
HT model is the shape of the SonoSuede Panels.
While both are the same length (48") and depth (1"), the HT
version has a slightly triangular shape, whereas the Pro version is
rectangular.
The SCREEN6 system consists of a set of six SpaceCouplers and mounting hardware for wall or ceiling installations. They arrived in 3 boxes bundled together, each with 2 SpaceCouplers.
Build Quality
I dove into the boxes and first unpacked the box containing the SubDude isolation risers. These products are remarkably simple - constructed of 1/2" MDF covered with a dense, durable black fabric and supported by two 14" x 4" x 2" foam strips, with a smaller center strip of foam between them. The SubDude can be used for floating amps, speakers or subs, and it effectively decouples the sound source from the floor. The result is the removal of unwanted room resonance, which in turn tightens up the bass. Setup was as easy as removing the SubDudes from their boxes, and placing them underneath my subs and front left and right tower speakers.
 I then opened up the enormous boxes containing the SonoSuede
HT and SonoSuede Pro systems, and began to take out the panels. Other than the shape differences between the
standard panels in the HT and Pro systems, the only difference in the Corner
Traps is that they are 2" thick, as opposed to the 1" thickness of
the others. The build quality of the
panels themselves is excellent. The
fabric feels convincingly like suede, and is tightly glued to the panel itself,
which is lightweight and feels much like foam insulation. The rear of the panel is not fully covered in
fabric, and you can see the yellow-orangey panel material. It is firm, but gives a little to the touch,
and if you squeeze too hard you will make a dent or imprint in the panel. As long as you are reasonably careful, you
should not worry about damaging the panels as you install them.
I then opened up the enormous boxes containing the SonoSuede
HT and SonoSuede Pro systems, and began to take out the panels. Other than the shape differences between the
standard panels in the HT and Pro systems, the only difference in the Corner
Traps is that they are 2" thick, as opposed to the 1" thickness of
the others. The build quality of the
panels themselves is excellent. The
fabric feels convincingly like suede, and is tightly glued to the panel itself,
which is lightweight and feels much like foam insulation. The rear of the panel is not fully covered in
fabric, and you can see the yellow-orangey panel material. It is firm, but gives a little to the touch,
and if you squeeze too hard you will make a dent or imprint in the panel. As long as you are reasonably careful, you
should not worry about damaging the panels as you install them.
 Also
included in the box are several blocks of foam and several clip mounts. The clip mounts are pressed steel with 4
teeth that stick out to pierce and hold the panels. I found installation to be remarkably
easy. You have the option of mounting
the clips directly to the wall, or (according to Auralex) for increased bass
response you can put a foam spacer between the wall and the clips to
"float" the panels off of the wall.
I did this wherever possible in the room. It looked great, and I needed as much help
with stray low frequencies in my room as possible.
Also
included in the box are several blocks of foam and several clip mounts. The clip mounts are pressed steel with 4
teeth that stick out to pierce and hold the panels. I found installation to be remarkably
easy. You have the option of mounting
the clips directly to the wall, or (according to Auralex) for increased bass
response you can put a foam spacer between the wall and the clips to
"float" the panels off of the wall.
I did this wherever possible in the room. It looked great, and I needed as much help
with stray low frequencies in my room as possible.


Auralex SonoSuede Installation and Mounting
Installation of the panels went something like this. I would first measure where on the wall I wanted the panel to be, referring to the diagram and plans Auralex had given me for my room. I would then hold the panel against the wall in the position I wanted it to be mounted, and mark the wall with a pencil at the corners of the panel. I would then set the panel aside and screw the clips into the wall inside the boundary I had established with the corner marks, using Auralex's suggested 3 clips per panel. Once the clips are up, you just put the panel in place just above the clip, and then press towards the wall and down towards the floor. The teeth on the clip pierce the foam type material on the back of the panel, and once it is flush with the clip you are done. It was remarkably easy, and I was able to install most of the panels by myself. Every now and then I would have my wife come in to help line something up or hand me a panel when I was up high on the ladder.
 For the corner traps, I used finish nails (that were
provided by Auralex) to affix them to the corners of the room. I would measure out how high I wanted them
and then hold the panel in place and drive the nail through the hardened top
edge and the hardened side edge into the wall.
I did not hammer them all the way in yet, per Auralex instructions.
For the corner traps, I used finish nails (that were
provided by Auralex) to affix them to the corners of the room. I would measure out how high I wanted them
and then hold the panel in place and drive the nail through the hardened top
edge and the hardened side edge into the wall.
I did not hammer them all the way in yet, per Auralex instructions.
The corner traps were one place in my installation that I had to deviate from the suggested treatment plan from Auralex. The trim around my windows, and a few electrical outlets combined to make it impossible for me to mount all four panels in the front right and left corners of the room. I instead chose to mount one panel in each of the four corners of the room, and it turned out fine. I was glad I had not hammered the nails all the way in, as I had to make a few adjustments in the height of the first panel I put up. Once all were in place, I went around with a nail set and sank all the nails, which literally disappeared into the suede fabric.
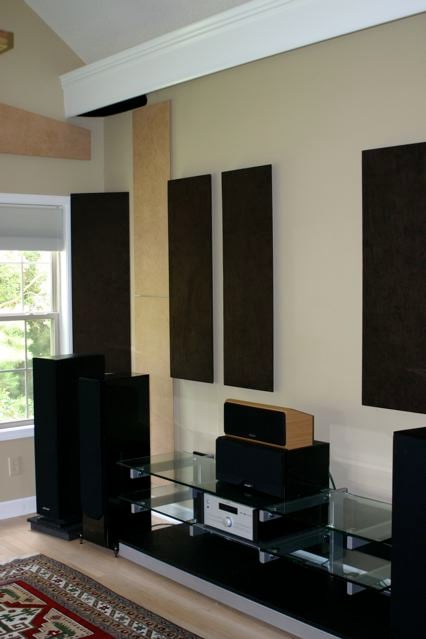 I was amazed at how easy and how quickly the installation of
the panels went. They look great in the
room, too. In my room, I had tons of
memorabilia and posters and photos on the wall - even a few autographed guitars
and a cymbal mounted. It was sad to take
it all down, but the room has a serious look to it now with the SonoSuede
panels. The brown panels look great in
the room, but the tan panels are not quite right for the color of my wall -
they are very close in color, but not exactly.
In hindsight, I probably should have ordered a custom color to better
blend with my wall, but it still looks pretty good.
I was amazed at how easy and how quickly the installation of
the panels went. They look great in the
room, too. In my room, I had tons of
memorabilia and posters and photos on the wall - even a few autographed guitars
and a cymbal mounted. It was sad to take
it all down, but the room has a serious look to it now with the SonoSuede
panels. The brown panels look great in
the room, but the tan panels are not quite right for the color of my wall -
they are very close in color, but not exactly.
In hindsight, I probably should have ordered a custom color to better
blend with my wall, but it still looks pretty good.
I placed the SubDudes under both subwoofers and the left and right front tower speakers, and suddenly my room had transformed. Although I had yet to hang the SpaceCouplers, the room had already begun to take on a different sonic quality. I was anxious to get going with hanging the diffusers.
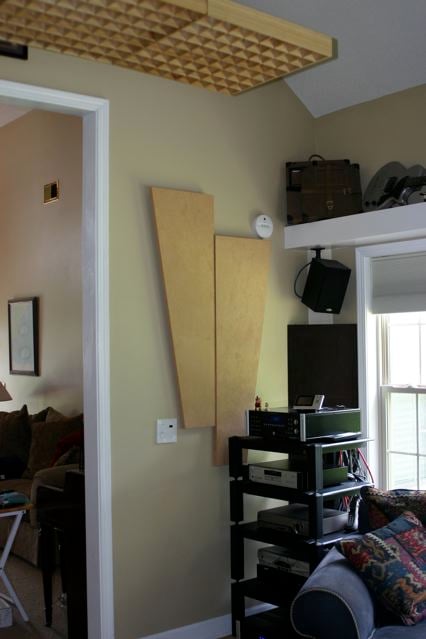
 The SpaceCouplers were going to be a bit more challenging to
install, in that I needed to hang them from the ceiling once assembled. I received six 2' x 2' x 3" panels that
I was to assemble into two matching 6' x 2' x 3" grids that would be
suspended from the ceiling. The popcorn
sprayed ceiling of the room is vaulted, reaching a height of about 14', and it
was going to be tough to find studs and measure it out. I decided I would hang it using fishing line
or thin steel rope. After a trip to Home
Depot, I came home with 1/16" stranded steel rope and some ferrule and
stop sets to create easily adjustable lines with loops on the end to attach to
the SpaceCouplers. I bought some
knotting anchors for the ceiling, as I was not comfortable that I was going to
find a stud to attach the hooks to.
The SpaceCouplers were going to be a bit more challenging to
install, in that I needed to hang them from the ceiling once assembled. I received six 2' x 2' x 3" panels that
I was to assemble into two matching 6' x 2' x 3" grids that would be
suspended from the ceiling. The popcorn
sprayed ceiling of the room is vaulted, reaching a height of about 14', and it
was going to be tough to find studs and measure it out. I decided I would hang it using fishing line
or thin steel rope. After a trip to Home
Depot, I came home with 1/16" stranded steel rope and some ferrule and
stop sets to create easily adjustable lines with loops on the end to attach to
the SpaceCouplers. I bought some
knotting anchors for the ceiling, as I was not comfortable that I was going to
find a stud to attach the hooks to.
To prepare the SpaceCouplers, I laid them out on my floor and used a provided template to mark drill hole positions on the three panels that would make up my grid. With a 1/4" bit, I drilled the holes and then used the included hex bolts, washers and tee nuts to assemble the grid. The tee nut had sharp teeth that dug into the soft wood frame, positioning it perfectly to receive the hex bolt from the other side. Auralex includes hangers that you insert between the panels and put the hex bolt through. They protrude from the top of the grid with a loop that will be used to suspend the assembly. It was tricky to join the panels and keep this loop standing up - I had someone hold it for me in order to keep it from falling back between the panels.
Once assembled and ready to hang, I found myself second-guessing my plan. For starters, my ladder is only 10 ft, and I was having trouble reaching the part of the ceiling that my measurements told me I needed to place the hooks. I actually called Sean at Auralex and began to discuss other options for hanging the grid, as I was not convinced I could create 4 hanging points per grid in the high ceiling that would be measured out correctly or that I could reach. Sean explained to me that the design of the two grids was only a suggestion, and that if another shape or array design would make hanging it easier, that I should certainly try that. We discussed the weight of the panels and bounced around some more ideas, and I went back to work.
After a bit more measuring and thought, I landed on a plan that ended up working out. First, I used rough measurements and drilled 4 holes in the ceiling using a 1/4" bit. I then put a plastic knotting anchor in the holes. I used a steel hook that screwed into the anchors and knotted them, creating a solid anchor that I felt would not pull out of the ceiling. Rather than having 4 separate steel rope lines that were going to be difficult to terminate in a way that would allow the grid to hang level, I decided to string two eight foot lengths of 60 lb. fishing line through the two loops on each side of the array. I used a fishing swivel on each end of the line, and then hung the swivel loops on the hooks I had installed in the ceiling. Once hung, I could easily adjust the grid as it hung to get it to level out. I did the same thing for the 2nd grid, and suddenly it was done! It worked out really well. The grids appear to float above the listening area - you have to look for the line to see it, and it disappears when the lights are dimmed for movies.
Auralex SonoSuede Listening Tests and Conclusion
After cleaning the room up and moving all of the furniture and speakers back into position, including putting the subs and main front speakers on the SubDude platforms, it was time for the moment of truth. Would the hours of planning and installation pay off? Just how much of a difference would it make? Would my wife notice the difference?
 For the
record, the answer to the question was yes, she did. She even commented that dialogue seemed to be
easier to understand in movies. Soon
after I had completed the install, I was walking around the house talking on my
phone. As I walked from the great room
into the theater room, I completely lost my train of thought, and had to ask
the person on the phone to hold on a minute.
Prior to the treatment, the theater room sounded just like the great
room (loud, with quite a bit of ambient noise).
It was now very quiet. The
previously "live" sonic quality of the room was now very subdued, and
felt very controlled. And this was just
the sound of my own voice talking on the phone. I spent many years in the music
business in Nashville earlier in my career, and I suddenly felt like I was back
in a recording studio. You walk into the
studio and it is so QUIET. After
installing the SonoSuede panels, I suddenly had created a room with acoustics
more similar to that of a control room in a studio than a living room! Improving the acoustics of the room actually
makes carrying on a conversation more pleasant - things just aren't as noisy in
there.
For the
record, the answer to the question was yes, she did. She even commented that dialogue seemed to be
easier to understand in movies. Soon
after I had completed the install, I was walking around the house talking on my
phone. As I walked from the great room
into the theater room, I completely lost my train of thought, and had to ask
the person on the phone to hold on a minute.
Prior to the treatment, the theater room sounded just like the great
room (loud, with quite a bit of ambient noise).
It was now very quiet. The
previously "live" sonic quality of the room was now very subdued, and
felt very controlled. And this was just
the sound of my own voice talking on the phone. I spent many years in the music
business in Nashville earlier in my career, and I suddenly felt like I was back
in a recording studio. You walk into the
studio and it is so QUIET. After
installing the SonoSuede panels, I suddenly had created a room with acoustics
more similar to that of a control room in a studio than a living room! Improving the acoustics of the room actually
makes carrying on a conversation more pleasant - things just aren't as noisy in
there.
I quickly began listening to CDs and DVDs that I was familiar with, and was thrilled with the results. The bass response was much better - much more controlled and tighter than before the treatment. Ultimately, I still have bass issues in this room. I continue to experiment with location of my subwoofers, as well as trying it with or without the SubDude platforms. But without question, my bass is in much better shape.
The overall sonic quality of any material I played was improved. The room does not have the reverberation that I had struggled with before, and the soundstage feels much smoother. The couch in the room is sort of a giant "half stop sign" design. Typically, the center of the couch was the ideal sweet spot for both music and film. After the treatment, the entire couch seems to benefit, having improved staging from the "end" seats.
Conclusion
Initially, I was bummed to be taking down all of my memorabilia from the walls of the room. But an unexpected result of the project is a very cool aesthetic. People seem to really like the way the room looks dressed out in the suede panels. I was also concerned that having diffusors hanging from the ceiling might not look good. But they really turned out great, seemingly "floating" above the room. So far, I've received nothing but compliments, even from a few of my wife's more decorator-savvy friends.
The Auralex treatments have absolutely improved my room. And the products are high-quality, attractive, and easy to install. If you have invested time and energy into your home theater and it's components but still feel like you are not getting the results you desire, it is time for you to consider improving your room. Auralex offers affordable solutions that you would be wise to consider.
For more information:
Auralex Acoustics, Inc.
6853
Hillsdale Court
Indianapolis,
IN 46250
1-800-959-3343
www.auralex.com
The Score Card
The scoring below is based on each piece of equipment doing the duty it is designed for. The numbers are weighed heavily with respect to the individual cost of each unit, thus giving a rating roughly equal to:
Performance × Price Factor/Value = Rating
Audioholics.com note: The ratings indicated below are based on subjective listening and objective testing of the product in question. The rating scale is based on performance/value ratio. If you notice better performing products in future reviews that have lower numbers in certain areas, be aware that the value factor is most likely the culprit. Other Audioholics reviewers may rate products solely based on performance, and each reviewer has his/her own system for ratings.
Audioholics Rating Scale
 — Excellent
- — Very Good
- — Good
- — Fair
- — Poor
| Metric | Rating |
|---|---|
| Performance | |
| Versatility | |
| Build Quality | |
| Ergonomics & Usability | |
| Ease of Setup/Programming/Integration | |
| Fit and Finish | |
| Performance | |
| Value |
Over the years J. has constantly found himself to be an "early-adopter," spending way too much money on "new" technologies such as Compact Disc, LaserDisc, and DVD. He is one of the few people who actually purchased (and still owns) a CORE programmable remote control (bonus points if you remember this product).
View full profile