
Motorola homesight Home Monitoring and Security System Review
Motorola Homesight Security Suite
- Product Name: homesight
- Manufacturer: Motorola
- Performance Rating:

- Value Rating:
- Review Date: October 19, 2005 19:00
- MSRP: $ 299 (starter kit)
|
Wireless Easy Starter Kit -
$299.99 Wireless System Controller
with Power Adapter |
Available Optional Modules: Wired Camera - $79.99 |
Pros
- Easy do-it-yourself installation
- Numerous scalable sensors & modules
- Very user-friendly keypad arm/disarm
- Flexible notification options
- Sleek design with small form factor
Cons
- Nonstandard configuration application
- Disappointing audio/video quality
- Security system cannot upload to server
- Not remote accessible without third party software
- No wall modules for dimmers or lighting
Motorola homesight Introduction
The homesight system is designed to secure your home and allow both local and remote monitoring as well as system status and activity recording. It works with an existing broadband connection and features an 802.11g networked series of sensors and control components. As shown above, the homesight system is comprised of cameras (wired and wireless, day and night), sensors (door, temperature, motion and water), sirens, and control devices like repeaters, keypads, and power controllers.
Motorola Homesight Overview of Components
We received a complete system with all components in order to fully configure a home with every module and sensor. Following is a brief description of each unit:
-
Easy Start Kit (HMEZ2000)
This features the 802.11g Wireless System Controller with AC adapter as well as a wireless camera, wireless door/window sensor and all the trimmings (2 AC adapters, mounting hardware, software, AAA batteries, etc). You MUST have this kit (or the similar HMEZ1000 kit to use the Motorola homesight system. -
Wired Camera (HMVC3020)
The wired camera captures color still or video images with sound and has a 60' range (cable included). Mounting hardware is provided for wall mounting the unit. -
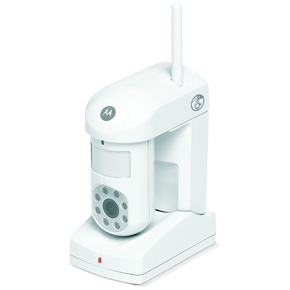
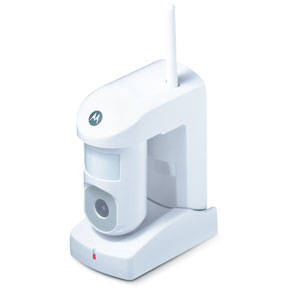
Wireless Camera - Day (HMVC3075)
This color camera handles stills or video and also captures audio from within a 6 feet radius. Its included passive infrared motion detector registers motion up to 20' away from the camera at a minimum viewing angle of 90-degrees. It comes with an AC adapter and mounting hardware. -
Wireless Camera - Day/Night (HMVC3050)
This color infrared camera handles stills or video and also captures audio from within a 6 feet radius. Its included passive infrared motion detector registers motion up to 20' away from the camera at a minimum viewing angle of 90-degrees. It comes with an AC adapter and mounting hardware. -
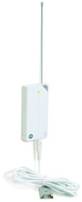
Wireless Door/Window Sensor (HMSM4140)
Using a magnetic seal, this sensor can be utilized on doors (standard, sliding, or French) or windows to alert homeowners when any entries are opened. It comes with AAA batteries and mounting hardware. -
Wireless Temperature Sensor (HMSM4150)
The temperature probe on this wireless sensor can alert homeowners of a breached temperature threshold (high or low). It is perfect for wine cellars, attics where AC units may be susceptible to leaking, or even greenhouses. It comes with AAA batteries and mounting hardware. -
Wireless Water Sensor (HMSM4160)
Putting the Wireless Water Sensor near your hot water heater, basement or other water-sensitive areas will allow you to be alerted in the event a water leak is detected by the system. Anyone who has had their home flooded will appreciate the convenience of this product. It comes with AAA batteries and mounting hardware. -
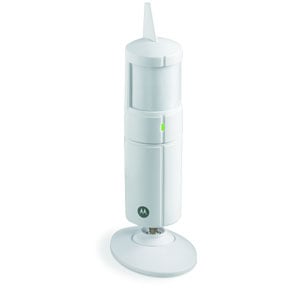
Wireless Motion Detector (HMSM4050)
This completely wireless motion sensor can be fully battery operated and mounted anywhere you wish to trigger a security system event. These are perfect for hallways or locations that are not already covered by a Day or Day/Night Camera. It comes with AA batteries and mounting hardware (includes a tabletop adapter.) -
Wireless Siren (HMAD8000)
No security system would be complete without the preventative measure of a siren. The Wireless Siren is able to be placed anywhere there is an AC outlet. In this way, you do have limitless locations where the unit can be placed. -
Wireless Power Controller (HMDC5025)
Want to remotely turn on or schedule a floor lamp while you are on vacation? The Wireless Power Control allows wireless control over any appliance or light as well as configuration of the system to automatically control the device according to preset parameters. -
Wireless Keypad Keys (HMSC7075)
Purchasable in packs of 2, adding additional keys (16 max) to the homesight system allows family members, babysitters, contractors and/or houseguests to have the ability to arm and disarm the homesight system without the use of a PC or having to remember any complex keycodes or passwords. -
Wireless Keypad Kit (HMSC7050)
This kit makes arming and disarming the homesight system incredibly easy. With the use of a simple Keypad Key you can arm or disarm the system without the hassle of codes or passwords. The Keypad Kit comes with two keys and additional keys can be purchased in sets of 2. The Keypad is backlit, so selecting "Arm" or "Disarm" is easy - even in the dark. The unit can be battery powered or can be connected to an included AC adapter. AA batteries are included along with mounting hardware. -
Wireless Repeater (HMAC9100)
In the event that your house has interior block walls or square footage that makes it difficult for the furthest areas to interact with the Wireless System Controller, the Wireless Repeater can be used to extend the range of the system. This kit includes mounting hardware and an AC adapter.
To begin setting up the Motorola homesight you'll need to purchase, at minimum, the Easy Start Kit (HMEZ2000) for $299.99 which includes the wireless system controller (the brains of the wireless networking system), a wireless camera, wireless door/window sensor, two power adapters, and the installation and configuration software. There are also some included options like an 8' AC adapter extension cable and mounting hardware for permanently installing the camera and door/window sensor.
The system requirements are easy to meet. Any Pentium 3 processor, or better, running Windows XP or 2000 will work just fine. The homesight software is not compatible with Macintosh computers. You connect the wireless system controller to your PC via USB (2.0 preferred) connection.
Motorola Homesight Unpacking, Installation and System Components
The Motorola homesight system components come in very nice retail packages. The retail clamshells contained helpful information and did a very good job of explaining the function of each kit as well as the specific contents of each package. The Easy Start Kit is by far the largest package, with all other components being available as individual items that can be purchased a la carte. In this way, the consumer can completely customize the system for their home and no products are wasted. I appreciated this approach as it would have been all too easy to force consumers into picking up grouped items that would result in wasted money and unused kit components.
As I unpacked the individual sensors and cameras I saw that nearly every component was encased by a UV-resistant ABS plastic. This is a good quality plastic that resists yellowing and also allows creative molding and design elements to be used in the products - which Motorola took advantage of in designing some of the kit components. The included AC adapters and extension cables all seemed of acceptable quality, especially the 60' extension cable for the wired camera which appeared to be a heavy duty ADB (6-pin) cable.
Installation
There are two ways to set up a home security system. One, you could figure out a very intelligent, thoughtful and efficient way to set up the Motorola homesight, or two, you can choose the "kid in a candy store" method. We chose the former and I'll outline the steps I took, along with some challenges I ran into along the way. If, perchance, you see a chance to improve the method, please take it.
Software Installation and Configuration
Installing and launching the software was very simple and I encountered no difficulties in getting the application to go through the process. As part of the installation process you will connect the Wireless System Controller to your PC (but not before it asks you to). At this point you are ready to run the Motorola homesight setup process which readies your system to add additional components.
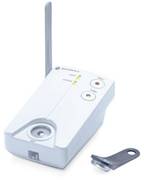
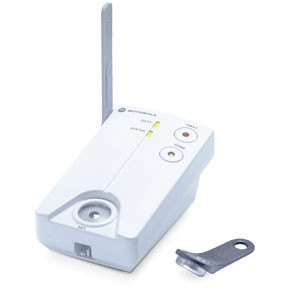
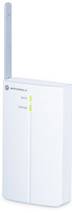
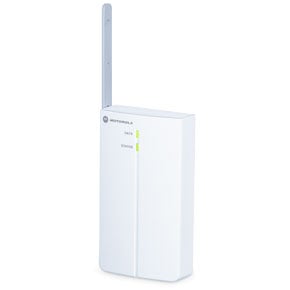
Connecting the Wireless System Controller
The one known constant in setting up the system involved unpacking the Easy Start Kit and making the necessary connections for the Wireless System Controller. It connects to the PC via USB 2.0 and requires a 12VDC power adapter (included). You will want to place the Controller in a centralized location - however, you need to connect it to a PC, and so you are a bit limited in that regard. This is where I wished Motorola had utilized on-board firmware such as found with most routers, allowing you to locate the Controller anywhere an Ethernet connection was present. This would entail a complete web interface to the configuration and monitoring software and was apparently not the direction Motorola wanted to take, likely due to the built-in video functions and desire for cost savings.
System Components
 Wireless
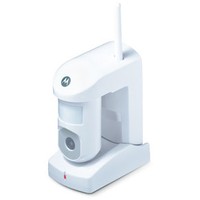
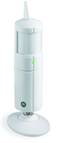
Camera - Day
Wireless
Camera - Day

I next installed the Wireless Camera - Day which also includes a motion sensor. I decided to place this camera in the living room (and I later added another Wireless Day/Night camera) so that it could pick up that wide open area. I set this camera on the counter using the included stand since there was no need to mount it on a wall for the angle I was attempting to capture. The Wireless Camera - Day is a rather rugged device. The camera can be manually swiveled from left to right in an arc that allows both a wide assortment of placement and positioning options as well as a way to hone the included motion sensor's field of coverage. The light on front tells of the device is active (green) or disengaged (red) and a 12VDC adapter provides power, so you'll need to plan to be somewhat near an outlet. An 8' extension cable for the AC adapter is provided, so you don't need to be right on top of one. Possibly the greatest thing that was overlooked in the design of this camera was the ability for it to tilt up or down. It would have been an incredibly useful feature and it was sorely missed when positioning the cameras for an optimal viewing angle. To allow the Motorola homesight system to recognize the camera, activate the Device Discovery function of the software and insert the included plastic "toothpick" into the Discovery hole on the camera (just behind the motion sensor in the top of the unit.) Should you decide to mount the camera, the included instruction sheets feature a template which can be used to easily drill pilot holes and plan the positioning of the device on a wall.
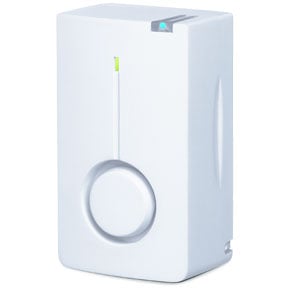
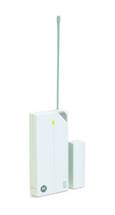 Wireless Door/Window Sensor
The Wireless Door/Window Sensor is the first component that makes you sit up and realize that this truly is a wireless connection (not even an AC adapter is needed for this device. A pair of AAA batteries (included) power this sensor for up to a full year according to the information provided by Motorola. There is a thin antenna that gets screwed into the top of the sensor. Motorola claims that once a unit is "Discovered" it will not need to be discovered again - even in the event of a power loss (or in this case, changing of batteries). I hope this is true because the Discovery hole is located on the rear of the unit (a design mistake in my opinion). If you utilize the included two-sided tape to affix the sensor to a door or window you will find it impossible to gain access to the rear of the unit without having to destroy the tape. The batteries are easily removable and in either case, I would recommend the use of the small mounting screws to affix the sensor to the door or window. A small helpful hint: be sure to attach the larger wireless sensor to the fixed part of the system (door frame, window sill/wall) and attach the small magnet brick to the moving part of the system (door, sliding window, etc). For all of the sensors, the included instruction sheets feature a template which can be used to easily drill pilot holes and plan the positioning of the sensors.
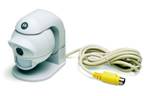 Wired Camera - Day
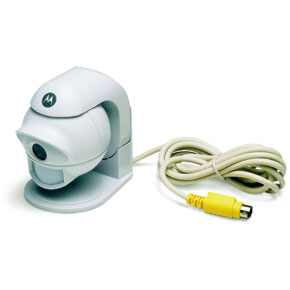
The wired camera is perfect for using in the room which houses the Wireless Control System. In this case it was the office. You can connect up to three of them to a single base station and use the Device Detection to add them into the monitoring system. Each wired Camera comes with a 60' extension cable (a 6-pin ADB cable) so you have almost unlimited flexibility in placement. In addition, the ADB cable supplies power to the camera so there is no need to locate it near an outlet.
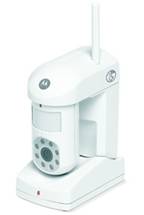 Wireless Camera - Day/Night
I installed two Wireless Day/Night cameras in my home. One was placed in the living room for security and another was placed in the toddler room to allow us to monitor him remotely. As with all of the Motorola cameras, the Wireless Day/Night Camera has a built-in passive infrared motion detector as well as microphone. It is exactly similar to the Wireless Day Camera noted earlier, except that it also features a color infrared camera which can take pictures in 0 lux light conditions (absolute darkness). It is perfect for any security or monitoring needs that don't allow for a well-lit area.
AC adapter, 8' adapter extender and mounting hardware are again included. I chose to wall mount one of the cameras and table mount the other. The process to mount the camera on the wall was easy thank to the included mounting template, and Motorola even included white cable holders that can be nailed into the wall to run the wire neatly up a corner (which I did).
Motorola Homesight System Components - Part 2
Wireless Temperature Sensor
A Wireless Temperature Sensor? While you may not immediately know what to do with one let me just say that even if you don't have a wine cellar or dedicated cigar room, you can always put a wireless temperature sensor up in the attic where it will neatly detect AC leaks which could result in a huge waste of energy and money. If you live up north you could put one in a basement or cellar to ensure that temperatures don't exceed set parameters.
I went through a huge fiasco earlier this year where I was making the attic cooler than my home. As a result I have placed a temperature sensor in a convenient area to alert me if the main air duct springs another leak. This kind of sensor is nice because I can set up a schedule and notification to immediately send me an email or a page should the attic drop in temperature beyond what would be considered normal.
 Wireless Water Sensor
Motorola made all of their door/window/temperature/water sensors out of the same ABS plastic mold. The sensors then conveniently plug into the bottom of the unit and each sensor is, of course, correctly identified by the Device Discovery tool. I thought the inclusion of a water sensor was brilliant as I can think of no more important notification feature than one that tells me there is a water leak in the house. It can be the difference between hundreds of dollars worth of damage and tens of thousands.
I placed the Wireless Water Sensor upstairs in the laundry room with the actual sensor placed in the water heater drip pan. Should any leaks occur the sensor should alert me with at least some time to catch the problem before it spills over into the rest of the house. I conveniently mounted the actual transceiver unit on the wall and allowed the water sensor, which attached with a long wire, to dangle down from there. In this way I got a nice clean connection and signal while making sure the unit was out of the way.
 Wireless Motion Sensor
The dedicated Wireless Motion Sensor is perfect for locations that do not require the use of a camera (not to mention you save a ton by not adding the video surveillance). I placed one in the stairwell to monitor motion going up or coming down the stairs as part of a whole home security zone.
I consider this part of my "upstairs" Device Group as it joins part of the security system to monitor traffic to and in the upstairs part of the home. Adding a motion sensor or two to your home is a very effective way to monitor and prevent intrusion to various areas that might be secluded or not have easy access to an AC outlet. The Wireless Motion Sensor runs off of two AA batteries (included) and can be stand-mounted or wall-mounted (we chose to wall mount it).
 What good is a home security system, as a preventative measure
anyway, if it doesn't have a siren? Well, Motorola provides one and it can be placed anywhere there is
an electrical outlet. You simply insert it like you would an AC adapter and press the Discovery button
to add it into the system. In addition to a siren, the unit features a strobe light that also goes off
in the event that the unit is triggered by a disturbance. To ensure that the unit is always functional,
it has an audible chirp in the event of a loss of AV power and also when activity is detected and the
system is unarmed. It has an internal battery backup so the unit will continue to function if the power
is out during an armed intrusion. The entire system, however, would also need to be on a battery backup
for this to function effectively of course.
What good is a home security system, as a preventative measure
anyway, if it doesn't have a siren? Well, Motorola provides one and it can be placed anywhere there is
an electrical outlet. You simply insert it like you would an AC adapter and press the Discovery button
to add it into the system. In addition to a siren, the unit features a strobe light that also goes off
in the event that the unit is triggered by a disturbance. To ensure that the unit is always functional,
it has an audible chirp in the event of a loss of AV power and also when activity is detected and the
system is unarmed. It has an internal battery backup so the unit will continue to function if the power
is out during an armed intrusion. The entire system, however, would also need to be on a battery backup
for this to function effectively of course.
Wireless Power Controller
One of the easiest ways to add some interactivity to your home while you are away is to simply schedule a living room/family room light to come on at predetermined times. You may perhaps even pop on the television at night to make the home appear occupied while you're away. One way to effect this is to utilize a Wireless Power Controller. It simply plugs into an outlet and allows you to connect a single 120V appliance into its AC outlet. The Motorola homesight system then has full control over triggering or scheduling the power up and down of the appliance.
More creative folks might set up a schedule to turn on a radio or coffee pot at predetermined times of the day or use it to schedule or trigger an untold number of devices.
 Wireless
Keypad and Keys
Wireless
Keypad and Keys
The Wireless Keypad Kit is hands-down the coolest feature of the Motorola homesight system. Instead of the traditional keypad where you must enter a numerical code to arm and disarm the system, the homesight uses encoded Keypad Keys that store your identity and tracking information on them. In this way the arm/disarm sequence is reduced to simply holding up your key ring to the activation button and pressing "arm" or "disarm". Now that's simple! The kit comes with two keys and you can buy additional keys in two-packs to use for guests, babysitters, contractors, etc.
Mounting the Wireless Keypad is simple and includes the option for battery powered use or connection to an AC adapter. I chose the former and mounted it just inside the doorway. This simple device arms and disarms the entire homesight system from one convenient location. Mounting hardware is included as is a template for drilling the holes to secure the unit to the wall. A desk stand adapter is also included in the even that you would prefer to set it on a table.
 Wireless Repeater
If you are like me, your house may not be all on one level and you may have some significant interference from one floor to the next. Motorola has made available Wireless Repeaters for use with the homesight system. To install, simply place them in locations where you would need to boost the wireless signal to additional sensors or video surveillance devices. Now, during the device discovery phase, new devices can be attached to the repeaters should they be unable to make contact to the Wireless System Controller.
I found some difficult locations in my home and so installed two repeaters - one upstairs and one on the other side of the downstairs level. The results were immediate and the system was able to connect to all devices with no apparent difficulties. Repeaters require an AC outlet (they come with a 12VDC adapter) and have a convenient desk stand to allow them to sit on any flat surface. You can also wall mount them with included hardware.
Motorola Homesight System Software
Software Configuration and Setup - A Tour
Setting up the Motorola homesight system is both easy and complex. The prior Product Installation Notes assume that you have successfully navigated the simple process of placing the devices and running the Device Discovery Wizard to attach each item to your homesight system. As this is accomplished for each item, macros are automatically added to the system for each component - meaning that your homesight system is almost automatically configured for use as a home monitoring system without any serious interaction. To get beyond the basics, however, you'll want to take a look at some of the things you can accomplish from the main Motorola homesight control screen.
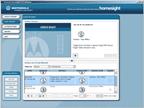
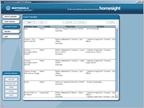
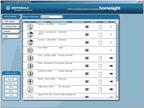 Device Overview
To get an instant snapshot of the devices in your system (a logical place to go after installing multiple items) check out the Device Overview screen. This area gives you a list of al sensors, cameras and devices as well as their status and configuration options. It even shows battery status or whether the unit is on AC power. You can view either individual devices, or what's known as "Device Groups" which allow you to group devices and sensors by area or purpose. I segmented my system into "upstairs" and "downstairs" for convenience.
 Event Archive
The Event Archive is the place you go if you want to check the logs, audio/video clips and still images captured by a triggered event in the homesight system. You can view the video immediately in the window (uses embedded Microsoft's Windows Media Player to handle the video playback) or simply take note of the logged data for various events such as motion detection or activity on a door/window sensor. This list can be filtered by device or date to help you narrow the focus of any activities you are trying to take a look at.
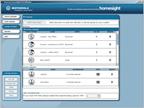 Device Discovery
Adding a new device at any time is easy with the Device Discovery page. Just click the "Start Discovery" button at the top and the system will ask you whether you are connecting new Motorola equipment or looking to create a new Device Group. The Discovery process will run for approximately 15 minutes - the length of time you have to push the "Discover" button on any new devices you are connecting to the system before you have to reinitiate discovery again. You can also delete devices from this page and view the battery/power status as well as whether the unit is armed, disarmed, and/or what state the sensor is in (open/closed, dry/wet, etc).
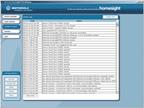 Event
Logs
Event
Logs

Want a down and dirty look at what's been happening in your system without all the fancy graphics? The Event Logs page is the place to go. Be warned, however, for some unknown reason, Motorola didn't prove a way to filter these logs, email, save or print them out. They integrated a way to save a ZIP file of the logs, however the generated files are non-standard and are more for technical support than for personal use or archival. Obviously, for those using their system for any length of time, this page will be next to useless by virtue of its unmanageable length.
 Event Schedule (macros)
The event schedule is the real meat and potatoes of the homesight system. This is where you will add a way to trigger events (really macro commands) to react to sensors, including the sending of notifications and recording of video and audio events. For example, if you wanted your living room's Wireless Motion Sensor to initiate video recording of the living room Wireless Camera for a period of 10 seconds upon activity, you could simply do the following:
- Click the "Add" button
- Enter a name for the schedule
- Under the Condition tab set the condition type (device-triggered or scheduled). In this case it would be a Device Event
- Select the Device (in this case a motion detector in the living room)
- Under Event select "Motion detected"
- Specify if there are time of the week limitations (weekdays, a range of time, etc)
- Under the Actions tab select the device to be initiated (the one you want to do something - in this case the corresponding Wireless camera) and select the desired "Action" (in this case "Capture Video")
- Click the "Add" button to add it to the list. Notice that you can have a single event trigger multiple devices to spring into action.
- Under the Notifications tab select whether you want to receive an email notification for the event or a cell phone notification. Click the "Add" button after making your choices. (Also, be sure to correctly set up your Email, Cell and SMTP information at the bottom).
As you can see there is a LOT of flexibility here. This is one place that Motorola spent a significant amount of time and energy and it shows. You can have one device trigger any number of other devices, send any number of notifications, and even pay attention to when these devices are active in performing monitoring activities. I set mine to automatically record at night - covering any instances whereby someone would break into the home while we are still sleeping in the house.
Motorola Homesight Remote Access, Key Management and Cameras
Possibly the most disappointing aspect of the Motorola homesight system is its complete lack of integrated remote access for the system. There are third party solutions, of course, from the integrated remote access available in Windows XP Pro, to the recommended affiliate I'm Touch remote access service (which incurs a monthly service fee of $8.95 or yearly fee of $89.95 for a single PC). While I'm glad that Motorola does indeed direct users to a third party solution, it would be even better if they had an integrated software and central server solution to meet this need. I would also like one very important option that seems to be missing from the system - the ability to upload security logs, photos and video to an Internet server.
In fact, without the use of a server you have a unique scenario: if thieves come in and steal the computer on which the Motorola homesight system resides - they also take all proof and evidence captured by the system. Oops. If that information is able to be uploaded via FTP to a server, however, then you have something that is securely storing your data on an off-location machine and you will be able to grab that information should a worst-case scenario occur.
I believe Motorola at this point is targeting those who would like to have an in-home monitoring system. This is not a completely secure suite of tools designed to fully protect against intruders, but rather a solid first line of defense that can enable you to do a measurable amount of home monitoring as well as out-of-town automating.
Key Management
 As I mentioned, the Wireless Keypad is the coolest part of the
homesight system. Simply come home (or leave), press your key into the
Keypad and the system arms or disarms with ease. No confusing passwords
or access numbers to memorize and each key is assigned to a specific
person or function. In this way, the arm/disarm logs and events are
tracked by the system and you always know who is responsible for
activating or disengaging the system.
As I mentioned, the Wireless Keypad is the coolest part of the
homesight system. Simply come home (or leave), press your key into the
Keypad and the system arms or disarms with ease. No confusing passwords
or access numbers to memorize and each key is assigned to a specific
person or function. In this way, the arm/disarm logs and events are
tracked by the system and you always know who is responsible for
activating or disengaging the system.
Each key is uniquely serialized, so when you add it to the homesight system for the first time it can be renamed and designated for use by a family member, babysitter, guest etc...
Macros
Macros simply allow you to enable an Event Schedule (macro) immediately. This includes arming or disarming the system, or running a record-on-event/sensor command.
Comprehensive Help Menu
The Help menu consists of a searchable index of help topics, organized by task, device and product. It includes a Quick Start Guide as well a step-by-step "how-to" guides for typical tasks undertaken in setting up and using the homesight system. There is also a significant amount of detailed information on each device and feature within the system. Overall I found it easy to use, though I preferred to search topics rather than use the linear navigation
Video Camera Performance
The video camera performance on the Motorola homesight, unlike their pristine website graphics, is not as good as I would have hoped. While I would assume that daylight video with perfect lighting would be much better, I had hoped that interior shots would have been at a higher resolution (video appears to be at around 320x240 pixels, 8-12fps. The wired cameras do not fare any better than their wireless counterparts, with rather choppy video and only 1/4 NTSC resolution. With a wide angle lens, such as the cameras feature, you would have a very hard time identifying any "suspects" (or even the pizza delivery person at your front door) at the resolution provided. In order for identification to take place it seemed as if the subject had to be within 3-4 feet of the camera itself. It would be nice to see better performance out of the wired cameras at least and I would love to see an option for higher-quality cameras (we'll pay for them) with selectable resolutions up to the capabilities of the Motorola's 802.11g network.
The camera quality is adjustable to some extent in that Brightness, Contrast, and Quality can be adjusted from 0-100. The default settings are about the best you will get, however and I did not see any difference between Quality settings of 75 and 100. In fact, on further experimentation with both the wired and wireless cameras, I didn't see any difference between a setting of 1 and 100, indicating to me that this function doesn't alter the real-time video settings.
Camera audio was rather disappointing, with most cameras having a very clear and present buzzing and being easily affected by any nearby magnetic interference (for example a fan motor). Periodically, audio would pop as the video camera (both wireless and wired) would glitch and jump. While they were certainly sufficient for capturing any needed audio in terms of getting something on disc, the quality could be much improved. It seemed as data flow increased (more motion and greater signal to noise) the video jumpiness increased as did the frequency of dropouts and audible pops.
Motorola Homesight Recommendations and Conclusion
Aside from some of the items mentioned previously such as upgraded cameras, off-site FTP'ing of files, better integrated remote access and more flexible Event Logs, there are some items I would love to see included soon. Chief among these are:
- PC-free system with bios/OS on the router itself (with support for Internet dial-in)
- Wireless thermostat
- Garage door sensor
- In-wall lighting control and dimmers (replace typical Decora-style plate switches)
- In-wall power control (replace typical Decora-style outlets)
- Outdoor motion detectors with flood lamps
- Humidity sensor
- Vibration (glass break) sensors
These are just some basic suggestions and do not reflect a deficiency so much as they reflect our desire to see the Motorola homesight system elevate itself to a new level and provide some serious competition to the existing wireless home monitoring solutions on the market. In particular, the addition of a thermostat and in-wall lighting and power controls would take this system into the area where we feel a truly robust home automation system needs to be and make Motorola a force to be reckoned with.
Conclusions
The Motorola homesight system is an effective whole home automation system that has some room to grow. While it excels in many areas (configurability, ease of use and expandability), there are some quality and growth areas that we look forward to seeing improved in future upgrades and iterations. For the price, this system is hard to beat; and to be honest, we could be accused of 'nitpicking' by anyone familiar with any of the competing home automation systems. I can recommend this without reservation to anyone looking to obtain a home security system with some automation capabilities that doesn't want to break the bank or deal with expensive monthly service fees and long drawn out contracts that are difficult to get out of. The Motorola homesight is a simple, expandable solution that doesn't overcomplicate the process of getting a home automation and security system. This is a product line to be watched carefully as it matures in a marketplace that is growing at a considerable rate.
Motorola homesight
http://broadband.motorola.com/consumers/
About Motorola
Motorola, Inc. is a global leader in wireless,
broadband and automotive communications technologies that help make
life smarter, safer, simpler, synchronized and fun. Sales in 2003 were
U.S. $27.1 billion. Motorola creates innovative technological solutions
that benefit people at home, at work and on the move. The company also
is a progressive corporate citizen dedicated to operating ethically,
protecting the environment and supporting the communities in which it
does business. For more information:
www.motorola.com.
The Score Card
The scoring below is based on each piece of equipment doing the duty it is designed for. The numbers are weighed heavily with respect to the individual cost of each unit, thus giving a rating roughly equal to:
Performance × Price Factor/Value = Rating
Audioholics.com note: The ratings indicated below are based on subjective listening and objective testing of the product in question. The rating scale is based on performance/value ratio. If you notice better performing products in future reviews that have lower numbers in certain areas, be aware that the value factor is most likely the culprit. Other Audioholics reviewers may rate products solely based on performance, and each reviewer has his/her own system for ratings.
Audioholics Rating Scale
 — Excellent
- — Very Good
- — Good
- — Fair
- — Poor
| Metric | Rating |
|---|---|
| Network Features/Performance | |
| Build Quality | |
| Ergonomics & Usability | |
| Ease of Setup/Programming/Integration | |
| Features | |
| Performance | |
| Value |
Clint Deboer was terminated from Audioholics for misconduct on April 4th, 2014. He no longer represents Audioholics in any fashion.
View full profile