
Denon AVR-3805 Receiver Review
Denon AVR-3805
- Product Name: AVR-3805
- Manufacturer: Denon
- Performance Rating:


- Value Rating:
- Review Date: June 08, 2004 19:00
- MSRP: $ 1200
Surround Formats: Dolby Digital Surround EX, Pro Logic IIx (Cinema, Music and Game Modes), dts ES Discrete 6.1 and Matrix 6.1, dts Neo:6, dts ES 96/24, HDCD
DSP: Analog Devices HammerHead SHARC 32 bit floating point DSP processor
Power Ratings
120 watts per channel (8 ohms, 20 Hz-20 kHz, <.05%THD)
160 watts per channel (6 ohms, 1 kHz, <.7%THD)
Audio DACs: 16 Burr-Brown PCM-1791 24-bit/192 kHz on all eight channels, in differential configuration
Audio ADCs: 24-bit/192 kHz Burr-Brown PCM-1804 on all Stereo analog inputs (Not EXT. Inputs)
Crossover: 40, 60, 80, 100, 120, 150, 200, 250Hz
Remote: EL backlighting pre-programmed/learning remote
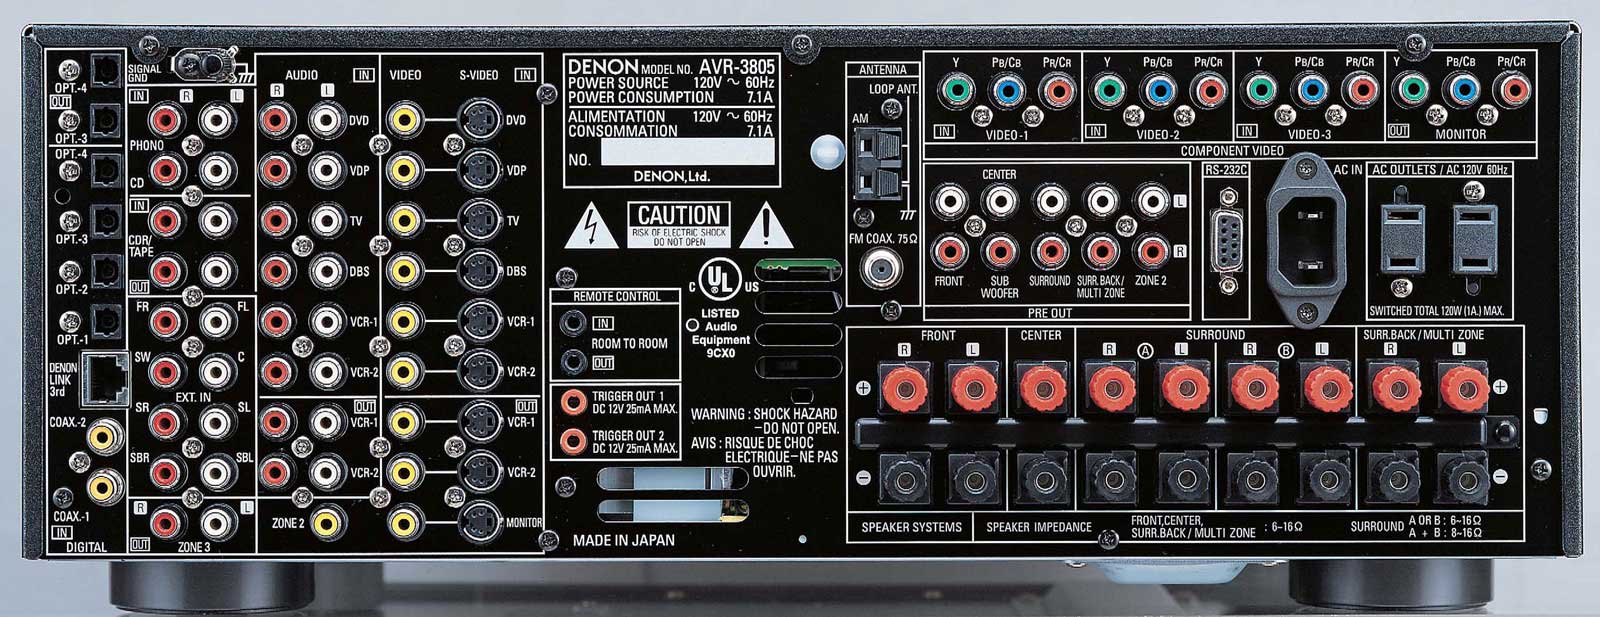
Video Inputs: 3 (assignable) 100MHz Component Video, 7 sets composite and s-video inputs
Video Outputs: 100MHz Component video output, 3 composite and s-video outputs, Multi-Zone composite video output
Audio Inputs: 7.1 external wide bandwidth (100 kHz) multi-channel inputs, 5/7 Channel Stereo, DENON Link 3rd (SACD & DVD-Audio compatible), 7 assignable digital inputs (5 optical, 2 coaxial), 10 analog inputs
Audio Outputs: 2 optical digital outputs, 2 multi-zone stereo pre-amp level audio outputs, fixed or variable level
Additional Connections: RS-232C port for third party control Systems, remote I/O ports, 2 assignable +12V triggers, detachable power cord
Dimensions: 17.1" W x 6.7" H x 16.4" D
Pros
- DENON Link 3rd Edition
- Component video up-conversion with OSD
- Three (3) HDTV-compatible component video inputs
- Can bi-amp front speakers for 240 wpc (5.1 only)
- Bass output in 2-channel direct mode!
- Lip Sync delay
- Can monitor video other than audio source
Cons
- Auto Setup doesn’t set crossover point
- No IEEE 1394/Firewire interface
- Aggressive Room EQ (boosts up to +9 dB)
- No digital sources output to Zone 2/3
 Denon AVR-3805 Introduction
Ever since agreeing to take on the review of the Denon AVR-3805 I couldn't go a day (much less an hour) without getting an email or a forum post requesting info on the unit or a deadline for my review (you know who you are!) I hadn't experienced this level of anticipation on Audioholics for quite some time and wondered if the new receiver would hold up to everyone's preconceived expectations. As is typical with Audioholics, the AVR-3805 receiver would receive a thorough workout, with all of its functions dissected and exposited for all to see. Suffice it to say, at the time of this writing this review, the AVR-3805 is the most feature-rich receiver in its price class... and not by a small margin. Some of its more notable features include:
- DENON Link 3rd Edition for "one-cable" SACD and DVD-Audio decoding from compatible Denon DVD players.
- 16 Burr Brown 192 kHz/24-bit DACs in differential configuration on all 8 channels (Note: Upon having Gene review the schematics for the AVR-5803 and this receiver, he discovered that Denon counts the + and - of each differential DAC as a separate DAC. In reality, this is still one DAC. Hence, there are really 8 DACs all configured differentially, with paralleling two DACs per channel for noise averaging in "direct stereo mode.")
- Dolby Pro Logic IIx
- HDCD decoding
- Auto Setup and Room EQ feature (optional Denon DM-S305 or compatible mic)
- 100MHz component video inputs/output (with component video up-conversion and monitor out via component video overlay)
- 120W x 7-channels (8 ohms, 20 Hz-20 kHz, < .05%THD; FTC spec rates with 2-channels driven)
- Lip Sync delay (up to 200ms)
Denon AVR-3805 Company History
This receiver is geared towards the serious home theater enthusiast, while being priced for the (subjectively-speaking) budget-conscious. As you can tell from our more recent reviews, it is possible to achieve excellent audio performance while forgoing separates in favor of the more solidly-built receivers. Your mileage may vary from model to model, but considering all the different components that make up a home theater room, a feature-laden receiver at this price point is mighty attractive. Since the introduction of the Denon AVR-5803 in 2002, Denon has been consistently breaking new ground with its receivers - and this unit is no exception.
Company History
From its beginning in the 1930s as a supplier of professional recording studio and broadcast equipment, Denon has become a world leader in the manufacture of the highest quality audio, audio/video, and software products. Denon is recognized internationally for innovative and groundbreaking products and has a long history of technical innovations, including the development and first commercialization of PCM digital audio. Denon is a subsidiary of D & M Holdings Inc. which is based in Tokyo and is the parent company of wholly owned subsidiaries Denon Ltd., Marantz Japan, Inc. and McIntosh Laboratory, Inc. Denon, Marantz and McIntosh are global industry leaders in the specialist home theater, audio/video consumer electronics and professional audio markets, with a strong and long-standing heritage of manufacturing and marketing high-performance audio and video components.
Denon AVR-3803 vs. AVR-3805 Features and Listening Room
For those of you familiar with the AVR-3803, here is a quick list of highlights you can expect to get with an AVR-3805 upgrade.
-
Dolby Pro Logic IIx
-
Additional 10 watts per channel (8 ohms, 20 Hz-20 kHz, < .05%THD)
-
Auto Setup & Parametric Room EQ
-
Extended Bass Management Crossover Points (150/200/250Hz)
-
DENON Link 3rd Edition (Super Audio CD & DVD-Audio) compatible digital input
-
True 3 Source, 3 Zone functionality with discrete power, Source Select and volume control for each zone
-
ALPHA 24 Processing Plus (AL24+) on all channels (not just the front speakers)
-
EL backlighting pre-programmed/learning remote
-
Two (2) assignable +12V triggers
Denon has kept busy and it shows. While the power ratings haven't changed much from the AVR-3803, the more significant improvements like DENON Link 3rd Edition (which supports SACD input in addition to the already-supported DVD-Audio), Auto Setup & Room EQ, and the new backlit electroluminescent (EL) touchscreen remote make this unit a class above its predecessor.
The Denon AVR-3805 didn't appear to break a sweat driving the 4-ohm impedance presented by the RBH Sound 1266-LSEs and 661-LSE speakers. In fact, the rated 120 watts per channel was sufficient enough to drive the Reference 3 System speakers to a steady 97dB SPL at the listening position without any audible distortion. For those of you who are wondering, this translates into approximately 105dB SPL (average continuous) from 1" from the front of the speakers. In the Reference room, the Denon receiver was parked at -10 on the digitally-controlled analogue volume to produce these levels.
It's always fun for us to participate in some of the discussions surrounding power output and ratings, whether it' s on our discussion forums or some other venue. The bottom line is that unless you are planning on putting your system outdoors, have very inefficient speakers ( < 88dB SPL @ 1 meter), or have ears like Beethoven (towards the latter stages of his life) most well designed 100 watt per channel amplifiers will supply sufficient volume for most home theater applications with integrated powered subwoofers. The question for you becomes: Does it have good linearity, efficiency and enough headroom to adequately articulate the program material without audible levels of distortion or noise for the loudspeaker system, listening environment, and listening preferences of the user?
The Listening Environment
The Reference System 3 listening room is characterized by a series of natural baffles and a good combination of neutral materials. It is often necessary to hang draperies and build or purchase fancy bass traps to eliminate problems in a room. When possible, I prefer to do it naturally; and as I built my home, I was able to construct a room where the furniture and natural materials could do most of the work for me. Bookshelves serve as diffusers, and 9' flat ceilings with berber carpet produce a room that is lively, but not highly-reflective.
The central listening position is on a sofa located in the center of the room, 11 feet from the front wall, and 8 feet from the rear wall. The RBH Sound 1266-LSEs are approximately 6.5' apart and the 61-LSE surrounds are 7' apart on the rear wall and faced directly forward to maximize their excellent imaging characteristics. An SVS PB2-ISD subwoofer was situated outside of the left 1266-LSE and was used for this review (along with both an RBH Sound 1212-SE and an Outlaw Audio LFM-1 - each of which was rotated in and out of the system throughout the testing period.)
Denon AVR-3805 First Impressions
This was my first lengthy period of time with a Denon receiver. My first impression was that Denon has one of the most configurable receivers at this price point. Their attention to detail is astonishing and should really put other manufacturers with products in this price range on notice. There are a few notable missing features, however, including:
- Video pass-through when unit is off.
- Independent crossover settings for 2CH or SACD/DVD-Audio modes
- Input level trims for each source (allowing you to match reference volume levels for all devices)
- Firewire support (you must purchase a D Link enabled Denon DVD player to benefit from a single direct digital audio connection for SACD and DVD-Audio)
- Zone 2/3 does not allow digital sources to be output on its analogue preamp outputs
Aside from the basic look of the unit, which is attractively simple (ok, they pretty much all look the same), my first impressions focused on sound. What I felt was a mixture of satisfaction and, call me whatever you like, an insatiable appetite to want to cause this receiver to somehow stumble during the first several hours of operation. I tried several of the most bass intensive music tracks to see how the unit would control my 4-ohm RBH Sound speakers in 2-channel mode and failed to hear anything but tight bass and well-controlled midrange at reasonable listening levels. I moved on to aesthetics and noticed the strangely familiar remote control. Where had I seen that type of look before? Then it hit me: Indiglo watches and membrane keyboards. The new Denon remote had truly gone retro in its appeal to find a different way of presenting a typically boorish set of buttons. The resulting remote will land you in one of two camps: Hate It or Love It. When taking such a departure from the norm, there isn't much room left for a middle ground. I personally found the remote to grow on me, however it has the feel of a device which will not age well and has the same "look at me" disadvantages shared by all non-tactile button-based remotes.
Setting Up the Receiver - Overview
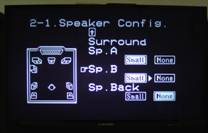
Most of the connections on the Denon are unambiguous. The only problem you are likely to have connecting to the AVR-3805 is what surround speaker terminals to utilize. Denon provides 2 sets of surround speakers apart from the optional surround back speakers. The purpose of the dual speakers is for those consumers wanting to configure their rooms with direct radiating speakers for DTS/SACD/DVD-Audio music and a different set of surrounds (usually bipolar) mounted on the sides of the room for home theater use. If you only have one set of speakers, you'll want to default the system to use the A speakers, even if you mount your speakers towards the back of the room and not the sides (like Reference System 3). While the graphical representation of your speakers will be incorrect in the setup OSD, this is the correct and easiest way to set up a system not using a separate "music-only" set of surround speakers. The selection of A or B has nothing at all to do with DSP or surround field settings (including EQ.) It is merely an assignment that can be utilized in the setup menu to designate what speakers should handle which decoding formats. While this is a meritorious feature, it really has a limited market. You would need to either sacrifice 7.1 for 5.1 to reconfigure the additional speakers, or place 9 speakers in your main listening area - a feat not many people can afford, let alone accommodate.
I have to say that it was a pleasure hooking up my Denon DVD-5900 to the AVR-3805 via Denon Link 3rd Edition. One cable, a brief visit to the receiver and DVD menus to enable Denon Link 3 rd and I was on my way to digital audio bliss. All bass management and processing/decoding was now being handled by the AVR-3805 and I no longer had to worry about running the spaghetti mess of interconnects behind the rack in order to outfit my system for analogue multi-channel connectivity. This is truly a one-cable audio solution for those possessing a compatible DVD player such as the venerable DVD-5900 (you will require the latest firmware update for Denon 3rd Edition pending SACD approval of Denon's proprietary format).
Of Particular Note:
- Zone 2 video monitor output
- Zone 3 audio outputs
- Powered Zone outputs (configurable for surround back speakers)
- Surround A or B speakers
- 7.1 multi-channel preamp inputs/outputs
Bi-amping the Denon AVR-3805 for 240 Watts for the Front Channels
 What? A $1200 receiver that gives you 2 x 120 watts for each front channel
to the main speakers in a bi-amped configuration while still allowing 5.1 surround? Absolutely. Read
on... Using unused "Surround Back" amps to bi-amp the main speakers was mentioned by Gene DellaSala in
his review of the Denon AVR-5803 receiver and the same procedure holds true for the AVR-3805. Why let
those unused surround back amplifiers go to waste if you are not utilizing either them or Zone 2
speakers? Here is the procedure to successfully bi-amp the Denon AVR-3805 and deliver additional power
to your main speakers:
What? A $1200 receiver that gives you 2 x 120 watts for each front channel
to the main speakers in a bi-amped configuration while still allowing 5.1 surround? Absolutely. Read
on... Using unused "Surround Back" amps to bi-amp the main speakers was mentioned by Gene DellaSala in
his review of the Denon AVR-5803 receiver and the same procedure holds true for the AVR-3805. Why let
those unused surround back amplifiers go to waste if you are not utilizing either them or Zone 2
speakers? Here is the procedure to successfully bi-amp the Denon AVR-3805 and deliver additional power
to your main speakers:
Before telling you HOW to do it, there are some caveats about doing this specifically with the AVR-3805. First, If you set it up to bi-amp, please expect to do your SETUP manually rather than using the mic for the AUTO SETUP procedure. Next, we have seen some complaints of noise (hiss) from some people who have done the bi-amping with specifically the AVR-3805. Accordingly, Denon is not "officially" endorsing this practice on this specific model.
That said, we encourage you to TRY the bi-amp setup and judge for yourself if you hear any objectionable increase in noise that negates the many advantages of bi-amping in general. The procedure below specifically connects the speakers LOW frequency to the Zone 3, while having the HIGH frequency connected to the FRONT speaker terminals. This may help to reduce any extra noise from the use of multi-zone from getting to the tweeters. The reason for choosing Zone 3 rather than Zone 2 is simply to still permit the use of a volume controlled zone 2 for genuine multi zone use, so long as an additional stereo amplifier is used. Additionally, because of details on the remote, it makes it slightly more difficult to accidentally alter some of the settings.
-
Connect a SHORT stereo cable pair from [PRE OUT LEFT & RIGHT] and run it into the Red and White jacks labeled [VDP].
-
DISCONNECT the SHORTING STRAPS from your bi-ampable speaker's terminals! This is whatever device the speaker manufacture has used to connect the two black terminals to each other, and the similar one used for the two red terminals. Failure to do this can quickly damage the amplifiers!
-
Connect the HIGH FREQUENCY terminals of the speakers to the receiver's FRONT LEFT and RIGHT speaker terminals.
-
Connect the speakers' LOW FREQUENCY terminals to the receiver's speaker terminals marked: [SURR BACK / MULTI ZONE]. These are to the far right, viewed from the back.
-
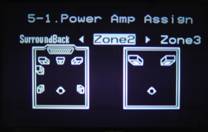
Via step # 5.1 in OPTION SETUP, set P.AMP ASSIGN to ZONE 3. See page 43 of the owner's manual for detail.
-
Via REMOTE (RC-969) press button that says [ZONE 2] until it changes to read [ZONE 3] with the bright bar above the ZONE 3 indication.
-
Press [SOURCE ON] to turn on the ZONE 3 amplifiers.
-
Select [VDP] as the SOURCE for Zone 3. This is done by pressing the letters [VDP] which are directly under the CD indication, NOT the VDP which is directly under the MD indication. Note that this step is what causes the "ZONE 3" to always play the VDP input, which is in turn, the signal from the Left and Right FRONT PRE OUTS of the main zone. Voila!
-
With the remote still in the ZONE 3 mode, press the VOL ^ up button while watching the front panel of the AVR-3805. Bring it up to read 00 as a starting point. Later in the process you will come back to this and adjust to your own taste for spectral balance of the front speakers. (More, later).
-
Next, put the remote back to the AMP mode, so the word AMP is underlined by the bright bar. You can now do any other setup steps you need and use the receiver as you normally would.
Anything you select to listen to will have its output for the front L & R go directly to the speaker terminals marked Front L & R and ALSO go out the L & R PRE OUT jacks which ultimately get to the SURR BACK / MULTI speaker terminals. Therefore, the CONTENT of the FRONT L & R speaker terminals is identical to the content of the SURR BACK / MULTI speaker terminals.
Once setup this way, you never touch the ZONE 3 again since the main zone is in control of everything.....one exception...
The ZONE 3 volume will adjust ONLY the level to the LOW FREQUENCY part of the speaker, whereas the MASTER VOLUME (main zone) will control ALL channels INCLUDING the LOW FREQUENCY part of the speaker. Therefore the ZONE 3 Volume, step number 9 in the list above, actually adjusts the RATIO of Lows to Highs in the speaker. If you want a bit heaver sound, bring ZONE 3 volume up a bit. If you want a bit brighter sound, take ZONE 3 volume down a bit. Some "Audiophiles" worry they won't know what setting is "Correct", but "REAL" audiophiles trust their own ears above all! One of the very powerful ADVANTAGES of the Bi-Amp setup this way is your ability to control the spectral balance of the speaker with this specific adjustment.
Notes: It would have been nice if the channel trim for the Zone 2/3 level control had +/-0.5dB precision as did all of the other channel trims of this receiver. However, we found +2dB adjustment to provide near unity gain with the main amplifiers. During this configuration I also wondered what would happen if the CD input were accidentally selected by mistake, causing the main channel preamp outputs to be suddenly routed to themselves (feedback). Not to worry, Zone 2/3 does not allow the same source to be sent simultaneously to the main speaker outputs so feedback is impossible - at least with regards to this configuration method.
Be sure to remove the jumpers on the back of the main speakers and then connect a set of wires from the "Front" channels of the receiver to the highs section of each of your front speakers and a set of wires from the "Multi Zone 2" channels of the receiver to the lows of your front speakers. Voila! You now paid only $1200 for a receiver that gives you 3dB of additional headroom in the form of 2 x 120watts per channel to your main speakers where you need it the most.
Denon AVR-3805 Receiver: Manual and Auto Setup
 Manual setup consists of identifying the number, size and location of your
speakers as well as configuring the AVR-3805 to accurately handle audio and video inputs and outputs.
For the most part, a tape measure, SPL meter and the Denon's internal pink noise generator will
be sufficient to accurately configure the Denon to work within your room.
Manual setup consists of identifying the number, size and location of your
speakers as well as configuring the AVR-3805 to accurately handle audio and video inputs and outputs.
For the most part, a tape measure, SPL meter and the Denon's internal pink noise generator will
be sufficient to accurately configure the Denon to work within your room.
All measurements for the receiver's configuration should be taken from the listening position, both in measuring distance and SPL levels. For Reference System 3 we came up with the following settings:
|
Speaker |
Size |
dB SPL |
Distance |
|---|---|---|---|
|
Front Left |
Large |
0 |
9.3 ft |
|
Front Right |
0 |
9.3 ft |
|
|
Center |
Small |
+0.5 |
9.0 ft |
|
Surround Left |
Small |
+1 |
8.6 ft |
|
Surround Right |
+0.5 |
8.6 ft |
|
|
Subwoofer |
Yes |
0 |
10.4 ft |
|
Crossover Setting: 60 Hz (40/60/80/100/12/150/200/250 Hz) |
|||
|
Reference Level Calibration to 80 dB SPL |
|||
I love the ability to set speaker distances with a .1 ft tolerance. For overseas users, the Denon even enables the user to configure the system in .01 meter increments. Using .01 meter increments will result in more accuracy regardless of what measurement system you typically utilize (.1 ft = 1.2" increments while .01m = .394" increments.)
Once the system was configured I noted the settings and continued with my evaluation period for several weeks.
Setting Up the Receiver - Auto Setup
 Auto setup and Room EQ are emerging trends that now come standard with
several models from Yamaha, Denon and Pioneer. Once I decided it was time to test the Auto Setup
functions of the AVR-3805, I redid my manual setup to ensure that my system had not changed from the
settings I had previously engaged. They were spot on and I recorded their settings for later
comparison.
Auto setup and Room EQ are emerging trends that now come standard with
several models from Yamaha, Denon and Pioneer. Once I decided it was time to test the Auto Setup
functions of the AVR-3805, I redid my manual setup to ensure that my system had not changed from the
settings I had previously engaged. They were spot on and I recorded their settings for later
comparison.
Verify/set your crossover frequency FIRST, before running any tests or auto setup. Auto setup will NOT adjust your crossover frequency.
Next, I proceeded to connect the Denon DM-S305 condenser microphone to the front of the receiver. I was careful to position the omni-directional microphone at exactly the listening position - precisely where the SPL meter was placed during the manual setup. The DM-S305 microphone is a $60 option and is a plug-and-play solution requiring no calibration of its own or level adjustment. This is an advantage for those looking to utilize the automatic configuration and EQ functions of the AVR-3805. It comes with a threaded insert on the bottom of the mic which is surrounded by a thin rubberized pad, providing sufficient isolation when mounted on a camera-style tripod (the mic is not designed for standard 5/8" threaded microphone stands.)
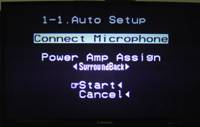
To begin auto calibration, click on "Auto Setup" from the Auto Setup / Room EQ Menu. The Denon will now remind you to Connect the Microphone and verify whether you are using the powered Surround Back speakers. Simply guide the remote down to the Start text and cursor left to begin. A good suggestion would be to run this setup in the evening, when ambient noise generally subsides by about 10dB or more. You will also want to turn off any air conditioning and remove small children from the room prior to performing auto calibration.
During calibration the Denon will produce a 2 second burst of pink noise from each speaker, checking frequency response, distance, level and phase. The starting volume for the test is automatically set by the AVR-3805 so there is no need to pre-set the receiver's volume at any particular level (another advantage of having a digitally-controlled analogue volume.)
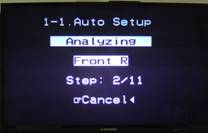 The order for the tests is Front Left, Front Right, Center, Subwoofer (measured twice),
Surround Left A, Surround Right A, Surround Left B, Surround Right B, Surround Back Left, Surround Back
Right (these last two will not be displayed or tested when Zone 2 or Zone 3 is configured in the
Auto Setup
menu. Each test burst is accompanied by the word "Measuring"
which
appears on the monitor output as well as the Denon's digital display.
The order for the tests is Front Left, Front Right, Center, Subwoofer (measured twice),
Surround Left A, Surround Right A, Surround Left B, Surround Right B, Surround Back Left, Surround Back
Right (these last two will not be displayed or tested when Zone 2 or Zone 3 is configured in the
Auto Setup
menu. Each test burst is accompanied by the word "Measuring"
which
appears on the monitor output as well as the Denon's digital display.
This single pink noise burst not only results in distance, speaker type and level settings, but also configures the parametric EQ settings as well (which by default are off.) At the conclusion of the Auto Setup you will be able to view the speaker configuration, delay times, and channel levels as set by the Denon receiver. Auto Setup rendered my system in the following manner:
|
Speaker |
Size |
dB SPL |
Distance |
|---|---|---|---|
|
Front Left |
Large |
-1.5 |
9.3 ft |
|
Front Right |
0 |
9.3 ft |
|
|
Center |
Large |
0 |
8.9 ft |
|
Surround Left |
Large |
-0.5 |
8.6 ft |
|
Surround Right |
0 |
8.6 ft |
|
|
Subwoofer |
Yes |
+2.5 |
9.3 ft |
You can see by the highlighted numbers that the AVR-3805, while not wrong configures speaker systems according to a fixed set of rules (see inset "Important notes on Denon Room EQ"). I would not, for example, consider the high performance RBH Sound 61-LSEs to be Large speakers as they perform strongly down to 45Hz but are not equipped to handle crucial lower frequencies at high SPLs.
In Reference System 3 I generally prefer sending all frequencies below at least 60Hz to the subwoofer. Every room and system is different, however and you may not choose to do the same in yours. In addition to this, I have been experimenting with utilizing the THX standard of 80Hz for home theater and music use which has produced excellent results as well.
Important Notes on Denon Setup and Room EQ
After re-reading the Denon manual, we realized that Denon rates speakers as being Large or Small based on the crossover frequency set by the user. We also re-ran the Auto Setup several times and verified that Auto Setup DOES NOT CHANGE the crossover setting. This is odd since the user may set the crossover to 60Hz for speakers that go down to 45 Hz - but if they are consequenctly set to Large by the Denon, then you lose all frequencies below the potential of the speakers. In addition, the user manual does not instruct the user to first set the crossover setting prior to performing an Auto Setup. It would be more accurate and beneficial to the user to have an Auto Setup system that actually evaluated and correctly determined the best crossover frequency for the given speaker system.When running the Auto Setup, the Denon's short white noise burst pattern runs only once per speaker (except for the subwoofer test which runs twice). This single test is used for both size, distance and speaker type as well as Room EQ settings. This is very detrimental to the system as a whole as it basically means the Denon is setting the parametric EQ based on the same test it used to determine the speaker's most fundamental characteristics. The three Room EQ modes (Normal, Flat and Front) are also calculated from the same test burst, meaning that a mathematical equation is used to determine each of those settings, rather than a separate set of measurements which we feel would be more appropriate. Based on these evaluations, we don't see how the system can perform optimally beyond a very basic "one-shot-cures-all" enhancement that is not truly geared for detailed room correction.
Denon AVR-3805 Automatic Parametric EQ Modes
Once you have run the Auto Setup function, you must choose to store the settings before being able to apply them to your room and utilize the configured parametric EQ. Once the Auto Setup completes, simply cursor down to the "Store" function of the on-screen display and cursor left to store the results of the Auto Setup. When storing the Auto Setup data, the front panel of the Denon shows the percentage completed (30%, 60%) The entire process takes about 20-25 seconds to complete. After storing your settings you can now engage the Parametric Room EQ modes which include: Normal, Flat, Front, and Manual (and of course you can turn the EQ function OFF.) Below you will find an abridged list of the various Parametric EQ settings as stored by the Denon for my system in the corresponding modes:
Room EQ: NORMAL
|
|
||||||||||||||||||||||||||||||||||||||||||||||||||||||||||||
|
|
||||||||||||||||||||||||||||||||||||||||||||||||||||||||||||
Room EQ: FRONT
|
|
||||||||||||||||||||||||||||||||||||||||||||||||||||||||||||
Room EQ: FLAT
|
|
||||||||||||||||||||||||||||||||||||||||||||||||||||||||||||
|
|
||||||||||||||||||||||||||||||||||||||||||||||||||||||||||||
Denon AVR-3805 Parametric Room EQ Settings Evaluation
Room EQ: NORMAL Setting
The Denon manual describes the "NORMAL" Room EQ mode as" adjusting the frequency response of all speakers suitable for a general surround system." I decided to jump right in and determine whether or not the full-on NORMAL mode of the Room EQ would improve audio (music in this case) at the listening position. To do this, we recommend engaging the on-screen display Setup Menu so that you can switch between Room EQ modes on the fly (each setting switch takes about 2-3 seconds for the parametric EQ settings to "take" during which audio is muted.) Another option is to cycle through modes using the "Room EQ" button which is conveniently located near the center of the EL remote control. To begin, I placed the Toy Matinee DVD-Audio disc into the Denon DVD-5900 (connected to the AVR-3805 via Denon LINK 3rd Edition) and kept the room EQ in the OFF position. When engaging NORMAL Room EQ, track 3, "Remember My Name", lost its intimate feel. While the sound stage didn't fold or collapse, the quiet and gentle nature of the song was replaced by a richer, fuller sound akin to a Phil Spector mix. While some details were more noticeable in the music, it seemed as if the Denon was accentuating everything leaving no nuances behind and creating a veritable "Wall of Sound". In listening to some other music samples, the NORMAL setting seemed to have an equally aggressive affect on the mix of the sound overall.
Room EQ: FLAT Setting
The "FLAT" Room EQ mode, according to Denon "adjusts the frequency response of all speakers flat." Prior to this review, I would have thought that the purpose of "NORMAL" setting was to adjust all speakers to a flat frequency response. Apparently "NORMAL" provides a bit more than simple room correction. On this setting, Nora Jones' vocals were moved forward a few feet, replacing the laid back style of the song with a more forward mix. On other discs I experienced similar feelings where the vocals were accentuated and the mix was brought forward so as to almost "flatten" the depth of the instrumentation in the mix. The "FLAT" setting is, to me, just a less aggressive version of the "NORMAL" setting. If you want some global room corrective EQ, but don't want to create a wall of sound, this might be your best choice.
Room EQ: FRONT Setting
The "FRONT" setting is intended to"adjust the characteristics of each speaker to match the front speakers." Of all of the settings, this one was the least intrusive as it only affected the surrounds and center channel speakers.
Room EQ: Recommendations
Based on my notes aboveI am going to make some serious recommendations regarding Denon's Automated Parametric Room EQ. First of all, prepare to do about an hour-long listening session, playing some of your favorite music. Go ahead and try out the "NORMAL" mode - and be prepared to like it... for about 3 minutes, until your ears get fatigued from the onslaught of sound. After this, switch between the various modes using the on-screen display, so that you can pick and choose what mode you are jumping to, rather than cycling via the remote. I think that the Room EQ system is going to vary in its usefulness depending upon the room, the speakers, and the listener. There is simply no way for any reviewer to tell you what will and will not work for you with regards to this type of system. I can tell you, however, that with my RBH Sound reference speakers, I prefer to leave the system off.
 What would make this system much more useful would be to cap the amount of gain and allow
limited tweaking of the amount of correction that is allowed. As you can see from the charts above,
several of the target frequencies received +8 and +9 dB of GAIN from the system -
a general no-no
in the world of room correction. A good solution for this would be to apply a global "strength"
filter that would apply to all EQ settings and would come with a "high,
medium, and low"
configuration. This would allow some flavor of correction to be done without
generating the potential "wall of sound" effect that I observed. Denon could also focus the
majority (or even all 8) of its parametric EQs on fixing the most notorious problem in listening rooms -
room modes. By targeting just frequencies below 120Hz, they could provide an incredible service
to those wishing to smooth out their low frequency response...
of course this also has its own
difficulties and inherent trade-offs.
What would make this system much more useful would be to cap the amount of gain and allow
limited tweaking of the amount of correction that is allowed. As you can see from the charts above,
several of the target frequencies received +8 and +9 dB of GAIN from the system -
a general no-no
in the world of room correction. A good solution for this would be to apply a global "strength"
filter that would apply to all EQ settings and would come with a "high,
medium, and low"
configuration. This would allow some flavor of correction to be done without
generating the potential "wall of sound" effect that I observed. Denon could also focus the
majority (or even all 8) of its parametric EQs on fixing the most notorious problem in listening rooms -
room modes. By targeting just frequencies below 120Hz, they could provide an incredible service
to those wishing to smooth out their low frequency response...
of course this also has its own
difficulties and inherent trade-offs.
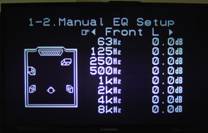
Overall, the Room EQ system is a potential victory, but it must be used cautiously and its results will vary from system to system. It also could benefit from running a separate test for Room EQ once the speakers were configured; and mode-specific calibration. Take your time, listen to the differences, and draw your own conclusion. Based on my observation with the system I would doubt that the "Normal" mode will result in any truly accurate correction, but rather will create something akin to a DSP mode that renders a very forward mix of all channels. Denon also provides a Manual fixed Q equalizer that will allow you to do some correction on your system at fixed frequencies (63Hz, 125Hz, 250Hz, 500Hz, 1kHz, 2kHz, 4kHz & 8kHz).
Denon AVR-3805 RC-969 Electroluminescent (EL) Universal Remote Control
 Pros
Pros
- Automatic wake/sleep mode that works really well
- Super easy learning remote functions and presets
- Punch-through support for programmed/learned functions
- Adjustable backlight time
- Lighted volume and channel keys
Cons
- Very difficult to see display in sunlight (even at brightest setting)
- Missing some useful functions like 'Video Select'
- Auto wake only works well if remote is oriented horizontally
- Remote is VERY big and is not very ergonomically-shaped
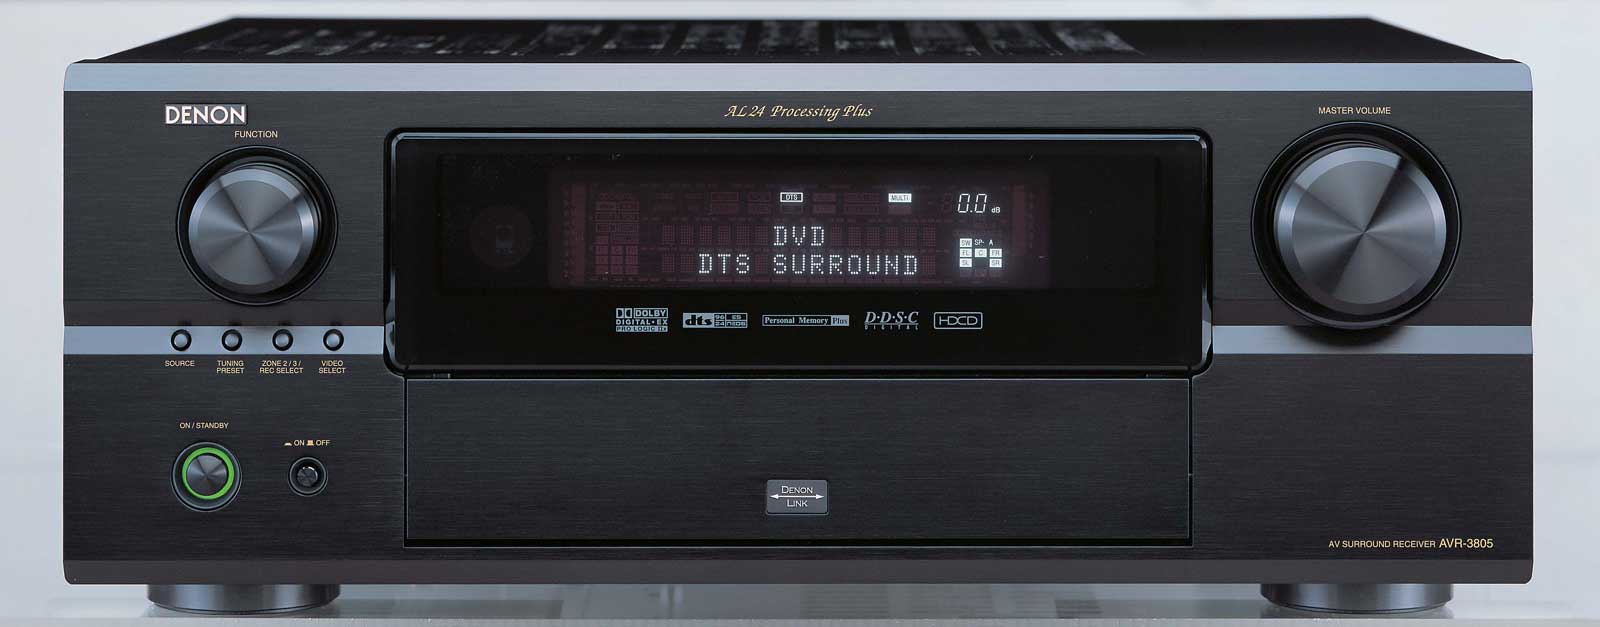
As I've said before (and will probably say again) remote controls are generally hit or miss. On this remote control, Denon decided to go retro. It features an Electroluminescent display which is essentially the same technology employed by LCD backlights. Electroluminescence is simply light (radiant energy) created by an electrical field that does not result in heat. In fact, ELDs could be thought of as inefficient capacitors that lose energy in the form of light. Current ELD life expectancy is around 100,000 hours at 75% of original luminance - that's probably longer than you will use this receiver!
The luminous blue color of the buttons is merely the backlight being allowed through the insulating surface that covers the remote's functions. Each function, or button, has its own parent EL area and the EL backlight is configured so as to allow different buttons to become lit when certain modes are engaged. The remote feels big in your hand, and indeed it is over 9" long and nearly 3" wide at its top and bottom. There is no real ergonomic shape to the remote, except for a slight taper around the midsection. The physical buttons available on the remote are channel up/down, volume, channel select/enter and a 4-way cursor/menu control button. I am not a particular fan of LCD remotes, and the Denon RC-969 shares the same downfalls in that it commands your attention in order to use functions not related to volume or channels. For example, want to record/watch a show on DVR, change the display mode of your HDTV, or bring up the guide on your cable box? With the EL remote, you have to look at the screen and select the correct function. A tactile button-based remote allows you to simply navigate by feel to your more commonly-used functions.
Source Switching
Pay attention to the source buttons or they may throw you. At first glance you'll wonder how on earth your fingers will select between the amp and tuner buttons (for example.) In actuality, the source buttons 舠 toggle 舡 between two or more devices each time they are pressed. Pressing VCR/12 activates VCR1 on the first press, and the screen visually references VCR2 if pressed again. The same is true for ZONE2/ZONE3, CD/CDR, DVD/DVDR, TV/DBS/CABLE, AMP/TUNER, and TAPE MD. VDP (video disc player) won the lottery and has its own button.
All in all, the remote control enables easy control over all equipment once you program it, which is an easy process - one of the more straightforward methods I've seen. Controlling unusual functions such as the variable "aspect ratio" on my Mitsubishi WS-55813 HDTV means you'll have to assign a function to whichever available button you can find. This problem isn't unique to EL remotes- it also exists on remotes with physical buttons. Going back to my earlier statement, however, at least with an LCD remote you can customize the display.
There is a missing feature, or button, that is conspicuously absent from the remote control. It's unfortunate because it is an excellent feature for the Denon receiver. "Video Select" on the front of the AVR-3805 receiver allows you to select a different video source while listening to the current audio signal. This function effectively allows the user to do things such as listen to a DVD or CD while you browse the web on an HTPC (assuming you connect all video through the Denon's switching video inputs.) This is a cool feature, but its usefulness is diminished when you have to activate it from the front of the receiver.
For a $1200 receiver, the included Denon RC-969 is sufficient and its luminescent blue display is a pretty impressive coffee table item to show your friends. It's cool to have a remote that responds to your touch when you pick it up - I don't care who you are!
Denon AVR-3805 Music and Movie Theater Modes - DSP Simulation
Denon may not be known for their DSP modes, but they should be known for their DSP customization capability. There are too many configurations to list here, but Denon allows some pretty precise adjustments to its DSP. For example, let's assume you wanted to listen to the "Rock Arena" DSP setting for some old Def Leppard CDs you found lying around (come on, you know you listened to them!) You could choose to alter the room size parameter for the effect, adjust tone controls (for just that DSP mode), and even determine whether you wanted to utilize the subwoofer (assuming a sub was configured during the setup process.) Obviously tone controls are defeated in Direct mode as they should be. Another great example of DSP customization is revealed in that you can set dynamic compression, AFDM (Auto Flag Detect Mode - on/off), tone controls, ES matrix modes (on/off) and LFE levels for each different (applicable) surround mode. Incidentally, AFDM is simply a software embedded identification signal (or "flag") that will automatically trigger 6.1 channel mode using the surround back speakers for content that is encoded in THX Surround EX or DTS-ES. (When auto-detect is engaged, only 5.1 will be used if the AFDM signal is not detected.)
DSP Simulation
Listed below are the parameters of the Denon custom DSP available to 2-channel and multi-channel audio sources. When adjusting DSP parameters be sure to first select "AMP" on the remote control to enable access to the "SURR PARA" (surround parameter) button. Pressing the surround parameter button allows you to set the DSP mode to your own taste. In addition to this, Denon's Personal Memory Plus system automatically memorizes the surround modes and input modes selected for each input source. The result is a memorized matrix whereby when each input source is selected the modes set for that source are automatically recalled.
The available custom DSP modes are:
Widescreen: This creates a wider soundstage by 1) activating all 7.1 speakers (if present) and 2) chorusing the surround channels to deliver a "larger" sound. My experience with this mode found it to lower low frequency response a bit for some reason, and of course its effects varied depending upon the source.
Super Stadium: Fun for sporting events, this mode adds a long reverb time and extra bass EQ to all speakers to deliver the effect of being live at a stadium. I chose to adjust the "EFFECT" parameter of this DSP sound field effect to 7 to make it more tolerable. There is a tremendous amount of slap-back echo set to around 30-50ms which, while simulating a larger stadium, needs to be rolled back a bit to not be quite so distracting.
Rock Arena/Jazz Club/Classic Concert: Similar to the Super Stadium mode, but scaled back with far less reverb, these modes simply livens up the room to give you more of a "live" feel when listening to CDs. Rock Arena adds Bass EQ as well as some treble to the signal. I also reduced the "EFFECT" setting on this mode to 6 or 7 in order to tame it a bit depending upon the source. The Jazz Club setting is said to provide the feel of a "live house with low ceiling and hard walls." It fairly accurately mimics this, and while many will not want to add DSP to their jazz CDs, it makes for a neat effect.
Mono Movie: I've had some luck with this mode, however mileage varies with the source and there are usually audible "surprises" in each film that don't behave well with the DSP methodology.
Video Game: Providing a greater emphasis on the surrounds, this mode delivers a more active surround field which is desirable for playing games - especially FPS and action-style types.
Matrix: This DSP mode actually slows down time and allows you to walk on the ceiling... Well, not quite. Actually it takes some of the stereo-only content of the main channels and accentuates the overall sound field by placing that content (with delay) into the surrounds. Crank up this mode in the surround parameters menu and you'll hear a solid delay from the front channels to the rear.
Virtual: Virtual enables a different kind of sound field from just 2-channels.
5CH/7CH Stereo: Available in most receivers, this mode sends left/right content to the surrounds and back surrounds as well as a summed mono signal to the center channel for a nice "all-speakers-on" party mode.
As I mentioned earlier, none of the Denon DSP's will amaze you or your friends, but they may prove to be entertaining at times when you have some fun experimenting on music or movie sources.. I utilized the 5CH Stereo mode on more than one occasion when I was entertaining guests and I figured the Super Stadium mode would have been fun to engage during the Superbowl (though I imagine it would have grown tiresome after a while.) Mono movie mode is hit or miss, though I have found it to help old black and white television movies on more than one occasion.
Denon AVR-3805 Suported Formats: HDCD, DTS 96/24, AL24+, Denon Link 3rd Edition
DTS 96/24 Support
DTS 96/24 was developed by DTS in order to enable high-quality 5.1-channel audio playback on DVD-Video players along with full-motion video. The name signifies a 96 kHz sampling frequency and 24-bit resolution signal. The higher bit-rate allows a greater dynamic range resolution of the sampled source material. DTS 96/24-compatible CDs are capable of 88.2 kHz in 24-bit resolution using standard CD players (provided it has a digital output for conventional DTS CDs.)
HDCD (high Definition Compatible Digital)
HDCD is relatively new and is based upon using a CODEC (compression/decompression technology) that uses 20-bit high-resolution samples as opposed to standard 16-bit CDs. HDCD does this while remaining completely compatible with standard redbook CD players. It also helps that the more than 5,000 CD titles currently using HDCD are mastered with this extra resolution in mind - and greater time spent on the recording material almost always results in a better sounding disc, regardless of the technology utilized.
AL24 Plus (AL24+ Processing Plus)
AL24 is a proprietary processing system whereby an optimized analogue waveform technology is utilized to read the 192 kHz sampling frequency of DVD-Audio discs. Denon claims that AL24 Processing Plus thoroughly suppresses quantization noise associated with D/A conversion of LPCM signals. This results in the reproduction of line level signals that have the best possible clarity for the format. Denon's AVR-3805 now supports AL24 Plus on all 7.1 channels.
DENON Link 3rd Edition
Break out the champagne, Denon has enabled native DVD-Audio (MLP) and SACD (DSD) support with DENON Link 3rd Edition (included on the AVR-3805 and fully active). Once approval from SACD licensers is given for transmission from Denon Link 3rd-enabled DVD players, you will finally be able to connect ONE CABLE from the player (like the DVD-5900 or future players) to the AVR-3805 (or AVR-5803).
Note: DENON has already submitted 'DENON Link 3rd Edition' to Super Audio CD licensers and content holders for the purpose of obtaining approval for transmitting multi-channel digital signals of Super Audio CD, and this is currently in the approval process. The digital transmission of Super Audio CD to the AVR-3805 or AVR-5803A from players equipped with 'DENON Link 3rd Edition' will become possible upon completion of the aforementioned approval process and at the stage where formal approval has been obtained. DENON plans to make notification concerning details of the implementation period, method and price of updates to 'DENON Link 3rd Edition' for DVD players which have been sold, and are currently equipped with 'DENON Link 2nd Edition (SE)'.
D-Link worked flawlessly for me, allowing the AVR-3805 to handle all bass management and
processing for DVD-Audio as well as DVD-Video discs. Getting the D-Link connection is as easy as
enabling D-Link in the DVD player (in this case the DVD-5900), setting your Digital Audio Assignment
for the DVD Player to DLINK in the AVR-3805 and connecting the D-Link cable (which should be included
with Denon Universal players.) In the event that you have a Denon DVD Player equipped with DENON Link
2nd Edition, you can set the DVD input to switch to the external Multi-channel inputs whenever a D-LINK
signal is not present, thus allowing your player to send SACD to the AVR-3805 through its multi-channel
inputs (this function is enabled by default.
Build Quality
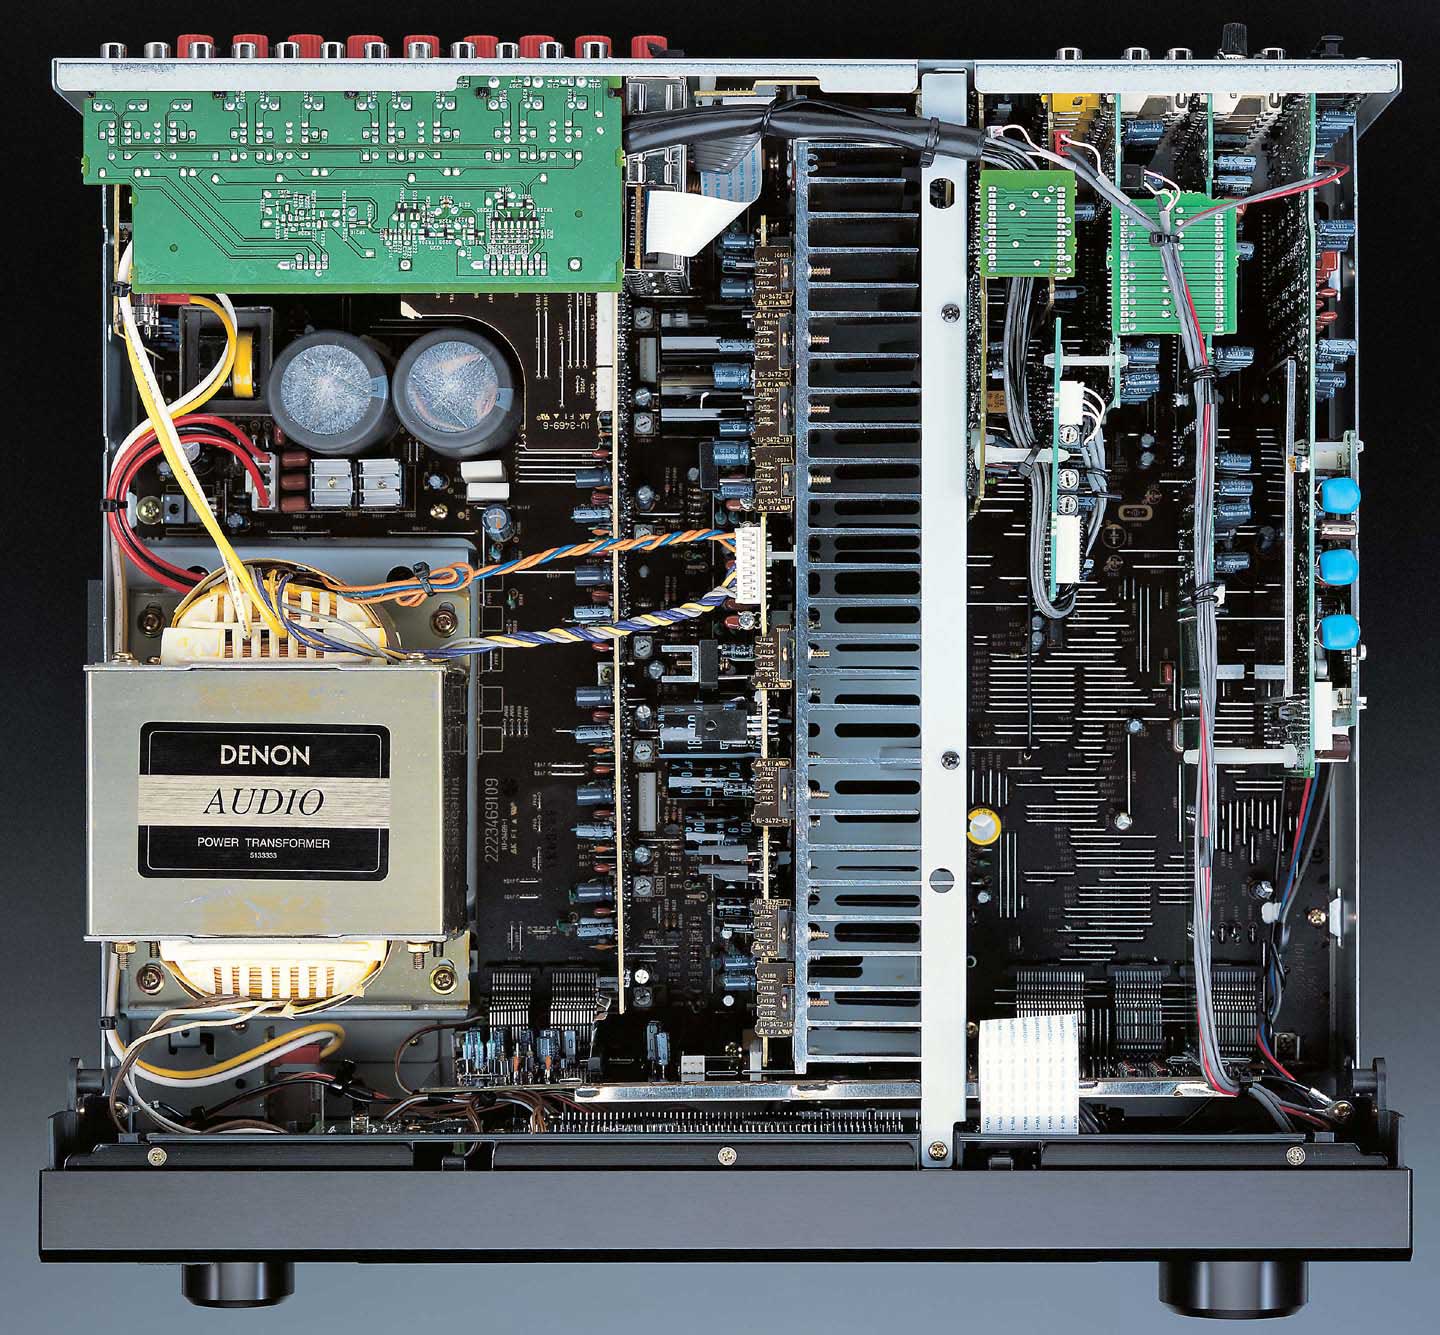
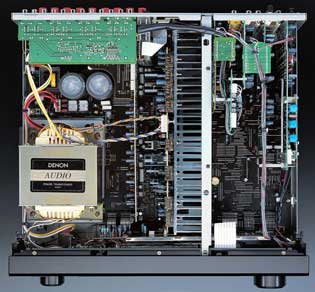 The Denon AVR-3805 not only performs well, but also has an exceptional
build quality for its $1199 price tag. Based on the fuse rating of 7.1 amps, we can deduce that the
power transformer is around 850VA (7.1A x 120V). Taking into account amplifier and power supply
efficiency and processor overhead, true output power in 7-channels all-channels-driven would be about
850 x 0.7
舑
50 = 545 Watts / 7 = 77 watts per channel assuming the receiver doesn't have
built-in current limiting. It features a very hefty equal power amplifier section, with discrete output
devices on all seven channels. It has a large power transformer that takes up nearly 1/6th of the
interior of the receiver and is coupled with a rectifier diode and oversized block capacitor to
stabilize the power at high output levels.
The Denon AVR-3805 not only performs well, but also has an exceptional
build quality for its $1199 price tag. Based on the fuse rating of 7.1 amps, we can deduce that the
power transformer is around 850VA (7.1A x 120V). Taking into account amplifier and power supply
efficiency and processor overhead, true output power in 7-channels all-channels-driven would be about
850 x 0.7
舑
50 = 545 Watts / 7 = 77 watts per channel assuming the receiver doesn't have
built-in current limiting. It features a very hefty equal power amplifier section, with discrete output
devices on all seven channels. It has a large power transformer that takes up nearly 1/6th of the
interior of the receiver and is coupled with a rectifier diode and oversized block capacitor to
stabilize the power at high output levels.
The heat sink for the amplification section runs the entire length of the unit and provides ample cooling for the AVR-3805, even during extended home theater use. I ran it through several movie nights and didn't find it to be excessively hot, even directly over the heat sink.
Also, don't miss our
findings on bi-amping
the
AVR-3805 to deliver 240 Watts per channel to your main speakers.
Denon AVR-3805 Listening Tests: Two-Channel & Multi-Channel
With Auto Setup / Parametric Room EQ and Denon Link 3rd Edition, there was a lot to reveal about this new unit, but how does it sound? As far as the ability of the Denon AVR-3805 to deliver a consistent, accurate performance, you won't be disappointed. The Denon was connected to some pretty inefficient speakers located in Reference System 3 and was utilized for several weeks in both 2-channel and multi-channel modes. I popped in some CDs that I am very familiar with for some 2-channel listening and disengaged the Room EQ settings.
Two-Channel Performance
Peter Gabriel's So has always been a favorite of mine and I enjoyed listening to the brass in "Sledgehammer" emanate from the RBH 1266-LSEs. The Denon AVR-3805 seemed to have no difficulty at all in accurately pushing out the tight, low-end bass notes found in "Big Time" and shrugged off any potential clipping or congestion due to not having enough power to drive the 4-ohm load of the RBH Sound Signature Series speakers. This album has sufficient dynamic range and was produced well before it became popular for the labels to compete in terms of perceived loudness (see our multi-part article on Current Trends in the Recording Industry ).
Sting's Ten Summoner's Tales is a great CD from the 90's that I listen to whenever I want to hear high end clarity at loud volumes. "If I Ever Lose My Faith In You" provided ample proof that the Denon had no trouble in ringing out the upper mid and high frequency ranges at high volume levels. There could be an argument for how adding a separate amplifier and using the Denon's preamp outputs for the main channels (center as well for home theater) could provide some added dynamic and smoothness but at the price point of this receiver you would have to consider taking the leap to a completely different solution - whether that be separates or a flagship receiver like the AVR-5803A. For $1200 the AVR-3805 performed like a receiver costing much more and it would, in fact, make an excellent (and highly competitive) preprocessor for those looking for a top-end unit to match with a separate amplifier.
Multi-Channel Performance
To see how well the receiver could do driving all of its channels at high SPL, I placed a few select DVDs into the Denon DVD-5900 and sat back to enjoy the show. The goal was to experience the full sound field and get a handle on how loud you could really play the AVR-3805 with its rated power. On a system that has speaker loads from 4-ohms to 8-ohms all around we could get into some interesting volume levels.
Remember that for these tests, the Denon had configured all of my speakers to "Large", including the surrounds, so the amplifier was sending everything to all the speakers, including the low frequency information. The only sound going to the subwoofer was the dedicated LFE track.
The Fifth Element is perhaps my favorite movie of all time. The intricately woven scenes and back and forth dialogue of this underrated film are an incredible testimony to the filmmaking and writing process. It also has some spectacular sound and the Superbit/DTS disc is an incredibly vibrant example of what DVDs can look and sound like. For this listening test, I called up soprano Plavalaguna's amazing operatic performance (voiced/played by Albanian Inva Mula-Tchako with only a few digital enhancements) and turned up the system for an incredibly rich surround experience. If your room sounds just like an opera house during this scene, you have arrived at sonic bliss and can stop buying more gear! Following this scene is an explosive gun-battle sequence that will test system dynamics quite well.
Putting in The Lord of the Rings: The Two Towers DVD I was able to really get the surrounds going by queuing up the Battle for Helm's Deep. This epic scene pushes a lot of volume to each channel. More power will enable you to go louder with more clarity (obviously more easily identified in music discs, such as Toy Matinee's DVD-Audio disc or Nora Jones' Come Away With Me multi-channel SACD) but the AVR-3805 seemed to provide a respectable amount of performance for its price class.
I found the Denon AVR-3805 to handle whatever I threw at it with both finesse and power. At no time did it sound compressed or distorted at reasonable listening levels. If you're looking to power a large room to ear-bleeding levels, or you really want to go a step futher in dynamics performance then you may need to supplement the AVR-3805's amplification - at least the front three channels. I seriously doubt, however, that anyone purchasing this receiver for $1200 or less will be dissatisfied with the output it achieves and the quality with which that output is presented.
Denon AVR-3805 Review Summary and Conclusions
The Denon AVR-3805 is an impressive all-around receiver. It is feature-rich and is the next in line of an unbroken a pedigree of solid performers from Denon. We recommend the Auto Setup for those who are not comfortable with using an SPL meter and reference tones. For Room EQ your mileage may vary. I cannot recommend the Normal mode under any serious listening scenarios, however the Flat and Front modes may do well in certain room/speaker configurations. Denon has attempted to provide this functionality to give everyone a fighting chance to counteract the effects of room acoustics and possibly mismatched speakers... something I think they should receive credit for.
The customization offered by the AVR-3805 rivals just about anything in its price class. With the ability to bi-amp the main channels, full customization over your speaker configuration, and ample control over how DSP modes are utilized and configured for each source mode, the Denon AVR-3805 tops our recommended list in its price class. Add to this 8 Burr-Brown 24-bit 192 kHz DACs on all eight channels, 24-bit 192 kHz A/D conversion on ALL stereo analogue inputs, and some of the latest, most progressive features yet to hit the hi-fi market and you've got a real winner.
The Score Card
The scoring below is based on each piece of equipment doing the duty it is designed for. The numbers are weighed heavily with respect to the individual cost of each unit, thus giving a rating roughly equal to:
Performance × Price Factor/Value = Rating
Audioholics.com note: The ratings indicated below are based on subjective listening and objective testing of the product in question. The rating scale is based on performance/value ratio. If you notice better performing products in future reviews that have lower numbers in certain areas, be aware that the value factor is most likely the culprit. Other Audioholics reviewers may rate products solely based on performance, and each reviewer has his/her own system for ratings.
Audioholics Rating Scale
 — Excellent
- — Very Good
- — Good
- — Fair
- — Poor
| Metric | Rating |
|---|---|
| Multi-channel Audio Performance | |
| Two-channel Audio Performance | |
| Build Quality | |
| Ergonomics & Usability | |
| Ease of Setup | |
| Features | |
| Remote Control | |
| Performance | |
| Value |
Clint Deboer was terminated from Audioholics for misconduct on April 4th, 2014. He no longer represents Audioholics in any fashion.
View full profile