
Basic Home Theater AV Set Up Guide - Hooking It All Up
How to Set Up A Home Theater
So, you bought a home theater system? Great! Watching a movie on a properly set up surround sound system, or listening to your music through a new set of speakers can be an amazing experience. But, the key to a great home theater isn't just spending a lot of money. Setting up the system correctly is just as important as what you buy. This guide, very simply, walks through the basics of speaker placement, how to hook everything up, and how to change a few settings to really make your system shine. Throughout this article are links to other articles that go into more depth on each topic. Be sure to also check out our related YouTube video discussions linked below for further insights.
Where Do I Place My Speakers?
In most rooms you won't be able to place your speakers in the perfect spots. It would be great if every room was designed with surround sound in mind, but alas, it isn't. Still, there are some good rules to go by. The diagram below shows the ideal placement for speakers in a 7.1 system. Notice how the speakers are perfectly set up for one seating location, the elusive "sweet spot". Because most people are not hermits watching movies in solitude, you will probably have a variety of seating locations. When placing your speakers, you will need to decide if you want to optimize your system for one location or, as we prefer, place speakers so that individuals in a variety of positions can experience good quality surround sound. Choosing to setup your system for multiple seating locations may also affect your decision to go with a 5.1 or 7.1 system, but more on that later.
Check out the Speaker Layout of the Audioholics Showcase Theater Room

Dolby Suggested Speaker Layout
Let's go over each speaker location and what the considerations should be for each.
Center Channel Speaker: The center speaker should be located directly above or below the display. The majority of the dialogue in a movie comes through the center speaker, so it is important to think carefully about the placement. Try to place the center speaker as close to the television as possible being careful to angle the speaker towards your ears.
Front Left/Right Speakers: The front, or main, speakers provide off-screen effects and carry all the stereo soundtrack information as well as the background environments. Placing these too close together will create a small sound stage, and you will lose out on separation between the front 3 speakers (center, front left, front right). If they are too far apart, you will have a gap in the sound stage between the front 3 speakers. Again, place these speakers as close to ear level as possible, paying particular attention to getting the tweeters as close to ear level as possible. Finally, please do yourself a favor, and do not mount these in the corners of your room.
Surround Speakers: The placement of surround speakers is typically where people go wrong. The most common mistake is putting them behind you. Surround speakers, as seen in the diagram above, are supposed to go directly to your left and right. Unlike the front 3 speakers, surround speakers should be placed anywhere from a couple inches above ear level to 2 feet above ear level, when seated.
Surround Back (7.1) Speakers: In some rooms, adding two more surround speakers, often called "rear" or "surround back" speakers, can be quite beneficial. However, it will depend a lot on your room size and where you have your seating. For example, surround back speakers are particularly helpful when there are multiple rows of seating, where it isn't possible for everyone to fully experience surround effects in a 5.1 system. Before you get caught up in assigning money and resources to a 7.1 system, be sure to take a look at your room (and budget) before just buying surround back speakers. If you do decide to purchase surround back speakers, they can be configured in a variety of ways, depending upon your A/V receiver and whether or not you are using a standard 7.1 mode (Dolby Pro Logic IIx, for example) or one of the various THX modes which are available.
Subwoofer(s): In a 5.1 or 7.1 system, the .1 is the subwoofer. So, if you had two subwoofers, you would have a 5.2 or 7.2 system. In my experience, many salespeople underplay the importance of a subwoofer. A cheap, inadequate, or poorly placed sub has the ability to ruin an otherwise great system. Many people may advise you to just place the subwoofer in the corner, which makes many industry professionals cringe. There is no "best" place for a subwoofer; the best thing to do is experiment with different places around the room. If you have tiny satellite speakers with a crossover set to >80Hz it is a good idea to keep the subwoofer somewhere in the front of the room. More on this topic, and information on what a crossover (X-over) is, will be discussed later in this article. Below are links to additional articles on speaker and subwoofer setup:
Connecting the Speakers and Subwoofer(s)
Once you have put your speakers in place, it is time to plug them into the receiver. This should be simple enough, but I have seen many good installers make careless mistakes here, which will have a major impact on sound quality.
First, you need to make sure you don't mix up the positive (typically red, or marked with a + mark) and negative (typically black, or with no markings) ends of your speaker wire. The black and red labeling is simply for convenience, the wires are the same. You simply need to make sure that whatever wire you attach to the positive terminal on the speaker; you attach the same wire to the positive terminal on the receiver. The same goes with the negative wire. Don't worry too much if there is no way to tell the difference between the + and – wires, you can check for it later, but it is much easier to hook it up correctly the first time.
You will need something the strip the wire back, typically a wire stripper, dykes, or utility knife will work. Be careful first to not cut yourself, and second to not cut off the copper strands inside the wire jacket. You only need to strip back enough so the bare wire can go into the back of the receiver and speakers. If you strip off too much, the wires may touch and short out; somewhere between 1/4" and 1/2" works well.
If you want a really clean look, or think you will be moving your speakers or equipment anytime soon, installing banana plugs or spade plugs on the ends of your speaker wire is extremely helpful. Banana and/or spade plugs are simply metal/gold ends that attach to the bare copper strands. They make connecting and disconnecting equipment easier, quicker, and reduce the chance of wires touching and shorting out. With that said, it is up to you if you would like to use them or not, it is more of a preference than anything else, though after hooking up tons of A/V receivers, we wouldn't be caught dead without them.
Your subwoofer will hook up with a single RCA cable. You will see some RCA cables marketed as "subwoofer" cables. If you purchased one that is fine, but if you have a high quality RCA cable lying around, you could use that too, and it's likely that there's little difference. There is a plug on the back of every modern AV receiver labeled, "sub out" or "sub preout." Just connect that to the input on your subwoofer. Some subs will have multiple RCA inputs on them; you will want to use the one labeled "LFE in". If your subwoofer doesn't have that label, connect the RCA to the left input or use a Y-splitter to send signal to both inputs. Some subwoofers will also have speaker connections on the back, however these should only be used if you have an older receiver that doesn't have an RCA subwoofer output. You may also notice a "phase" switch or dial, along with "gain/volume" and "low pass filter". For now, don't touch the phase adjustment, put the gain/volume a little under 1/2, and turn up the low pass filter all the way (probably around 120Hz) or set it to "disable" or "off".
Selecting the Right Cables and Connections - What's the Difference?
Modern A/V receivers have a number of input options, and finding the best way to hook up everything can be hard to do. The typical manual doesn't do much more than confuse the average consumer. I cannot tell you how many clients I have talked to who have spent hours pouring over manuals only to end up more confused than when they started. This section of the article should make sense of all of the inputs, outputs, knobs, and wires that create our home theater systems. First I will explain some basic concepts, then go through a common scenario of hooking up equipment. This article does not discuss hooking up equipment with receivers that don't support HDMI; however, the principles in this article will also help connect older equipment.
First, we need to look at the types of connections you will encounter.
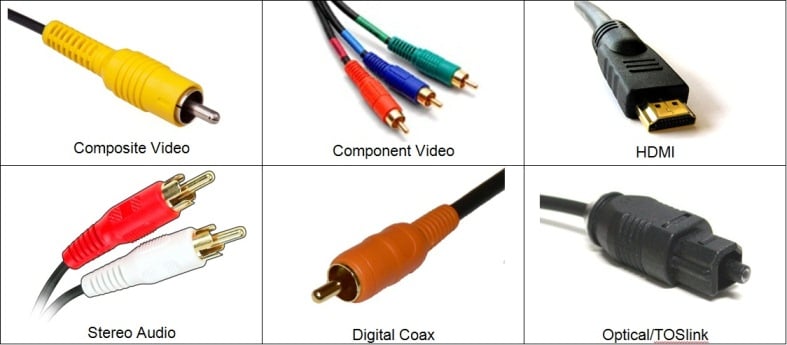
In most systems, you will only use HDMI
- Composite video is the lowest quality and oldest of the connections discussed here. It does not support HD. It should only be used if absolutely necessary, for example a VCR may use composite video
- Component video uses 3 RCA cables. It does support HD; although, most devices limit it to a 1080i resolution.
- HDMI is the newest connection, and the one that you will most likely use. An HDMI cable handles both video and audio. It is the highest quality connection available, in most new system this will be the only cable you need.
- Stereo audio uses two RCA cables and supports 2 channels of audio. This connection does not support 5.1 surround sound or digital audio.
- Digital coax uses an RCA cable to pass 5.1 surround sound signal. Digital coax is typically colored orange or black. It is available on many DVD and Blu-ray players, but it does not support the highest quality sound available on Blu-ray discs. It is far better than stereo RCA audio, however.
- Optical cables use light to pass a 5.1 surround sound signal. It is available on many DVD and Blu-ray players, but it does not support the highest quality sound available on Blu-ray discs.
How to Get 5.1 Surround Sound from your Home Theater System YouTube Video Discussion
If all of your equipment supports HDMI, connection should be a breeze. In some cases your equipment won't have an HDMI output. Maybe you are hooking up a Wii which only supports composite video (a yellow RCA cable), or component video (red, green, blue). In that case, you will have to run either composite or component cable(s) for your video signal, and a separate cable for sound. With a Wii, your only option for sound is stereo audio.
Hooking Up Our Example System
Because there are so many different types of connections, it would be impossible to cover how to hook up each type of device, so I have chosen to use a few popular devices to use as examples. Let's start with the following equipment: a Blu-ray player, a Wii, an HD Satellite box, and a 7.1 AV Receiver. Below is a picture of the receiver, and a diagram of how everything should be hooked up.
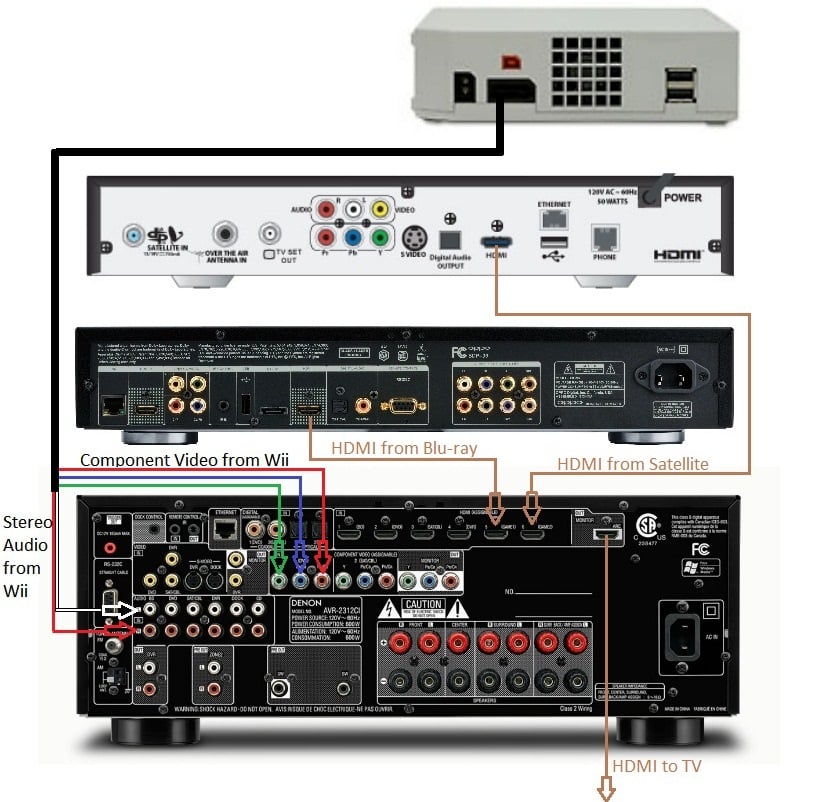
Home Theater Connection Diagram
- Blu-ray – One HDMI cable goes from the Blu-ray player to an HDMI input on the receiver.
- Satellite/Cable Set-top Box – One HDMI cable goes from the Satellite/Cable Set-top receiver to an HDMI input on the receiver.
- Wii – A component video cable (must be purchased separately, does not come with the Wii) goes from the Wii to a component video input on the receiver. The receiver in this example will take the component input and convert it into HDMI so a component video cable does not need to be ran to the TV. Most new receiver over $500 will do this conversion (see Editor's note below).
- TV – Only one HDMI cable goes to the TV, from the "monitor out" on the receiver (see Editor's Note below for the exception to this rule). One mistake a lot of people make here is purchasing an HDMI cable that is too short. I would recommend a 6' or 8' HDMI cable when hooking up any TV over 46", assuming your gear is located just below. The common lengths of 2' to 4' are best suited for connecting your source equipment to the receiver.
- Receiver – You can plug your sources (Wii, Blu-ray, Satellite/Cable set-top box) into the HDMI and Component inputs on the receiver. On the back of the receiver the input will typically be labeled, just remember which input everything is plugged into. Most new receivers over $500 will convert component or composite video to HDMI. S-video inputs and outputs should never be used. Ever.
Editor's Note: If you have an older HDMI receiver, or one that doesn't provide HDMI upconversion, be sure to connect composite and component video outputs to your television as well if you utilized those inputs. You'll also have to change inputs on your TV when you change sources on your A/V receiver. Realize this when you consider buying the entry-level model, so you're aware of the extra steps involved.
YouTube Video Discussion: 10 Tips to Improve your Home Theater Experience
Basic Settings and Tweaks
Too many people purchase great home theater equipment, and take the time to plug it in properly, only to forget a couple settings that can make or break their entire experience. For most audiophiles, this is the fun part. Spending some time testing your system can make the difference between a good system and a great system. Below is a list of common devices and what settings you should make sure to check on each one.
 TV:
The first thing to understand about TVs is that the Color or Picture
Mode settings out of the box (which affect brightness, tint, hue,
saturation, etc…) are not set to give you the most accurate
picture. There are many articles about calibrating TVs, so I will
just give some basic suggestions. First, set your TV picture to
"movie" or "cinema" mode. If it has a "THX"
mode, use that. For daytime viewing, you may want to go with one of
the other modes, but at night, be sure to reconfigure so you get
closer to accurate color. The easiest and cheapest way get your TV
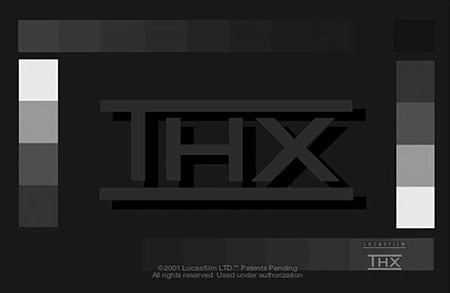
looking good is to use a test disc. A test disc will have various
patterns that show you how to adjust settings. Most THX certified
Blu-ray discs and DVDs have a free THX optimizer that will guide you
through adjusting brightness, contrast, tint, and sharpness. So, go
rummaging through your DVD or Blu-ray collection and find one with
the THX logo. Pop it in, dig through the disc menu till you find the
THX optimizer, and go to town. Note that without a blue filter you
will not be able to adjust tint with this disc (unless you have a
Samsung TV which has a Blue-only mode you can engage). If you want to
take the calibration one step further, purchase an actual test disc.
Disney's WOW disc is great for beginners, and only costs around $35.
Finally, decide whether or not you like the 120/240/480Hz mode which
goes by an endless myriad of names, including "MotionFlow",
"ClearScan", "Auto Motion Plus", "SPS",
"TruMotion", etc… If you notice some programs look too
smooth, or like a soap opera, the 120/240/480Hz settings are to
blame.
TV:
The first thing to understand about TVs is that the Color or Picture
Mode settings out of the box (which affect brightness, tint, hue,
saturation, etc…) are not set to give you the most accurate
picture. There are many articles about calibrating TVs, so I will
just give some basic suggestions. First, set your TV picture to
"movie" or "cinema" mode. If it has a "THX"
mode, use that. For daytime viewing, you may want to go with one of
the other modes, but at night, be sure to reconfigure so you get
closer to accurate color. The easiest and cheapest way get your TV
looking good is to use a test disc. A test disc will have various
patterns that show you how to adjust settings. Most THX certified
Blu-ray discs and DVDs have a free THX optimizer that will guide you
through adjusting brightness, contrast, tint, and sharpness. So, go
rummaging through your DVD or Blu-ray collection and find one with
the THX logo. Pop it in, dig through the disc menu till you find the
THX optimizer, and go to town. Note that without a blue filter you
will not be able to adjust tint with this disc (unless you have a
Samsung TV which has a Blue-only mode you can engage). If you want to
take the calibration one step further, purchase an actual test disc.
Disney's WOW disc is great for beginners, and only costs around $35.
Finally, decide whether or not you like the 120/240/480Hz mode which
goes by an endless myriad of names, including "MotionFlow",
"ClearScan", "Auto Motion Plus", "SPS",
"TruMotion", etc… If you notice some programs look too
smooth, or like a soap opera, the 120/240/480Hz settings are to
blame.
Satellite or Cable box: With a Satellite or Cable box, there are only a few settings to check. You need to see if the box has an adjustment for "Dolby Digital", if so, set it to "on". Some cable boxes don't have that option, in that case it should be enabled automatically. Also, on Satellite boxes make sure "1080p" and "16x9" is selected. Most cable boxes will not offer 1080p, in that case make sure "1080i" is selected.
Blu-ray: Surprisingly enough, many Blu-ray players do not send out an uncompressed surround sound signal by default. If you are using a receiver that supports Dolby TrueHD and Dolby Master Audio (if it is less than 3 years old, and is hooked up with HDMI you should be good), go into the settings on your Blu-ray and set audio output to "bitstream uncompressed" or "pass-through". Every Blu-ray player is different, so you may want to consult the manual to see what setting will work with Dolby TrueHD and Dolby Master Audio, and then choose that setting. I would also recommend turning off any dynamic range control options. As for video, set the resolution to "1080p" (assuming you have a 1080p-compatible flat-panel).
Xbox 360: The Xbox is pretty easy to setup. Turn on Dolby Digital in the Settings menu and set the resolution to 1080p. Newer Xbox 360s have an HDMI output, but older ones will need to use and optional Component video (red/green/blue) and a TOSlink optical digital cable for 5.1 surround sound.
PS3: The PS3 has automatic resolution and audio settings, but I would still recommend checking them. Go to the settings and run through the auto setup for audio, and the auto setup for video. For video, verify 1080p is selected. For audio on the PS3 slim, verify Dolby TrueHD and Dolby Master Audio are selected. If they aren't, make sure your receiver supports them and turn them on manually.
Wii: If you are using component video cables, set the resolution to 480p. Also, go into the sound settings and turn on surround sound. This will send Dolby (mono) Surround audio to your receiver that can be decoded into a pseudo 5.1 experience using Pro Logic II DSP.
AV Receiver: The AV Receiver is the heart of your system. Each receiver will have a varying level of control, and some seem to have endless pages of customization while others only have a few basic settings. Most new receivers come with an auto-setup mic. These mics vary in accuracy and thoroughness. Some mics take measurements from multiple positions. Other, less expensive mics only take measurements at one position. I always recommend running the mic because some features on your receiver will not work without running the initial setup. Just realize that even the best mic can, and probably will, make mistakes.
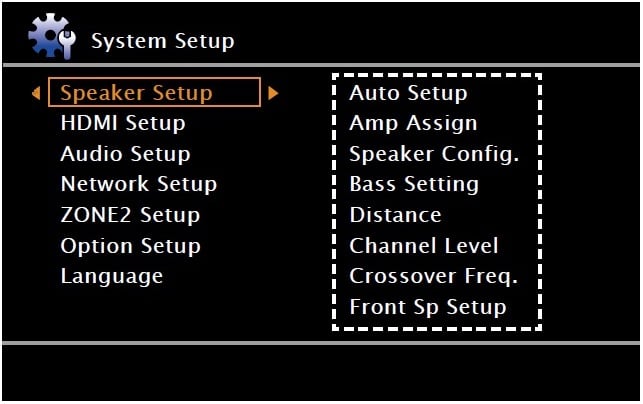 If you decide to run the Auto Setup function, make sure you go into the bass management menus after the calibration is completed to check the crossover settings for your speakers and subwoofer. Most Setup
systems either don't set a crossover setting, or they do it non ideally for your speaker system. This is why we recommend manual setup of your bass management. Navigate to that option on your receiver. You will
have a global crossover setting, or you will see a list of each
speaker with a frequency next to it. You'll also be able to set each
speaker to "Large" (i.e. "don't use the crossover")
or "Small" (i.e. "use the crossover"). A
crossover frequency will set how low of frequency signals are sent to
your speakers. Every speaker is different, so there is no absolute
answer, but 80Hz is a good guess in most situations. You can also
look up the speaker's user manual and the manufacturer will typically
(unless they are Bose) tell you how low the speaker will play. For
example, a small satellite speaker with a 3-inch "full-range"
driver might only play down to 120Hz. In general, and I am making a
big generalization, set all of your speakers to "Small"
unless they have a powered subwoofer in them. If you have
floorstanding or bookshelf speakers, start by setting your crossover
frequency to 80Hz. If you have smaller, satellite style speakers, set
the crossover between 100Hz-120Hz. Many auto setup systems will incorrectly identify a surround speaker as large simply because its placed close to a wall where it gets a little bass boost. It is a better option to set the speaker to "small" because it will take the strain off the smaller speaker by not allowing it to produce the deep bass frequencies while redirecting the bass to the speaker that is designed to do this - the subwoofer. Most of the time having
multiple crossover settings per channel group simply isn't needed so if
your receiver offers this option, just set all your speakers to "small'
and their corresponding crossover settings to 80Hz. If you do set the subwoofers crossover frequency higher than 80Hz, we again recommend placing the subwoofer towards the front of the room to make it less localizable. In order to keep this article from
being too terribly long, I will stop there. Below is a link to a more
thorough article about crossover frequencies. If you really want to
get into home theater, I crossover frequencies is something you will
want to learn more about.
If you decide to run the Auto Setup function, make sure you go into the bass management menus after the calibration is completed to check the crossover settings for your speakers and subwoofer. Most Setup
systems either don't set a crossover setting, or they do it non ideally for your speaker system. This is why we recommend manual setup of your bass management. Navigate to that option on your receiver. You will
have a global crossover setting, or you will see a list of each
speaker with a frequency next to it. You'll also be able to set each
speaker to "Large" (i.e. "don't use the crossover")
or "Small" (i.e. "use the crossover"). A
crossover frequency will set how low of frequency signals are sent to
your speakers. Every speaker is different, so there is no absolute
answer, but 80Hz is a good guess in most situations. You can also
look up the speaker's user manual and the manufacturer will typically
(unless they are Bose) tell you how low the speaker will play. For
example, a small satellite speaker with a 3-inch "full-range"
driver might only play down to 120Hz. In general, and I am making a
big generalization, set all of your speakers to "Small"
unless they have a powered subwoofer in them. If you have
floorstanding or bookshelf speakers, start by setting your crossover
frequency to 80Hz. If you have smaller, satellite style speakers, set
the crossover between 100Hz-120Hz. Many auto setup systems will incorrectly identify a surround speaker as large simply because its placed close to a wall where it gets a little bass boost. It is a better option to set the speaker to "small" because it will take the strain off the smaller speaker by not allowing it to produce the deep bass frequencies while redirecting the bass to the speaker that is designed to do this - the subwoofer. Most of the time having
multiple crossover settings per channel group simply isn't needed so if
your receiver offers this option, just set all your speakers to "small'
and their corresponding crossover settings to 80Hz. If you do set the subwoofers crossover frequency higher than 80Hz, we again recommend placing the subwoofer towards the front of the room to make it less localizable. In order to keep this article from
being too terribly long, I will stop there. Below is a link to a more
thorough article about crossover frequencies. If you really want to
get into home theater, I crossover frequencies is something you will
want to learn more about.
When using the included microphone, don't just throw it on the couch and hit start. Blankets, pillows, barking dogs and cushy chairs can all skew the results. Position the mic as close as possible to your ear level when seated - and, ideally, you'll place it on a tripod. Then, step out of the listening area, make sure everything is quiet, and start the test. Follow through with each listening position, if the mic takes measurements at more than one location. Once the setup is done, you will want to go into the menu on the receiver. Typically this is done by hitting the "menu" button on the receiver remote (some remotes need to be put in "receiver" or "amp" mode first). The on-screen display will then show up on the TV. You should find a setting in the receiver menu to manually adjust the speakers.
Auto Setup vs. Manual Setup
 Most of the time the
automatic setup systems get speaker identification and channel level
spot on. If you ran auto setup in the last step, the setup mic should
have already figured out if you have a 5.1 or 7.1
surround sound system and set the speaker type and levels as well as
crossover if that is part of the included configuration process. If
you want to manually double check everything, however, you can do so
with an SPL meter. An SPL meter is used to measure how loud a sound
is and can be purchased from radio shack for about $50. You simply point the SPL meter up at the ceiling, ear height, at the primary listening position and set it to "C-weighted" and "slow response".
Most of the time the
automatic setup systems get speaker identification and channel level
spot on. If you ran auto setup in the last step, the setup mic should
have already figured out if you have a 5.1 or 7.1
surround sound system and set the speaker type and levels as well as
crossover if that is part of the included configuration process. If
you want to manually double check everything, however, you can do so
with an SPL meter. An SPL meter is used to measure how loud a sound
is and can be purchased from radio shack for about $50. You simply point the SPL meter up at the ceiling, ear height, at the primary listening position and set it to "C-weighted" and "slow response".
There will be a setting for "test tones" where you can adjust channel levels up or down in your receiver's menu system (typically under Manual Setup). You want to set each channel so they measure roughly the same on your SPL meter. 75dB is usually a good reference point. Feel free to bump the subwoofer channel up a few dB however, as most people prefer a little bass boost. Don't be surprised if your levels are different on your left and right channels if, for example, your Surround Left speaker is farther away from the listening position than your Surround Right speaker, or if one speaker is nearer to a wall than the other.
If you notice that your subwoofer level is turned down as far as possible, you should turn down the volume knob on the back of the subwoofer a little bit, and run the setup mic again.
Testing It All Out - Listening!
You are done!! Speakers are placed and hooked up, all your equipment is plugged in, and a few important settings changed. Now, put in our favorite CD, DVD, or Blu-ray and start listening. This is where most people quit; however, the true audioholic is never done with their system. Play around with speaker and subwoofer placement. Run the THX optimizer audio tests, maybe get a full calibration on your TV. From this point on, learn more about home theater and have fun.
Cliff, like many of us, has always loved home theater equipment. In high school he landed a job at Best Buy that started his path towards actual high quality audio. His first surround sound was a Klipsch 5.1 system. After that he was hooked, moving from Klipsch to Polk to Definitive Technology, and so on. Eventually, Cliff ended up doing custom installation work for Best Buy and then for a "Ma & Pa" shop in Mankato, MN.
View full profile