
A Tale of 5 Installs Part 1 - Frank's Pad
$500 for HDMI and surround... Not bad.
"Frank" is a married guy who would love to have surround sound in his home. He makes a modest living so his budget is wisely limited to around $500 - which lands him squarely in the home theater-in-a-box crowd. Additionally, his room is set up such that we'll have to mount speakers on his ceiling due to doors, openings, etc. The good news is that Frank is very handy and is completely into assisting in getting his surround sound system up and running in the best way possible. His wife is also very cool and isn't holding back his choice of products - the room and budget are going to dictate the limitations.
Vital Statistics:
- Married with a baby boy
- Wife very sympathetic to having surround sound
- Older home with attic
- Small, narrow room with lots of limitations for placement
- A/V Knowledge Level: "Tell me what to buy and I'll get it."
The Arrival
Frank lives in a nice Spanish-style home that is, near as I can tell, over 70 years old. It's been renovated and has wood floors and lots of character - I couldn't wait to check it out and see what we might do to integrate surround sound. At around 2PM I pulled into the driveway. I really didn't know what to expect, so I brought everything I could possibly think of. It's not like I hadn't done this several times before - but I had never really checked out this house and, apart from knowing it was an older wood frame home, I wasn't really going to be too selective on what I brought along. My equipment list consisted of everything listed in the Surround Sound Installation Primer article
Contemplating how to best handle putting surround sound into the room was actually the hardest part. I asked a lot of questions: Where do we put everything? What's the most efficient way to attack the problem? Where's the sweet tea? (OK, so I was thirsty.) The room was simply too narrow for any sort of bookshelf-on-speaker-stand system. There was also a door blocking the left speaker for a wall-mount installation. I hated to admit it, but hanging satellite speakers from the ceiling was looking like the only reasonable solution for this room. Of course, this limited the size of speaker we could put in here - maybe not such a bad thing given the small size of the room and his budget.
The room is about 11 feet wide by 20 feet long, oriented so that it is narrow and you sit either along the right side or (preferred) at back in two ridiculously comfortable easy chair recliners. I sat down in one to continue thinking about the room and talking over options with the victim… er, owner.
Realization finally set in - we were kind of boxed in (no pun intended... ah, yes it was). The only thing that made sense was a cheap-o home theater-in-a-box system. Oh well. We'd do the best with what we could and tweak the heck out of it to get decent sound. I committed to researching some systems later that evening as Frank was bursting at the seams to go out and buy something to put in here (I like this guy a lot). Of course we didn't need the system to install the wiring, so we quickly got to work.
You Don't Mind If I Make Your Living Room My Personal Workspace, Do You?
Frank's wife was awesome. She let me dump all my gear in the house - right on the rug. I left the C.I.T.S. system in the back of the SUV because it's big and I didn't need all that much from it this go-around. Besides, as convenient as a complete install-kit-in-a-box is, I saw no reason to lug it the 30 feet into the room when I could just lay it open in the back of my Jeep and pull out what I needed. Back in the living room, tools, cabling, drill gun, etc were splayed across the floor - ready for action.
Laying out the wiring plan actually took the longest and was the second phase of figuring out the entire install. That didn't mean that we didn't run into snags later down the road, but it helped to at least have a solid plan. Since the house is an older (1930s) frame house that has an easily-accessible attic, we decided that was the route we'd take. We already decided against wall-mounting the speakers given the door on the front left of the room. Mounting the surrounds on the side of the room would be near-impossible due to the fact that the right wall is an outside wall of the home. For anyone who’s ever been in an attic - that means that drilling and inserting cable through that header would be very, very difficult if not impossible without some major surgery. We wanted to avoid anything that would cause repair work. The surrounds would simply mirror the front and suspend from the ceiling.
Since we were ceiling mounting, the cable run would actually be very simple. Drop all four lines down the wall behind the equipment rack - and then run them to four points on the ceiling. Since the cables poke right through the ceiling and connect to the speakers directly, the cleanest installation was one that didn't even use terminations or any kind of ceiling-mounted wall plate.
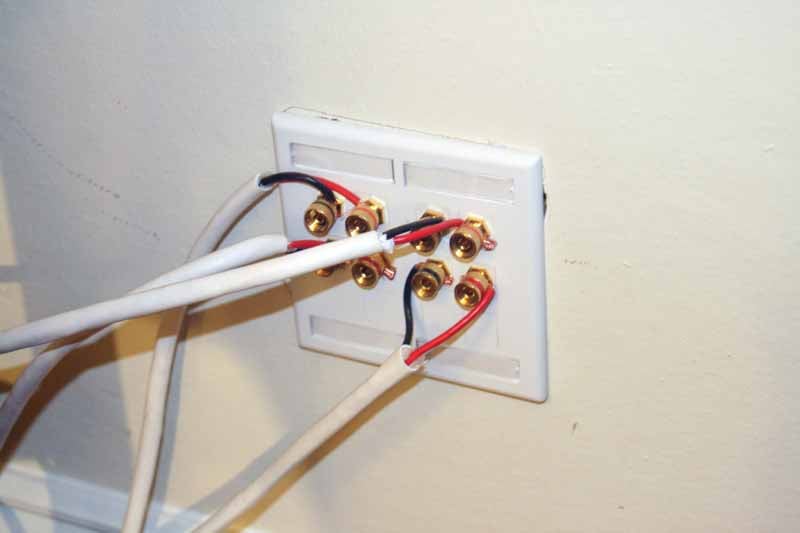
Where the four cables came down behind the equipment rack we planned to install four pairs of banana jack keystone modules and label everything accordingly. The center channel would get wired "locally" since it will be positioned near the television. OK, we had a plan - now we needed to execute it.
I Love Old Houses... Seriously.
 We needed to measure - a lot. If we didn't
figure out exactly where we were, we wouldn't be able to get our bearings. You
can't exactly just waltz into the attic and start drilling holes. We started by
finding a point of reference... Bingo! The air conditioning duct was almost directly
atop our desired location for dropping the four lines down the wall. We could
see that it was only a few inches away from the header for the wall that would
contain all four cables. That should be easy to locate and we could also
(typically) see the nail marks for the studs from within the attic, so we'd
know where to drill down below to get in between two studs. In these old homes
it's harder to do a knock test or use a stud finder since the entire wall is
essentially plaster overtop of wood furring strips - sometimes with a layer of
drywall on top for good measure…
We needed to measure - a lot. If we didn't
figure out exactly where we were, we wouldn't be able to get our bearings. You
can't exactly just waltz into the attic and start drilling holes. We started by
finding a point of reference... Bingo! The air conditioning duct was almost directly
atop our desired location for dropping the four lines down the wall. We could
see that it was only a few inches away from the header for the wall that would
contain all four cables. That should be easy to locate and we could also
(typically) see the nail marks for the studs from within the attic, so we'd
know where to drill down below to get in between two studs. In these old homes
it's harder to do a knock test or use a stud finder since the entire wall is
essentially plaster overtop of wood furring strips - sometimes with a layer of
drywall on top for good measure…
We decided to deal with the ceiling holes later - those would be easy.
We found our spot on the wall and drilled a hole into the plaster to define the corners of our double-gang electrical box. This was where we would place our Decora-style binding post connectors. The box fit in easily once we got through the plaster and wall slats. Plaster eats drill bits and blades for breakfast, but we got it all accomplished.
Frank's Pad - Part 2
 The attic access was at the back of
the house… of course. We're "professionals" so we used a ladder that
was too short. This was OK, though 'cause we put it on top of a table so it
would reach. No, I'm not kidding. Don't try this at home... or if you do, don't
blame any mishaps on us - we told you not to.
The attic access was at the back of
the house… of course. We're "professionals" so we used a ladder that
was too short. This was OK, though 'cause we put it on top of a table so it
would reach. No, I'm not kidding. Don't try this at home... or if you do, don't
blame any mishaps on us - we told you not to.
It was hot in the attic, but we had two things going for us: 1) Frank had some light up there thanks to his electrician, and 2) it was summer here in Florida. Wait, that second one didn't help us at all. Here in Central Florida, "hot" is a relative term. This time of year it's comfortably hellish. By the end of Sumer there will be fire and brimstone and we'd risk spontaneous combustion.
We made our way to the back of the attic where the room was. Frank came with, largely because he's not a girly man and doesn't mind a little dirt… or emphysema for that matter (wear masks if you go into an attic with Fiberglas insulation). We located the AC vent and quickly tracked down the header which was right where we expected. A couple holes later (we used a 1/2-inch spade wood bit) we were into the wall.
We brought the Impact Acoustics CL2-rated 12/2 speaker cable with us (not really, we forgot, but it makes for a good story) - and decided to run the first pair (the fronts) by using electrical tape to tie both wires to my drill bit extender. It's about 18-inches long and heavy enough that it will drop all the way down the wall. Frank went down below and we lowered it down the wall cavity. It came out perfectly.
There's a Hole in the Ceiling, Dear Liza
After the (first of many) attic adventures we needed a breather. And a shower. It was time for some sweet tea… and then back to work. The best way to put holes in your ceiling exactly where you want them is to drill, straight up, from below. We marked our positions and did just that. We then inserted single wires from our short romex stash to mark our positions in the attic (see our Primer for more on this).
Back up in the attic, we located the two front speaker holes and proceeded to push the cables through, having pre-cut them to approximate length so we didn't need to drag a whole spool all the way across the attic. Everything ran smoothly now. We ran the second pair (also pre-cut) down the wall for the surrounds.
Back down below Frank decided to do the last two and I protested by sitting on one of his comfy chairs and saying "OK" while pretending to focus on something important. I could hear him crawl across the attic towards the surrounds. Not because of his movements on the rafters above, but because he was coughing up his lunch from one end of the room to the other. I feared my friend might be dying and I'd have to climb up into the attic and pull his lifeless body back down… or seal it up there. Nah, his wife would probably notice him missing and see the cables poking out.
Frank is Alive
He made it out and the coughing finally stopped. It turned out he inhaled something that didn't agree with his lungs. Perhaps fiberglass doesn't dissolve once it hits moisture - weird, since it looks so much like cotton candy. I wonder why they don't use that stuff in ceilings instead.
We now had four holes in the ceiling with four cables poking out. I also made a few last minute tweaks to where the cables came out of the wall so I could properly fit the low voltage electrical box in and attach the Decora-style connectors and plate. It has a very nice finished look. Frank wanted to purchase the home theater-in-a-box system right away - as soon as I told him which unit to buy. He was wisely on a budget so I packed up my things and headed back home to do a little research before returning the next day to tweak the final system.
I Guess My Work Here is Done?
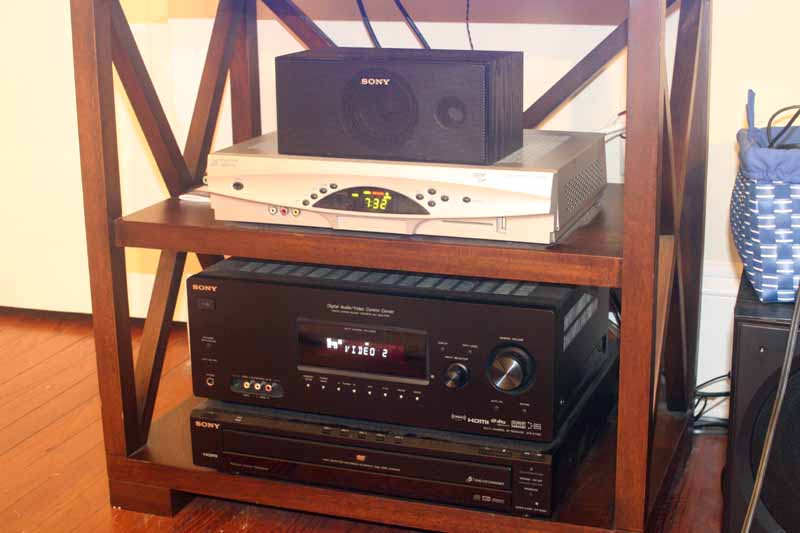 I pulled into Frank's house and walked
into the living room. He'd already installed the Sony
HTiB system I recommended. While I'm not a Sony fanatic, this system was
both easily accessible from the local big box store and it had HDMI switching
and component video inputs. It just seemed like a really good value, especially
since the room was small and didn't require lots of power. All four speakers were
mounted and the center channel was placed directly underneath his LCD
television. Now THAT'S what I'm talking about - enthusiasm. We might just make
an Audioholic out of Frank yet. I ran the setup and tweaked the system,
instantly reminded of how bad Sony's menus are and how they were made by people
with no sense of either the English language or best practices of system
calibration. After much weeping and gnashing of teeth I was able, through the
use of the manual, to discover the means of setting levels, speaker size and
changing the orientation of the speakers to be recognized as ceiling-mounted. I've
literally calibrated dozens of systems - having to use the user manual to
figure out how to set levels and get a test tone means that your device is most
certainly NOT user friendly. Sony makes nice TVs but in my opinion their entry
level receivers leave much to be desired.
I pulled into Frank's house and walked
into the living room. He'd already installed the Sony
HTiB system I recommended. While I'm not a Sony fanatic, this system was
both easily accessible from the local big box store and it had HDMI switching
and component video inputs. It just seemed like a really good value, especially
since the room was small and didn't require lots of power. All four speakers were
mounted and the center channel was placed directly underneath his LCD
television. Now THAT'S what I'm talking about - enthusiasm. We might just make
an Audioholic out of Frank yet. I ran the setup and tweaked the system,
instantly reminded of how bad Sony's menus are and how they were made by people
with no sense of either the English language or best practices of system
calibration. After much weeping and gnashing of teeth I was able, through the
use of the manual, to discover the means of setting levels, speaker size and
changing the orientation of the speakers to be recognized as ceiling-mounted. I've
literally calibrated dozens of systems - having to use the user manual to
figure out how to set levels and get a test tone means that your device is most
certainly NOT user friendly. Sony makes nice TVs but in my opinion their entry
level receivers leave much to be desired.
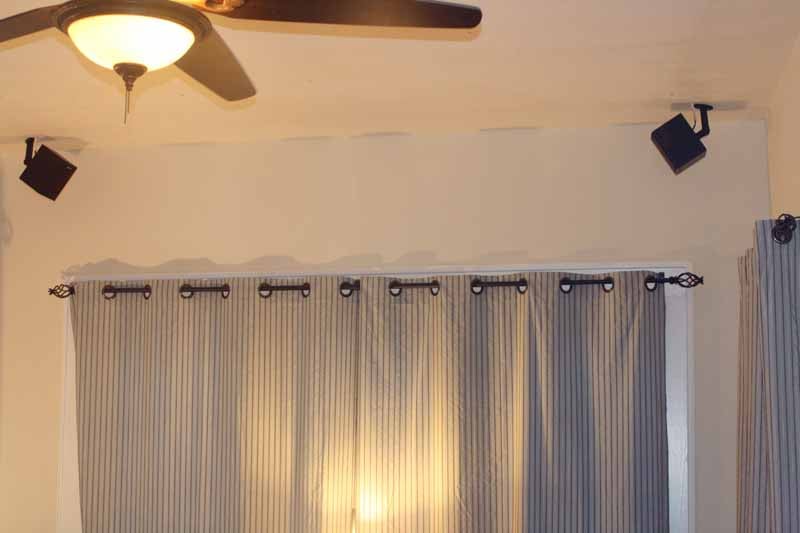
We
pointed the surround speakers together rather than towards the middle of the
room to create a more diffuse surround soundfield.
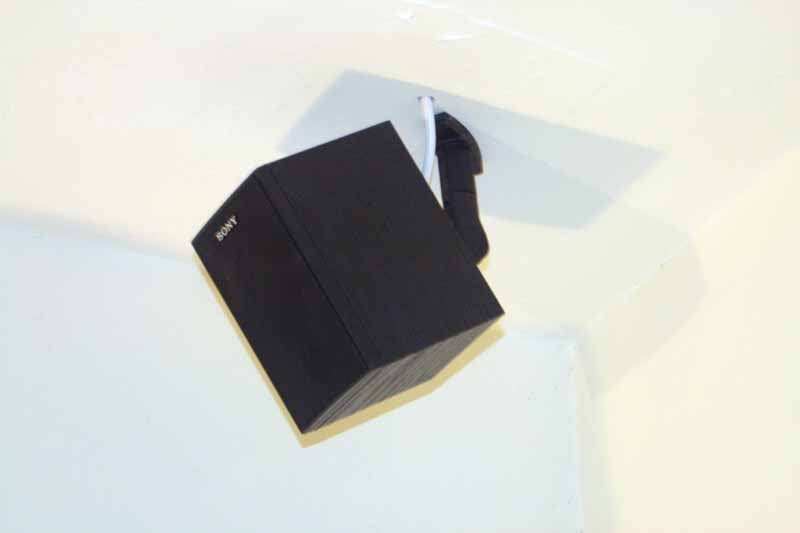
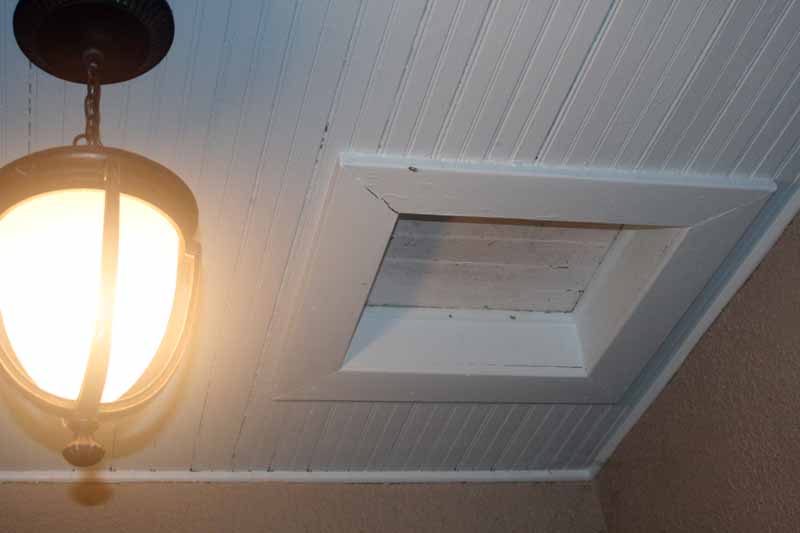
You can
barely see the hole where the speaker wire emerges from the ceiling. Much less
intrusive than a fully exposed speaker binding post wall plate.
Video was a bit messed up due to a bad HDMI cable or connection - we never did figure out exactly which it was. Thanks, HDMI. Wiggling the connection caused the HDMI video to drop out. That's about as much fun as using a screwdriver as a toothpick. I replaced the cable and rustled up another optical cable to ensure everything had surround sound (the HTiB didn't support HDMI audio and thus lacked any ability to handle high definition audio). This wasn't terribly important for now since we were using a regular DVD player (also Sony). The good thing is that the system uses standard speakers and a receiver, so upgrading is possible one component at a time.
We popped in some DVDs and cranked up the system. I pulled out Gladiator because, well, it's a great way to impress people with a new home theater. The opening scene of the Roman army's attack is impressive and it has lots of information in the surrounds, which I tweaked up in level just a tiny bit (know your audience). I next tried some multi-channel music with a DTS CD. It sounded OK, but not all that great (not surprising given the constraints of the system, so I wasn't complaining too much). I quickly realized that the "subwoofer" left much to be desired, mostly because it was too small and underpowered for the room (who am I kidding - for any room). The room itself was also not sealed off from the rest of the house, having two French doors which opened to a formal living area. All we could really do was move some of the "dead spots" around so that they didn't land on our primary seating positions. We couldn't move too much, however, since the sub ultimately had to live in the front right corner. I moved the sub out a tad from right beside the equipment rack and the mode left the back of the room - which was a pleasant change. We ran with that and called it a day.
What Did I Learn?
Everyone I tell about this experience wants to know what I learned from it, whether I'll do it again and, most importantly, when can they have it done in their house. First off, I learned that everyone has a different idea of what surround sound is and how much money and equipment it will take to meet their needs. Secondly, each house has its own challenges and this was no exception. The key is to not rush into things. Be willing to sit down and go over your plan of attack. Think through each component, the layout of the room and any potential issues you may face in bringing surround sound into your home.
After installing multiple systems (include quite a few of my own) over the years, I think I'm equipped to handle just about any room and any condition. Block construction? Check. Wood frame? Check. Attic? Check. Crawlspace? Check. Hide wiring under crown molding? Bring it on. Installing surround sound in your home takes time, patience and some knowledge of what's doable and what's not. Being able to think on-the-fly and come up with workarounds is a must. Following through is imperative. In all cases, however, I've never met a room that couldn't be conquered and this experience bolstered that feeling and empowered me to be even more optimistic when talking to people about installing 5.1 in their homes.
I think you should have the same optimism and aggressiveness when deciding to do surround sound in your home. It CAN be done. Heck, it should be done. In the immortal words of one of the world's largest marketing companies: Just do it.
Clint Deboer was terminated from Audioholics for misconduct on April 4th, 2014. He no longer represents Audioholics in any fashion.
View full profile