
Installing an Articulating Flat Panel Mount in a Corner - Part Two
Mounting your flat panel TV in a corner
Hopefully, you've read some of our others articles on mounting flat panel displays on the wall. In either case, most faithful readers know that around here, we're very passionate about yanking people out of the 80's, ditching their built-ins and wall units and putting their televisions up on the wall, nice and tidy. But what about corner locations? Not as easy, right? Perhaps, but there are some simple tricks and tips you can employ to make sure you have a successful time of placing your flat panel on the wall, even if it means positioning it in a corner-mounted location. Once again we teamed up with MonoPrice to locate and implement a solution.
What You Need
In our last article we pretty much showed that all TV mounts are expensive - at least the ones you'll be able to find at your local electronics store. Even a quick glance online revealed to us that the cheapest flat panel corner-compatible mount for a 27-inch TV at your local Best Buy is going to run you $79.99. On top of that you've got a 6-foot HDMI cable - that's $12.99 for their house brand... and a component video cable of the same length is $14.99 (and a pretty junky-looking product at that). After that you also need to factor in that you'll have to run power into the wall to do it right. I mean, as cool as they are, flat panel TVs don't run on solar energy. The cheapest solution for that will run you around $100. Add it all up, and the total comes to about $208.
Now check this out... we dialed up MonoPrice and had them configure a system for us to do the same thing - except they went premium all the way, offering better quality components and higher rated cables, all for less money. Here's how their components and pricing broke down:
- Adjustable Tilting/Swiveling Corner Wall Mount Bracket (23-40-inch) - $29.12
- Recessed Pro Power Kit - $48.18
- 6' HDMI 24AWG CL2 High Speed Cable - $6.75
- 6' 18AWG CL2 5-RCA AV Coaxial Cable - $15.62
Total: $99.67 + $14 shipping = $113.67
And, as we're apt to point out, did you take note that the corner mount was a fancy articulating tilt/swivel model with a 24-inch extension and 80-lb rating? How about the fact that all of the cabling was CL2 (in-wall) rated? The NEC requires that signal cables like HDMI cables need to have at least a CL2 rating for installation within the walls of homes in the United States. This rating has to do with the composition of the cable jacketing and whether or not it will emit toxic fumes in the event of a house fire.
Required Tools:
- Razor knife
- Wire strippers
- 12/2 electrical cable
- Electrical tape
- Level
- Screwdriver
- Screw gun
- 3/16-inch drill bit
OK, so you once again (have you read our other articles?) saved nearly $100 - now let's get to work.
Installation
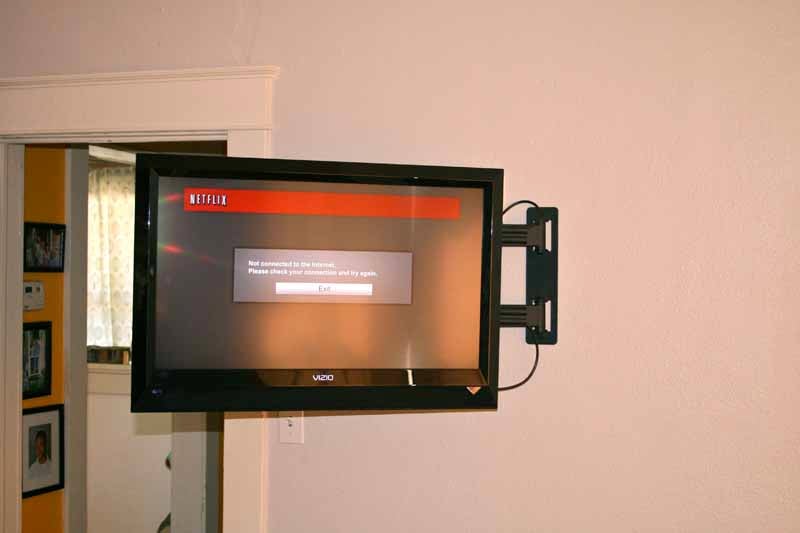
Let's step back a moment. The particular challenge we had here was to install a TV, in the air, on the wall, so that it could swing out over a bed for easy viewing. The desire was for the TV to suspend freely, with no wires showing. About the only thing we did that was a little odd in our example was to hard-wire the TV into an existing circuit, thereby bypassing the need for the lower part of our power supply component of the Recessed Pro Power Kit. Aside from that, everything else is perfectly straightforward in terms of process and procedure. Like always, our goal is to have a securely mounted television that you can maneuver without fear of the unit falling or otherwise coming away from the wall where it is anchored.
In the case of a corner or articulating mount, placement is really an issue of locating the stud. For a single-stud mount you are typically dealing with a system that uses an articulating arm, rather than a wider, dual-stud surface plate. Because of this, it is of the utmost importance that you fully, and completely catch a stud with both (or in this case, three) of the vertically-aligned lag bolts. You don't want the TV pulling out of the wall, and toggle bolts in drywall simply aren't going to cut it with an articulating all mount and a heavy flat panel - unless you want it on the floor... in pieces.
 Once you have an idea where the studs are, you can go ahead and install the mount. In this case, it's a very simple process of marking your holes and pre-drilling them. It helps at this stage to have a drill gun and a 3/16-inch drill bit to get three holes ready for the included bolts. You can also really help yourself by locating the position for your Recessed Pro Power Kit and then opening up the hole to concretely verify where the location of your target stud is. This is particularly helpful for scenarios where the wall may be using lathe and plaster and where studs may not be so easy to pinpoint exactly. Why do you want to hit the studs dead-center? Well, that fact that the mount is rated support up to 80 pounds is only valid if it's installed correctly. If you can get it anchored securely to a stud, then you'll be able to use all of that rating and not feel like your TV is in danger of crashing down at any minute (that's no way to watch TV).
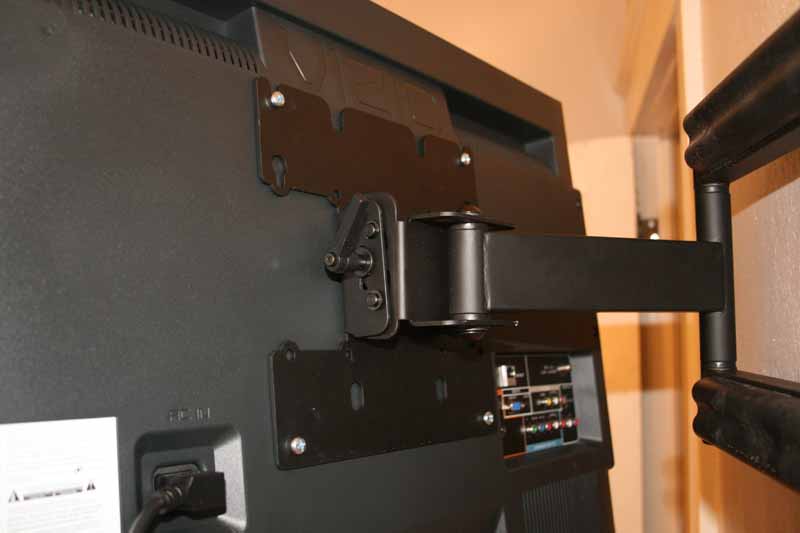
 The mount is built really well in terms of the parts and construction, with a lever that frees up the mechanism and allows the TV to adjust tilt without having to use tools. The only problem is that the tilting mechanism is, oddly, a two-part venture, that results in the TV being able to twist until you secure both sides. Once you secure it enough to remove any chance of wobble, the tilt mechanism isn't very adjustable. We've seen better methods for adjusting and maintaing the "tiltability" of a mount. This mount also doesn't come with a built-in level, so you'll want to use your own torpedo level in a vertical position to set the correct orientation during installation. Once you have everything perfectly mounted, you'll find that the articulation movement is quite smooth and the TV can be pulled in and out with relative ease.

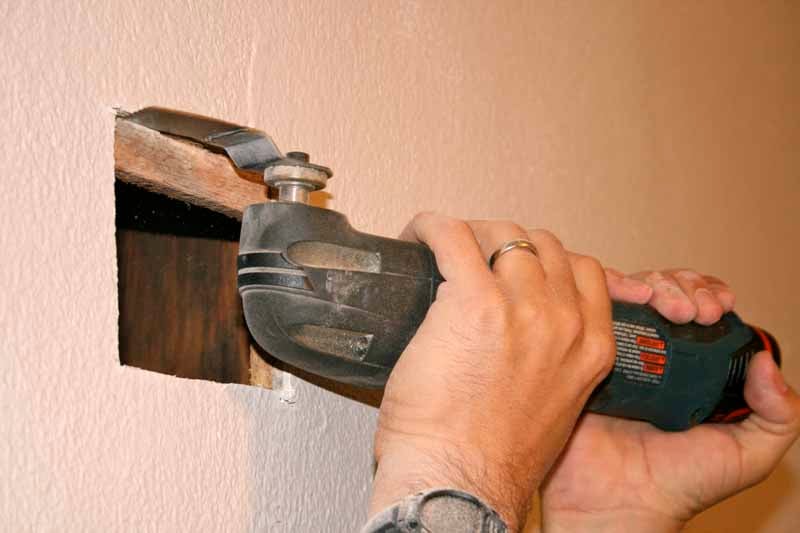
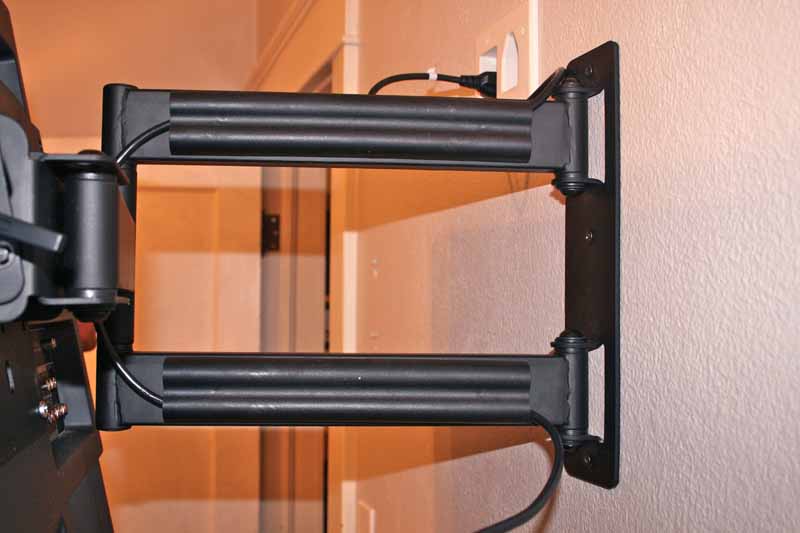
Now that the television was mounted, we began working on installing the Recessed Pro Power Kit. The Recessed Pro Power Kit is like the dessert topping, but really it's also the engine of the vehicle - without it, you simply can't have a "floating" display. You need to hide not only your low voltage A/V cables, but also your power feed to the TV - this product makes both possible. For most, you'll want to install it about 18-inches off the floor, where the rest of your power outlets should be located. Because of our bedroom location and intended use, we actually opted to mount the Recessed Pro Power Kit just above where the back plate of the mount rested near the wall. Sometimes the best choice may be to mount it next to the display mount - this is where you need to factor in your television size (knowing how much of the wall it will cover once positioned, and where the inputs are (so that you don't block them). In either case, you probably want to keep everything within the same stud cavity, allowing you an easy pass-through for the A/V cables and the 12/2 power wire.
After cutting our holes, we ran the 12/2 power cable through the included remodel box and the low voltage HDMI and component video cables (as well as our RF cableTV line) through the remaining opening. For this installation we actually opted for longer cables with the option of running them into a nearby closet - and skipped the lower portion of the Recessed Pro Power Kit. For those running low voltage cables, don’t forget to pull them through the opening before you run them up (or down) the wall to or from the TV.
Editor's Note: When using wire nuts, be sure to use electrical tape to secure the nuts to the wire and prevent an eventual short in the event that they would work themselves loose over time.
Guess what? You're almost done. If you planned the install correctly, all that's left is cable management. Go ahead and hang your TV on the mount's VESA-compatible mounting plate (assuming your mount was like ours, if not, follow the instructions that came with it). With this particular mount, you can place the top two screws (included) into the mounting holes on your flat panel, and simply set the TV into the mount - it will hold it while you put in the lower screws and tighten everything down - very simple. When you're done you should have complete control over the articulating mount, and be able to fully extend and retract the TV in addition to being able to set the tilt as needed. For cable management, just pop off the twin plastic covers on the top and bottom arms and run your cables along the arms, replacing the covers and snapping them into place. Very neat and very easy.
Conclusion
 We don't pull any punches - we want to see everyone with a flat panel TV mount it to their wall. That's the reason they're so flat - and getting flatter all the time. If you're trying to limit the size of your TV to fit within your 80s entertainment center, you're just not getting it... Throw it out. Start over. Welcome to 2011. It also doesn't hurt that companies like MonoPrice have provided a clear way for consumers to get the products they need to accomplish this goal - and not go broke doing it. In fact, after shopping online for products like this you may start to wonder what on earth the local retail chains are smoking to charge consumers so much for so little. Purchasing these types of mounting products online is one way to make this fantasy a reality.
Special thanks to MonoPrice.com for providing the products to make this installation article possible.
Clint Deboer was terminated from Audioholics for misconduct on April 4th, 2014. He no longer represents Audioholics in any fashion.
View full profile