
XTZ Sound Room Analyzer II Pro Measurement Kit Review
Computer not included
- Product Name: Room Analyzer II Pro
- Manufacturer: XTZ Sound
- Performance Rating:

- Value Rating:
- Review Date: March 31, 2014 09:00
- MSRP: $ 360
| Included in box |
| Software CD |
| Microphone |
| Microphone clip |
| Telescoping stand (19” – 47” High) |
| Two USB 12.5’ cables. |
Pros
- Comes as a complete package (mic, cables, tripod, software, case)
- Automatically calculates PEQ to correct for room modes
- Full featured (RTA, FFT, RT60, waterfall, SPL, etc.)
Cons
- Limited functionality to save/overlay curves
- Some issues with saving waterfall plots (patch pending)
- Not compatible with Mac
With kits like XTZ’s Room Analyzer II Pro, it’s easier than ever before for consumers to analyze the acoustics of their room and make the needed adjustments. At Audioholics, we have always said that great equipment is only part of the equation. Not only does the gear need to be configured properly (crossover, level, distance, etc.), the acoustics of the listening space also need to be considered. Taking into account the effects of the room—whether through speaker placement, equalization, or passive room treatments—is essential to achieving the best performance possible. Room Analyzer II Pro allows consumers to tackle all of these areas. Read on to see how, and how well, it works.
Overview
I can’t blame you if you have never heard of XTZ Sound. I only heard of them about a year ago, and my job is to write about this stuff! Founded in Sweden in 2004, XTZ Sound has become a well-respected Internet direct brand in Europe and are now making a name for themselves across the Atlantic. A quick perusal of their products will show you that they seem to live up to their motto, "To offer the best relation between price, performance and quality on the market.”
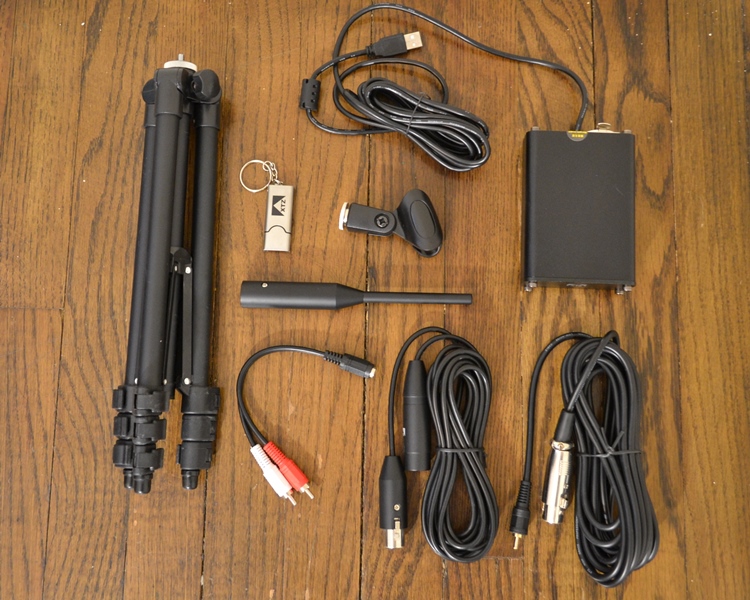
XTZ Room analyzer II Pro Contents
XTZ offers two Room Analyzer packages, standard and pro. The standard version, simply called XTZ Room Analyzer II, retails for $230 and comes with the basic version of their software, a tabletop USB mic (+/-2dB), and necessary cables. The Pro version retails for $360 and is essentially a step above the standard kit in every way. It includes an upgraded mic (+/-1dB), 13”-44” adjustable tripod, calibrated external soundcard, aluminum carrycase, necessary cables, and more full-featured version of the software. The software has more advanced functions like 3D waterfall, stimulus EQ, more overlays and tone generator.
At this point in most reviews, I would launch into a discussion of what the product is supposed to do and wait until later in the review to talk about how it actually performs. In this review, however, both sections are integrated together below.
Set Up
One of the main advantages of kits like Room Analyzer II Pro or OmniMic from a Dayton Audio, is that set up is simple. Everything you need comes packaged together, and has all been calibrated to work in unison. Piecemeal systems like Room EQ Wizard (REW) tend to require a significant amount of time and research before you are ready to actually take measurements.
The first step with this system is to install the software, which is downloaded from XTZ Sound’s website. This is odd to me because the kit comes with a thumb drive, but the only thing preloaded on it is the manual. I’m not sure why the software doesn’t just come on the thumb drive. In order to download the software, you need to enter in your email, full name, street address, and phone number. XTZ Sound indicated that in the future they will likely only require an email address. Next, you need to enter in the serial number of the kit, which took me a bit to find because of a lack of instructions. Eventually I located it on the external soundcard, also referred to in the manual as the aluminum connection box or simply, connection box (I later found out that the serial number is also visible on the outside of the outer paper box the carrycase comes wrapped in). The software downloaded and installed without a hitch.
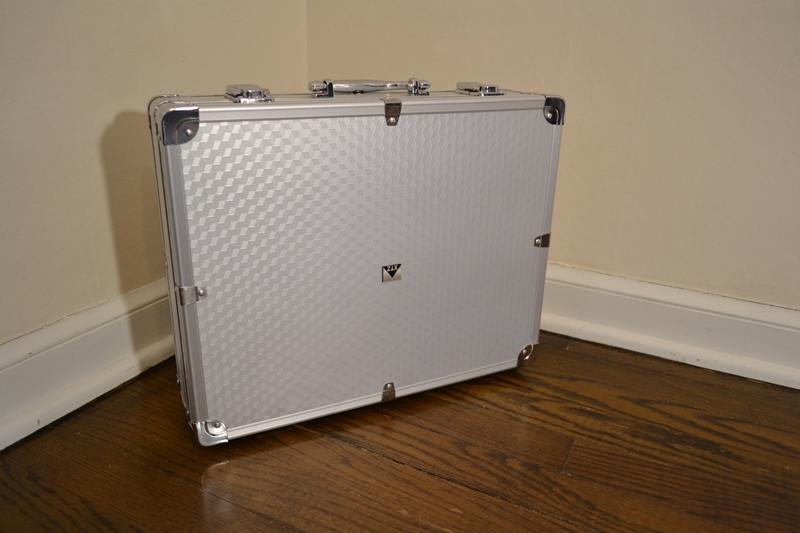
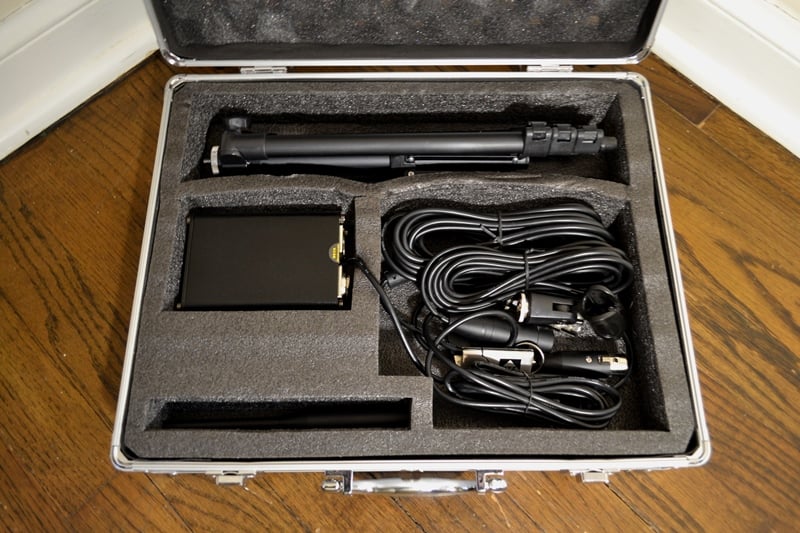
Aluminum Carrycase
Next, I turned my attention to the actual kit. The aluminum carrycase is a great addition and a big plus for professionals who plan to tote the system to clients’ homes, or simply for storage for normal users. It seems durable enough, but the foam insert doesn’t fit the equipment quite as nicely as I would prefer. As you can see from the image above, the divider between the tripod and cables arrived misshapen from shipping. Making the divider a little thicker and adding a notch for the USB cable protruding from the connection box is all that’s needed remedy this problem. Those small suggestions aside, the case is a great addition to this system and something I would chose to purchase standalone if it wasn’t included.
All of the included components with this kit strike me as the best that can be done for the money. The tripod and XLR cables don’t exude quality, like you might find with costlier standalone products, but each piece is quite functional. The same goes for the microphone. It looks similar to most of the omnidirectional measurement mics on the market, but is a little smaller and lighter than my Dayton audio EMM-6, one of the more popular entry level mics for sale. The connection box, on the other hand, has a solid aluminum enclosure that reminds me of professional gear. Overall, I have no complaints with the included parts. They work very well; it’s as simple as that.
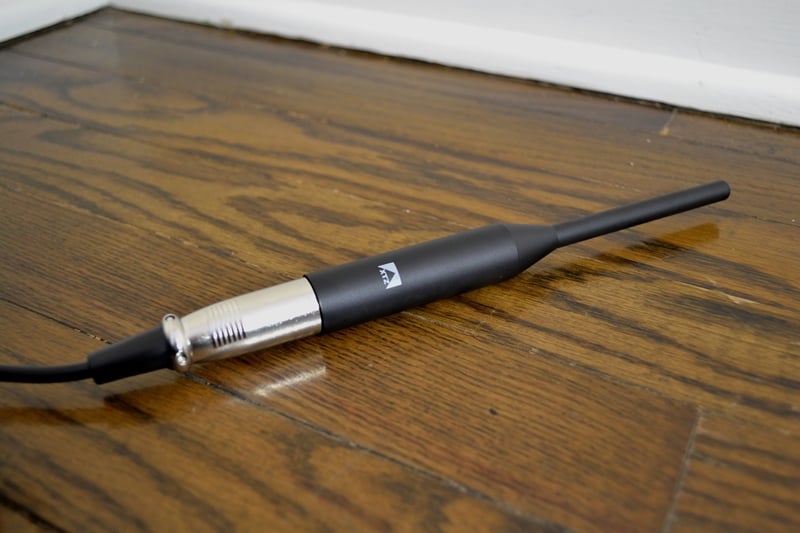
Microphone
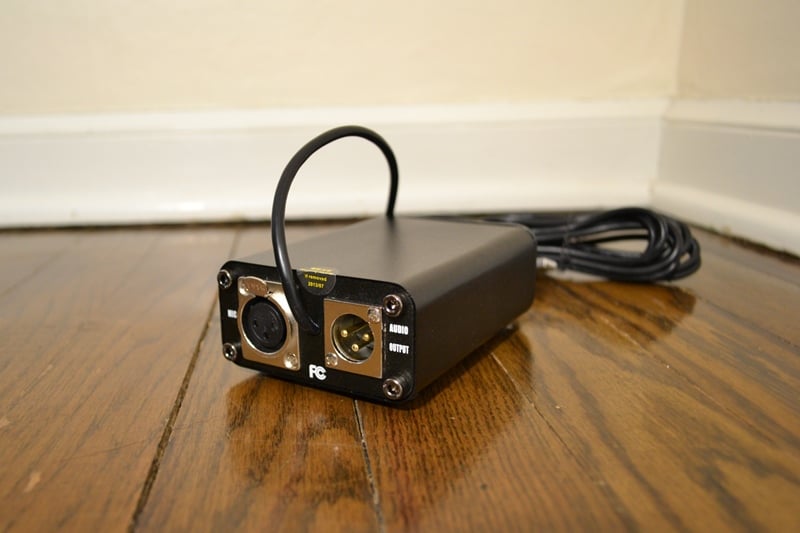
External soundcard
Actually connecting the system is refreshingly simple. The connection box is the heart. It sports an XLR output to send test signals to your receiver, XLR input for the microphone, and a non-detachable USB cable for your computer. This setup allow you to bypass the likely less than spectacular soundcard built into your computer, which is a big win for XTZ Sound, since non-linear soundcards are a major obstacle to achieving accurate results.
Once the software is installed and the physical connections made, you are ready to take some measurements.
Software Breakdown
The software is split into four major sections, labeled: SPL Meter, Room Analyzer, RTA, and Full Range. It can also switch between standard and advanced operation modes. In advanced mode a host of extra configuration options are available, such as selecting what octave smoothing to apply. Unlike with some other measurement software I have used in the past, XTZ Sound’s Room Analyzer II Pro was rock solid in terms of stability. It never crashed on me and the connection box never experienced any driver issues.
XTZ Room Analyzer Software Screenshot
Measurements for each section of the software are loaded and saved independently, though RTA measurements cannot be exported or loaded. Saving each section independently makes sense, but I would also like a “save all” option. You can also export a screen dump, which is a screen capture of whatever section of the software you are using at the moment.
In addition to the four sections of the software, a noise generator is included that can output white or pink noise in 1/3 octave intervals from 16Hz to 20kHz. This is a great feature to help identify any buzz or rattle issues in a room.
SPL Meter
The most basic requirement of any acoustic measurement suite is an SPL meter, and the Room Analyzer II Pro’s SPL Meter has enough configuration options for most anyone. You can select between slow (1 second) or fast (125 milliseconds), and A, C, or Z weighting. A weighting is designed to reflect the natural response of the human ear. It’s not particularly applicable for home theater, but is often used when setting levels in large venues, like a concert. C weighting mimics the human ear at listening levels of 100dB or more. C weighting and slow speed is typically used when setting speaker levels in a home theater. Z weighting is linear from 10Hz to 20kHz, applying no weighting. The mic with this kit is only flat down to 16Hz, though, not 10Hz, which isn’t a big deal because the sweep only goes down to 16Hz anyway. This is probably for the best, as 10Hz is mightily low and may blow some drivers.
You can see the SPL meter in the screenshot above, on the left side of the image. Notice the useful stats at the top, which include peak and average values. At the bottom there are adjustments to reset the stats or pause the meter.
Room Analyzer
The main focus of XTZ Sound’s Room Analyzer II Pro is ... you guessed it ... the Room Analyzer function. It works by taking a series of measurements using sine sweeps at either a single position or three positions, and then suggesting filters to compensate for room modes. Before taking any actual measurements, you need to set the proper output level. This is done by dragging the output level control up or down (look at the top right of the image below), or adjusting the volume on your receiver, until the level shown is close to the green G. This system worked really well for me and made it easy to make sure all measurements were taken at an appropriate level.
When performing a 3-position measurement, the software shows a figure indicating that the first measurement be taken close to the front left speaker, second by the center listening position, and third by the front right speaker. Note that you can choose whatever positions you like. The marked positions in the figure are simply there to tell users to move the mic around. In fact, I would typically recommend not following the provided diagram, and instead focus on the main listening positions. Each position is weighted equally, so if one bad measurement taken away from the listening area can throw off the results. On a side note, it would also be nice to be able to take measurements at more than 3 locations, though it’s usually not necessary.
After the measurements have been completed and the EQ calculated, the software gives you a number of tools to tweak the results, as long as you are in advanced mode. Below is a comparison of standard and advanced modes.
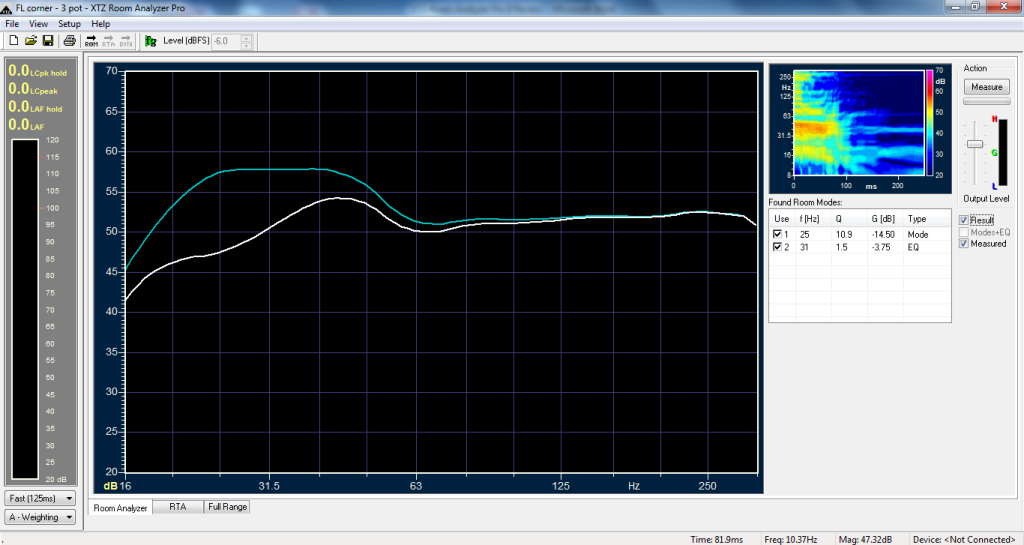
Room Analyzer Basic Mode
In the basic mode, you can view the measured curve (blue) and calculated results curve after applying the suggested EQ (white). It also displays the found room modes with suggested EQ (frequency, gain, and Q) in the table on the right. Above the table is a spectrogram that changes to show whatever curve you have selected. The spectrogram and frequency response graphs can actually be swapped by double clicking whichever one is displayed in the smaller window on the upper right.
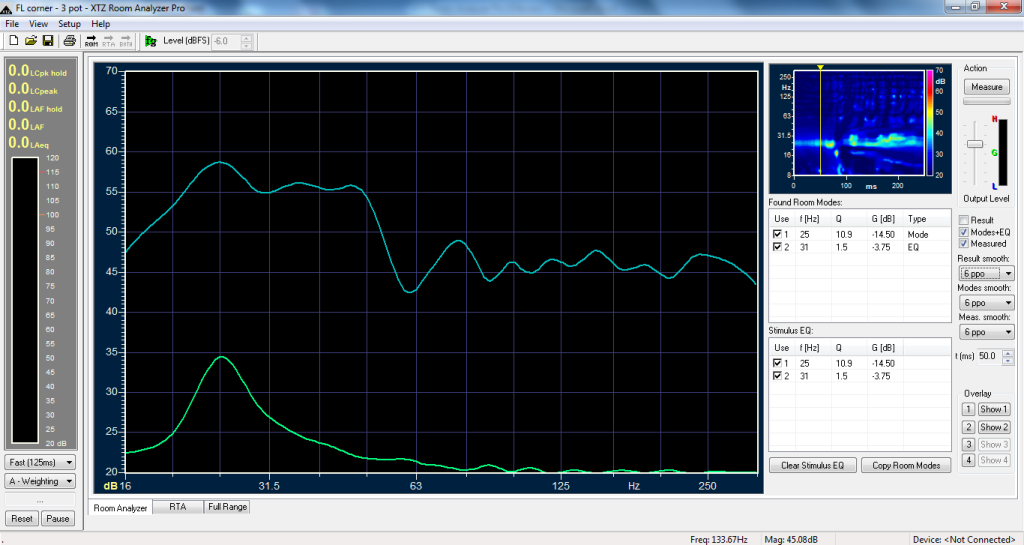
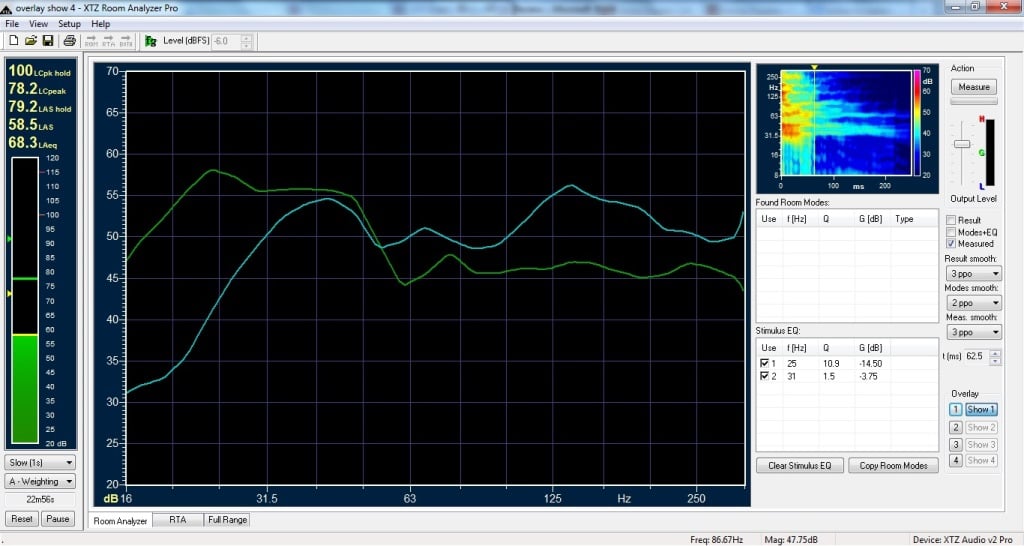
Room Analyzer Advanced Mode
As you can see by comparing the screenshots above, the advanced mode offers users much more control than the standard mode. For starters, the time can be changed so you can view the frequency response at different decay times. You can also now view a third curve, Modes + EQ (green), which helps visualize exactly what the filters are doing. Maybe more useful than either of those features is the ability to copy Found Room Modes filters into a Stimulus EQ section. Any filters in the Stimulus EQ are added in-line to the signal sent to your receiver. This allows you to test the effects of different filters without actually loading them into your equalizer. The gain, frequency, and Q of the filters in the Found Room Modes and Stimulus EQ sections can be manually edited. This gives you plenty of power to try out different filters quickly and easily. You can also add extra filters by right clicking the frequency response curve and moving the cursor to the frequency and amplitude you want.
Up to four different measurements can be saved and overlaid by using the overlay button on the bottom right of the screen. The idea seems simple: take a measurement and then save it by hitting one of the numbered overlay buttons. You can then show or hide each measurement by selecting the “Show” button. In practice, I found XTZ Sound’s management of loading, saving, and overlaying measurements to be a bit of a hassle, though a few changes could remedy my complaints. First, the inability to name each overlay is a big drawback for me. It’s difficult to remember exactly what each curve stands for, especially if you revisit the project at a later time. I found myself having to take notes to remember exactly what I adjusted in my system to achieve each overlay. A limit of four also seems odd, and is one of the reasons I didn’t use this system during my review of MartinLogan’s Perfect Bass Kit (PBK) to verify the accuracy of PBK. There’s also no option to average curves, which would be useful when trying to show the average frequency response across a variety of locations. There are no controls to change the color, dB offset, or frequency range of curves. Finally, saving each individual curve as a file, for reference later, is confusing. When saving or loading a curve, there isn’t an option to select which overlay you want to save or load. XTZ Sound clarified for me that Ithe latest performed measurement that has visible and correct spectrogram is what gets saved. All other overlays only include frequency response. They also indicated that the reason for the current system is for simplicities sake, as adding more features tends to make software more difficult to use, but that this system may be re-visited in the future.
The frequency response and spectrogram windows can be swapped
The last advantage to using advanced mode is the ability to independently adjust the smoothing applied to each curve. It took me a minute to figure out what smoothing options were available because they are labeled as PPO (parts per octave) and shown as whole numbers, not fractions. The options given are 2, 3, 6, and 12 PPO. Once my brain kicked in, I realized that these are the same as 1/2, 1/3, 1/6, and 1/12 octave smoothing. Most people will be fine with 1/3 octave resolution, but when taking speaker measurements I prefer to use 1/6 or 1/12.
Noticeably absent is the ability to change the dB scale of the window, which is locked in at 50-100dB. Frequency is also locked in at 16-315Hz. A nice touch is a little display at the bottom of the screen that shows the exact frequency and magnitude (dB) of the wherever your mouse curser is located.
The only device I own that allows for manual PEQ adjustment is the Emotiva X-Ref 10 subwoofer, so I used it to judge the accuracy of XTZ Sound’s calculated and suggested filters. I ran the room analyzer, applied the suggested filters to the subwoofer, and took another measurement to compare the results. Time and again the XTZ Sound Room Analyzer II Pro measurement system proved to properly find room modes, suggest filters, and calculate a results curve that very closely followed what I actually measured after applying the filters. In the end, that means that the Room Analyzer achieved its main goal of helping me EQ my system. From this perspective, the previously mentioned limitations (overlay, dB scale, etc.) don’t seem to be all that important because the system still excelled at its core mission.
Real Time Analyzer (RTA)
An RTA allows you to see how loud particular frequency bands are in real time. It has limited usefulness when calibrating a home theater system, but still serves a few purposes. XTZ Sound recommends using it to adjust the phase/polarity of your subwoofer. This is done by monitoring the SPL shown on the RTA at the crossover frequency between your speakers and subwoofer and then adjusting the phase dial to achieve the highest SPL possible at that frequency. Each time you adjust the phase control, you can save an overlay of the measurement (just for this session, not permanently save). The RTA is locked in at 1/3 octave resolution, which is a little low, but good enough for the needs of most users.
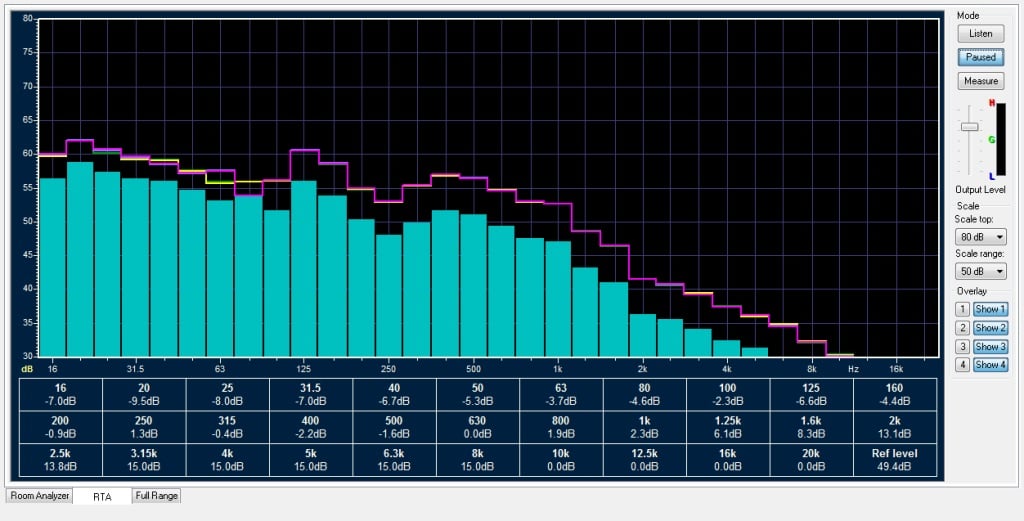
RTA Screen Dump directly from Room Analyzer II
Unlike the Room Analyzer, the scale of the RTA window can be adjusted. It’s not continuously variable, but offers a range adjustment of 50 or 100dB, and top limit of 120, 100, or 80dB. The bottom limit is always set to 20dB. The nifty chart under the RTA window gives you better look at the exact frequency of each band.
I would like to see the option for higher resolution than 1/3 octave, which would simply require a software update. Otherwise, the RTA offers an easy way to measure the frequency response of your system using the built-in tone generator, and the Listen function is a great way to see happens when playing other material through your system.
Full Range
The last major component of Room Analyzer II Pro is the Full Range window. This window gives you the type of controls that you would expect from an acoustic measurement package, such as 20Hz-20kHz sweeps, RT60, and a waterfall plot. The controls are very similar to the RTA and Room Analyzer windows, including an adjustable scale (30, 40, 50, 60, 80dB) and four overlays. The scale cannot be adjusted along the x-axis (frequency), nor can smoothing be adjusted. For most people, the available scale adjustments will work great, I’m just used to more customizability.
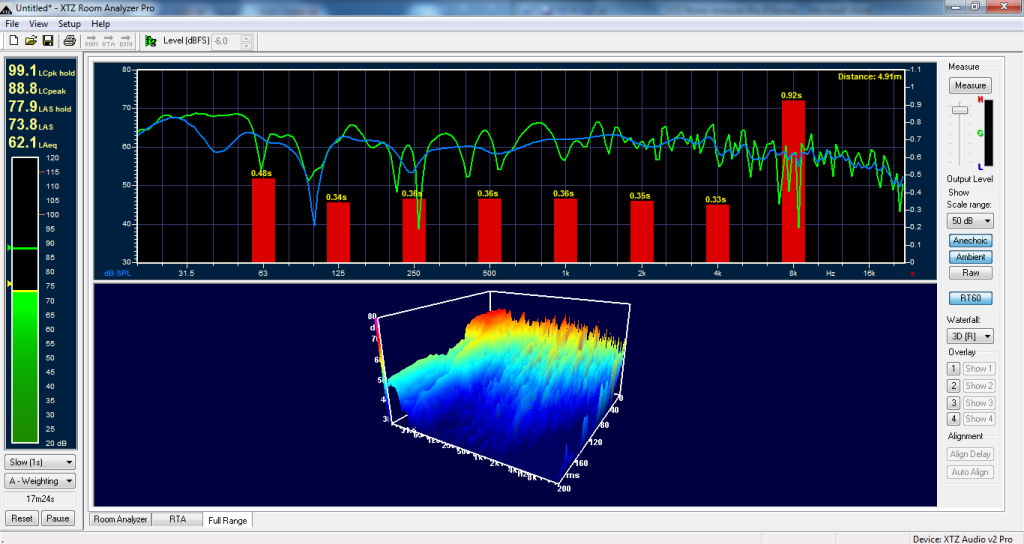
Full Range Results with 3D Waterfall Plot and RT60
The screen is split into two panes, a frequency response plot on top and waterfall plot on bottom. The divider between the two can be moved up or down to adjust the size of each plot. In the frequency response window, you can toggle on or off the display of RT60 (1 octave resolution) and switch among three different types of curves: anechoic, ambient, and raw. The anechoic curve (blue in the above image) is supposed to remove room interference by gating the response to 4ms. The ambient curve (green in the above image) is supposed to show room interaction by gating the response to 8ms, and Raw is full FFT. I think the RT60 and different curve options are handy, but would prefer a manually adjustable time gating instead of only three options. Then again, the three options probably make things easier for new users.
One feature unique to Room Analyzer II Pro is an Auto Align option that compares the acoustic distance between your speakers and subwoofer. You start by taking a measurement with a single speaker, then saving it using the first overlay, and then taking a second measurement using only the subwoofer. Next, you click the “Align Delay” then “Auto Align” buttons. The program tells you the acoustic distance difference between the two measurements (displayed in milliseconds and meters), which you use to set speaker distance in your receiver. Upon first testing out this feature, I was unable to get consistent results. I later determined that excess background noise and incorrect settings in Windows for the playback and recording devices (both were set to 44.1 kHz sampling frequency instead of the correct 48 Khz) were at fault. After these changes, I was able to get the software to help me dial in my speakers to the exact millimeter. It took a few minutes, as I needed to take a new measurement of the subwoofer every time I changed the distance, but that was easy as it could all be done from the luxury of my couch.
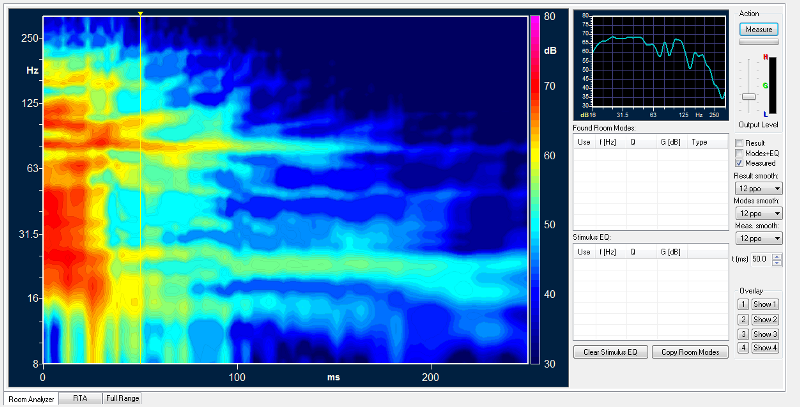
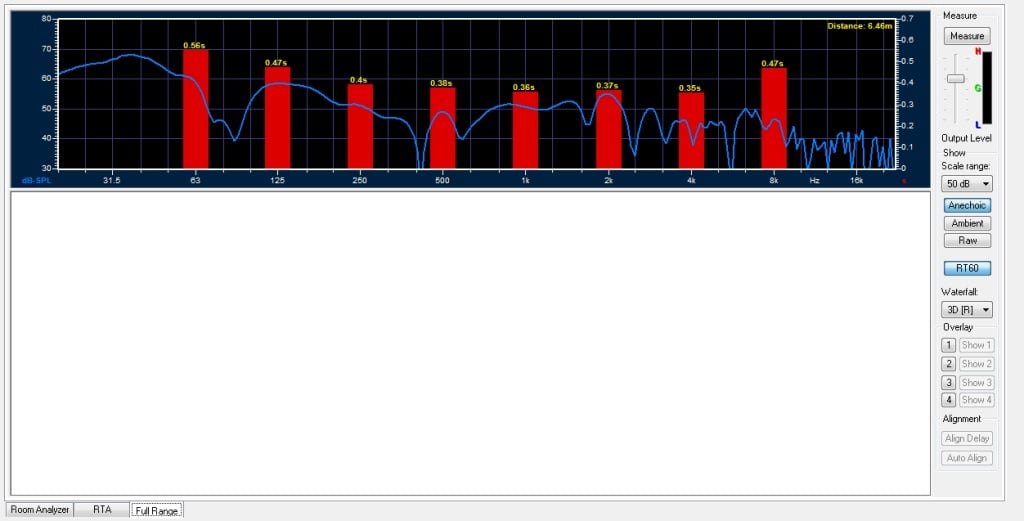
I did come across a few oddities when saving curves and screenshots. The above screenshot was taken using Windows’ Print Screen feature and accurately reflects what the software shows. The two images below were exported directly from the software. The left should show a 3D waterfall plot, but the software would only export an image of the 2D plot. This is too bad since the software can display the plot from an impressive array of 4 different perspectives (3D from 3 different angles, and in 2D). These options make it easy to interpret the plot, though dB, frequency, and time scales cannot be adjusted, which can make it more difficult to interpret with accuracy. XTZ indicated that this was a known issue and will probably be sorted out in the next version of the software.
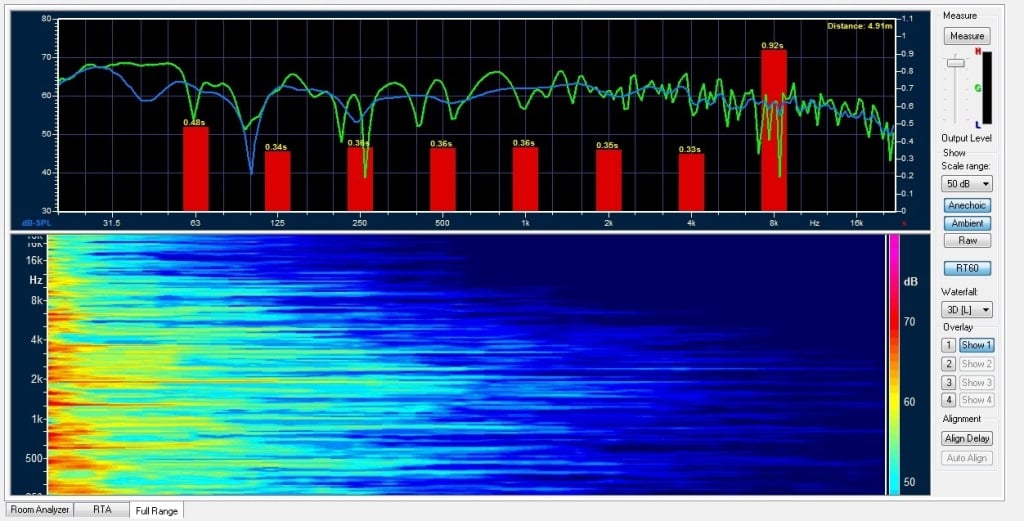
Should show 3D
waterfall
Waterfall plot missing
In the image on the right, the waterfall plot is completely missing. Obviously, it would be annoying to export a screenshot only to find that the waterfall plot is missing, but this anomaly is particularly worrisome because there is no way to save and reload waterfall plots. There’s also no way to save the entire project as one file. Let’s say, for example, that you are using all 4 overlays and want to exit the program and reload everything as it was, that’s not possible. Each curve needs to reloaded to each overlay individually, which isn’t a big deal, except that it gets really confusing when trying to remember which overlay corresponds to what curve, especially since the most recent measurement isn’t assigned to any overlay and cannot be hidden.
Okay, we’re done with the quirks of the Full Range section of Room Analyzer II Pro. For the most part, taking measurements and interpreting the results of only one or two overlays was very easy. The built-in tone generator, multiple waterfall plot views, RT60, and auto align are all great features of the software. One of the main competitors to this system is OmniMic, which doesn’t have all of the above features. Additionally, the ability to get all of this data from a single measurement and see the results on the same screen is a big plus.
Suggestions for improvement
Room Analyzer II Pro does a lot of things right. The system is easy to set up and use. The included equipment works well together. Finding and compensating for room modes is infinitely easier than it would be if you had to calculate everything manually. The RTA and Full Range windows offer even more insight into the acoustics of your home theater. That said, there are a number of improvements I would like to see. The overlay process needs to be updated to include options for adjusting color, name, dB offset, and the ability to cut off curves are certain frequencies so multiple curves can be spliced together. Each curve should be easily saved and reloaded individually or as an entire project. A 1/3 octave resolution for the RTA and inability to adjust smoothing in the Full Range setting should both be addressed. The screen dump feature should be updated to include all views of the waterfall plot.
Can you guess which line is MartinLogan Dynamo 1500X which is the Emotive X-Ref 10?
It would also be nice, though not crucial, to have more control over the scale for each section of the software, including dB and frequency range. Finally, while the user manual is pretty thorough, it does include some grammatical errors. This makes sense since it was originally written in Swedish and subsequently translated to English. The errors won’t impede your ability to understand the manual, but may provide a bit of humor. I would also like to see the manual include a little more explanation of how to interpret the measurements spit out by the software.
Conclusion
 There
is no current acoustic measurement system on the market that is perfect for
everyone. REW, OmniMic, and XTZ Sound are probably the most common, but all of
them have advantages and disadvantages. This system comes as a well-built,
easy-to-store or transport kit with everything you need. The retail price of $360
is quite reasonable considering all you get. Certainly
the main draw with this system is the automatic room analyzer, which I found to
work very well. The RTA and Full Frequency measurements, including waterfall
plot, RT60, and auto align functions make it easy to calibrate a home theater
system. Still, it is missing some features found in similar programs, like an
oscilloscope, distortion test, and polar response plot. In the end, I would
recommend Room Analyzer II Pro, or standard, to an individual who wants the
easiest way possible to start learning about room acoustics and how to really
tweak a home theater or stereo setup. Every other system on the market requires
a little higher knowledge level and time investment to set up, run, and
understand. All things considered, this is a pretty effective system. If you
are looking for a way to gain more insight into how your speakers interact with
your room and what to do to fix any issues, the XTZ Sound Room Analyzer II Pro
kit is probably the easiest method out there.
There
is no current acoustic measurement system on the market that is perfect for
everyone. REW, OmniMic, and XTZ Sound are probably the most common, but all of
them have advantages and disadvantages. This system comes as a well-built,
easy-to-store or transport kit with everything you need. The retail price of $360
is quite reasonable considering all you get. Certainly
the main draw with this system is the automatic room analyzer, which I found to
work very well. The RTA and Full Frequency measurements, including waterfall
plot, RT60, and auto align functions make it easy to calibrate a home theater
system. Still, it is missing some features found in similar programs, like an
oscilloscope, distortion test, and polar response plot. In the end, I would
recommend Room Analyzer II Pro, or standard, to an individual who wants the
easiest way possible to start learning about room acoustics and how to really
tweak a home theater or stereo setup. Every other system on the market requires
a little higher knowledge level and time investment to set up, run, and
understand. All things considered, this is a pretty effective system. If you
are looking for a way to gain more insight into how your speakers interact with
your room and what to do to fix any issues, the XTZ Sound Room Analyzer II Pro
kit is probably the easiest method out there.
Cliff, like many of us, has always loved home theater equipment. In high school he landed a job at Best Buy that started his path towards actual high quality audio. His first surround sound was a Klipsch 5.1 system. After that he was hooked, moving from Klipsch to Polk to Definitive Technology, and so on. Eventually, Cliff ended up doing custom installation work for Best Buy and then for a "Ma & Pa" shop in Mankato, MN.
View full profile